
How to Burn a DVD on Windows 10 (Updated 2025) | Best Methods & Tools
Summary: If you are curious about how to burn a DVD on Windows 10 or Windows 11? This article provides step-by-step guidance, whether you’re using native Windows tools or professional third-party software, to help you burn DVD on Windows 10 effortlessly.
Table of Contents
In the age of streaming and cloud storage, burning a DVD or CD on Windows 10 might seem outdated. However, there are compelling reasons why you still need to burn a DVD. For example, it serves as a physical backup for valuable files or memories.

Now, let’s explore the best DVD burning software for Windows 10 and learn how to burn a DVD on Windows 10 or 11 for movie playback, data backup, and more.
How to Burn a DVD on Windows 10/11 with Third-party Tools?
According to a Softpedia & TechRadar survey of 5,000 users on DVD burning preferences for Windows 10 reveals that 50% of users prefer using third-party tools such as Nero, DVDFab, and Ashampoo, mainly for their advanced features like menu customization. Meanwhile, 30% of users rely on free alternatives like ImgBurn and BurnAware for basic burning tasks. The remaining 20% use Windows' built-in File Explorer burning feature, primarily for creating data DVDs rather than playable video discs.
✅Suitable Users:
- Users who need high-quality DVD creation with advanced features.
- Users who want full control over DVD-Video encoding, menus, chapters, and subtitles.
- Film creators or business users who burn professional-grade DVDs/Blu-rays.
- Users who need features like Blu-ray burning, 3D video, and advanced authoring.
Burn a DVD on Windows 10/11 with DVDFab DVD Creator
While Windows 10 and Windows 11 do come with inbuilt DVD burning functions, if you want to create a playable DVD with a stylish menu, DVDFab DVD Creator is a better choice. With its extensive feature set including menu customization, wide format support, and fast burning speed, it simplifies the process of burning playable DVDs on Windows 10.
Trustpilot users praise the software’s fast rendering speeds and high-quality DVD output, Users who frequently create wedding videos, home movies, and corporate DVDs find it particularly useful.
- Burn DVD on Windows 11/10/8.1/8/7 and macOS 10.10 - 14
- Create standard DVD disc/ISO/folder from 200+ video formats
- Burn videos to DVD in batch with fast speed and high quality
- Select audio tracks, subtitles, or add external subtitle
- Serve as a easy-to-use DVD menu creator for users to customize professional DVD menu
- Auto-synchronize the meta information of the original video
- Support all DVD disc formats (DVD-9, DVD-5, DVD+R/RW, DVD-R/RW, DVD+R DL, DVD-R DL)
How to Burn DVD on Windows 10/11 with DVDFab DVD Creator?
If you wonder how to burn video to DVD on Windows 10, such as iPhone videos to DVD, with this DVD Creator software, just follow the simple guides below.
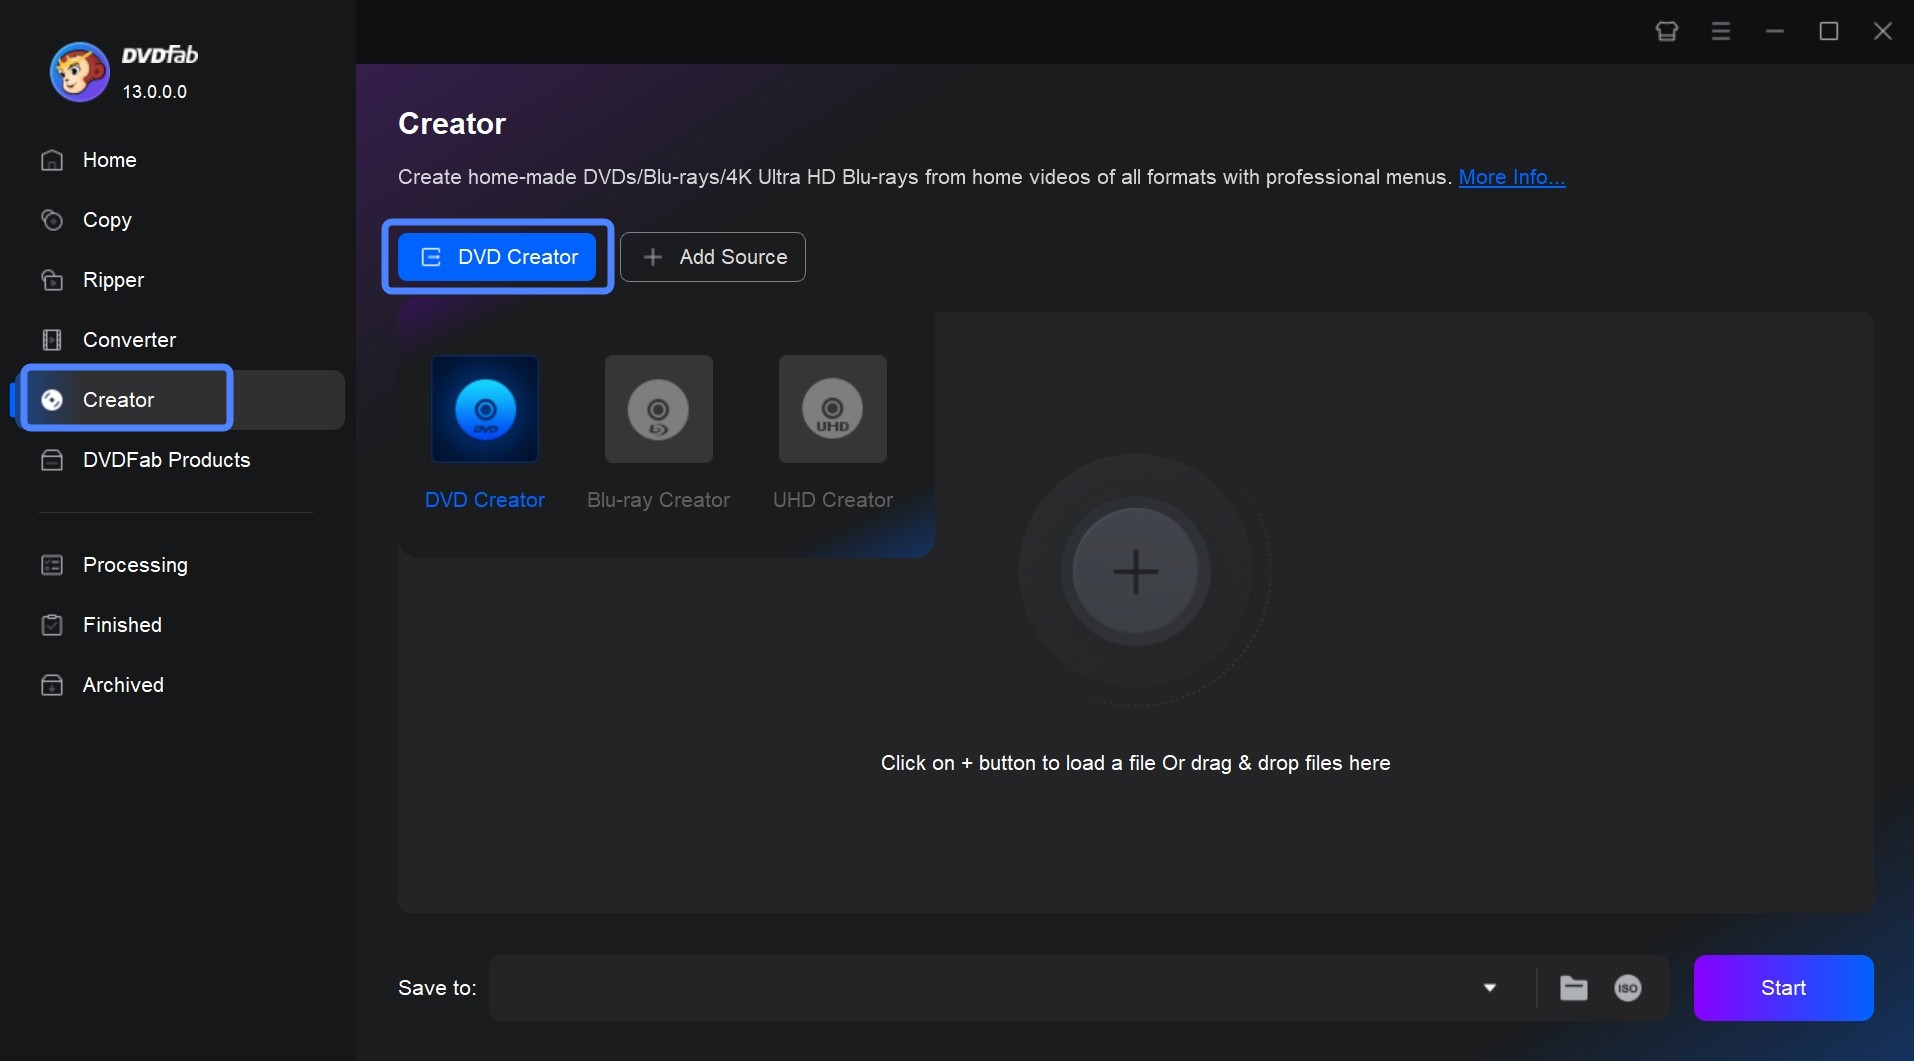
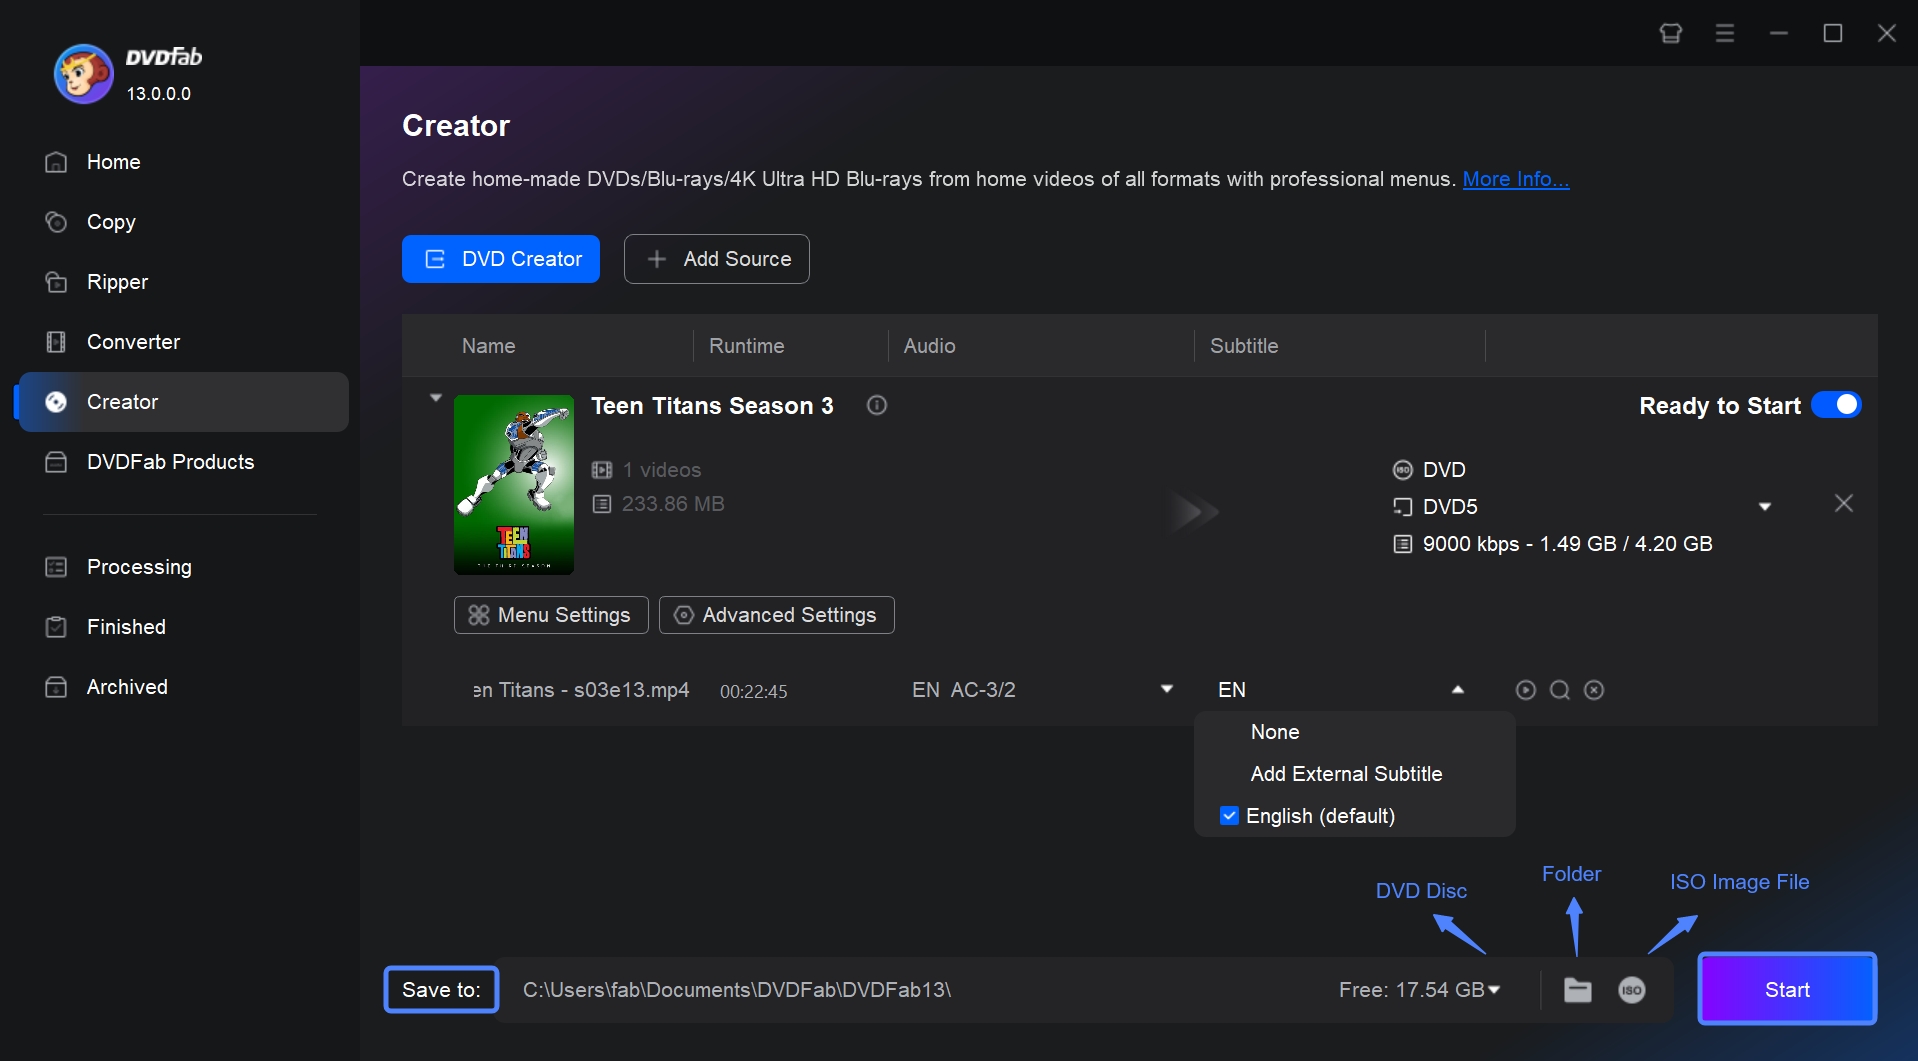
Step 1: Launch DVDFab DVD Creator and load the source videos.
Run DVDFab 13 and select the Creator > DVD Creator module. Add your video by clicking the Add button on the main page or by simply dragging and dropping the file onto the interface.
Step 2: Customize your DVD and create a DVD menu.
Once your source video is loaded, you can first select audio tracks and subtitles you want to burn. You can also add external subtitles to your video.
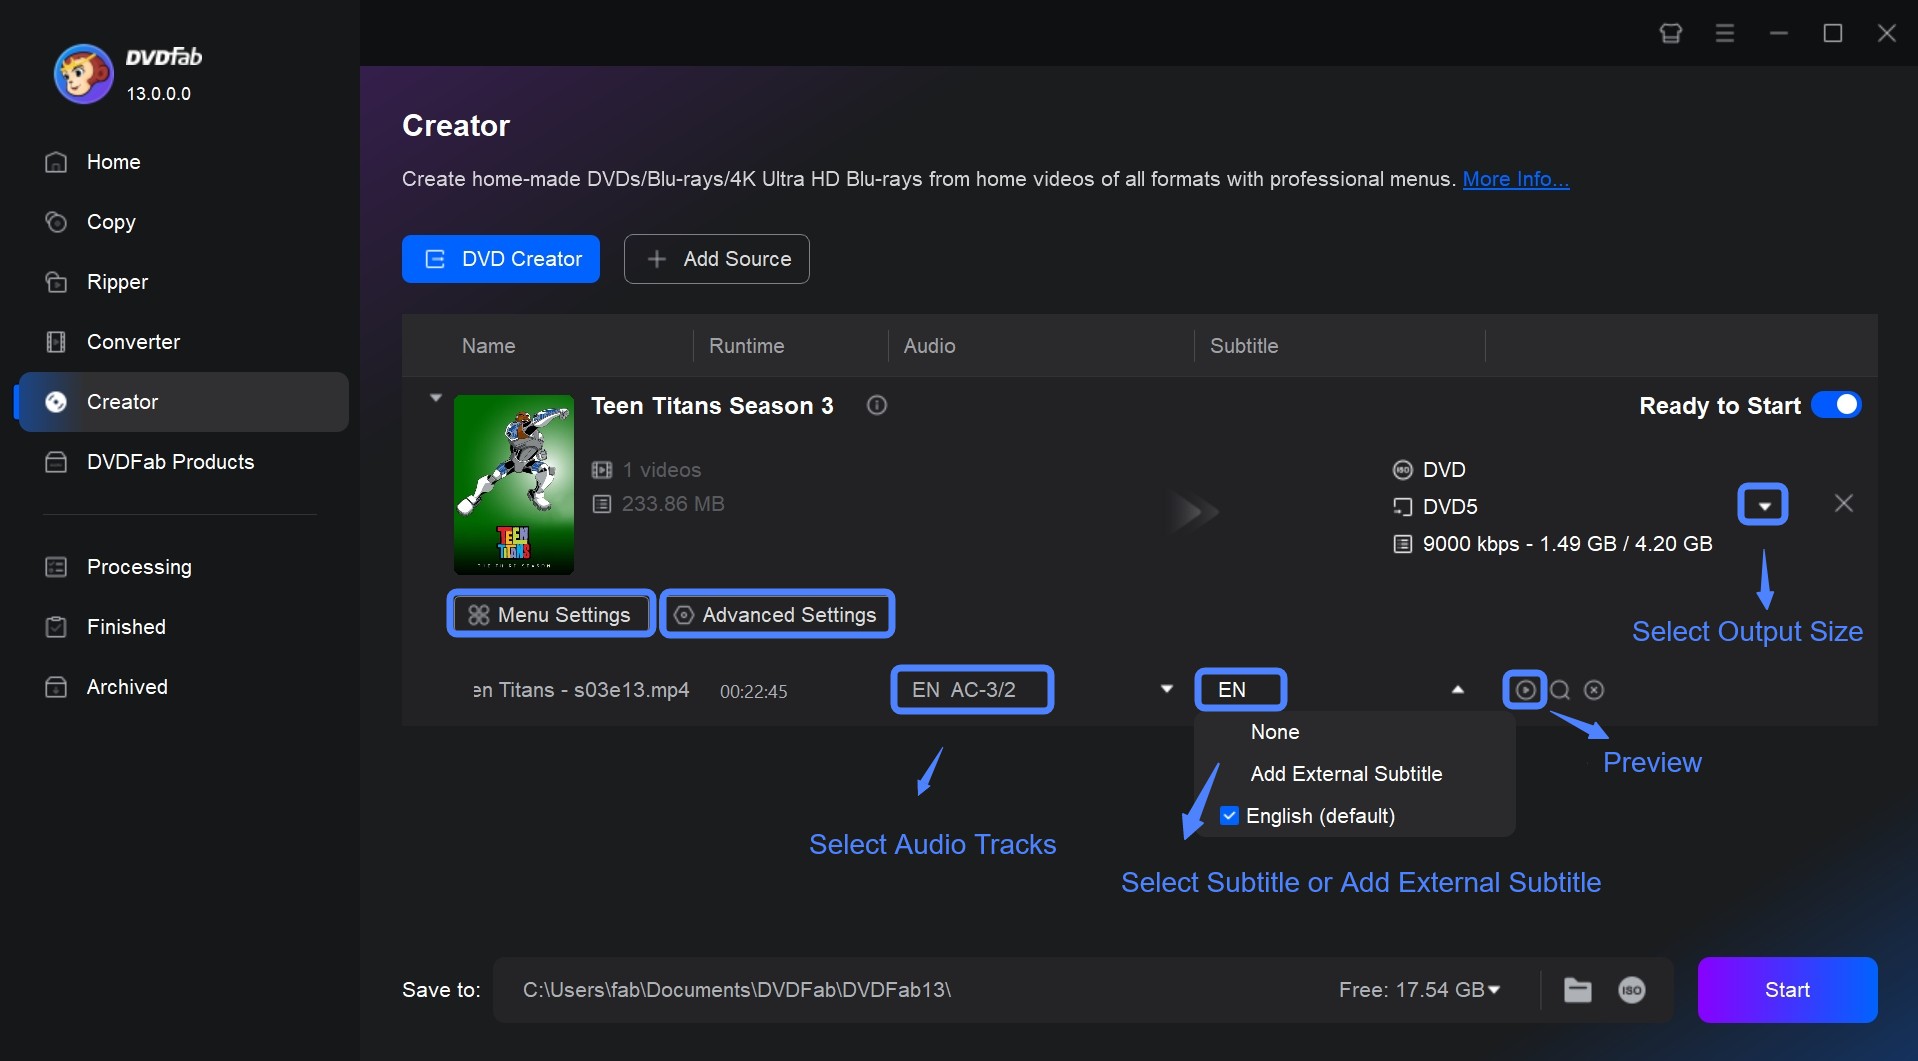
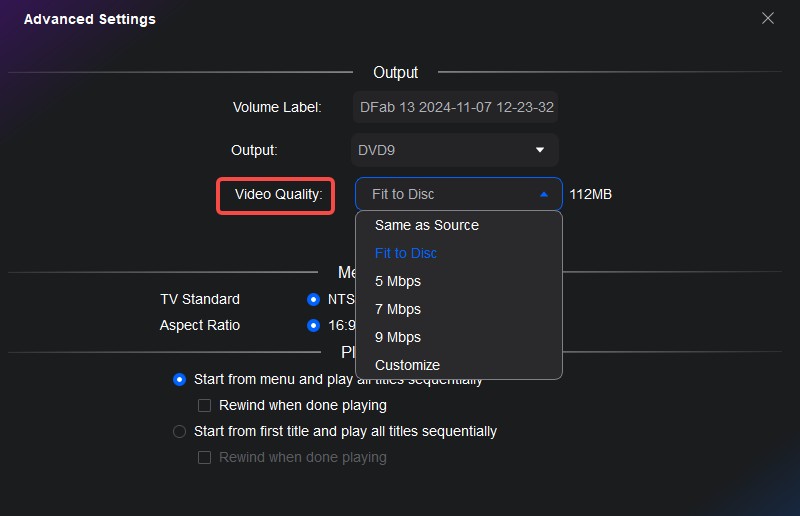
If you want to customize more settings of the video, you can click "Advanced Settings" to adjust the output size and quality to your preference.
💡How to choose DVD format and aspect ratio?
| Setting | Recommendation | Purpose |
| DVD Format | DVD-5(standard) orDVD-9(for longer videos) | Balances disc capacity and video length |
| Aspect Ratio | Match to source (16:9 or 4:3) | Prevents stretching or distortion |
💡How to choose video quality?
| Video Quality Options | Description |
| Same as Source | Retains the original quality of the video. |
| Fit to Disc | Automatically adjusts bitrate to fit the disc size. |
| 5/7/9 Mbps | Fixed bitrates—higher values (e.g., 9 Mbps) offer better quality. |
| Customize | Allows manual control over bitrate for precise adjustments. |
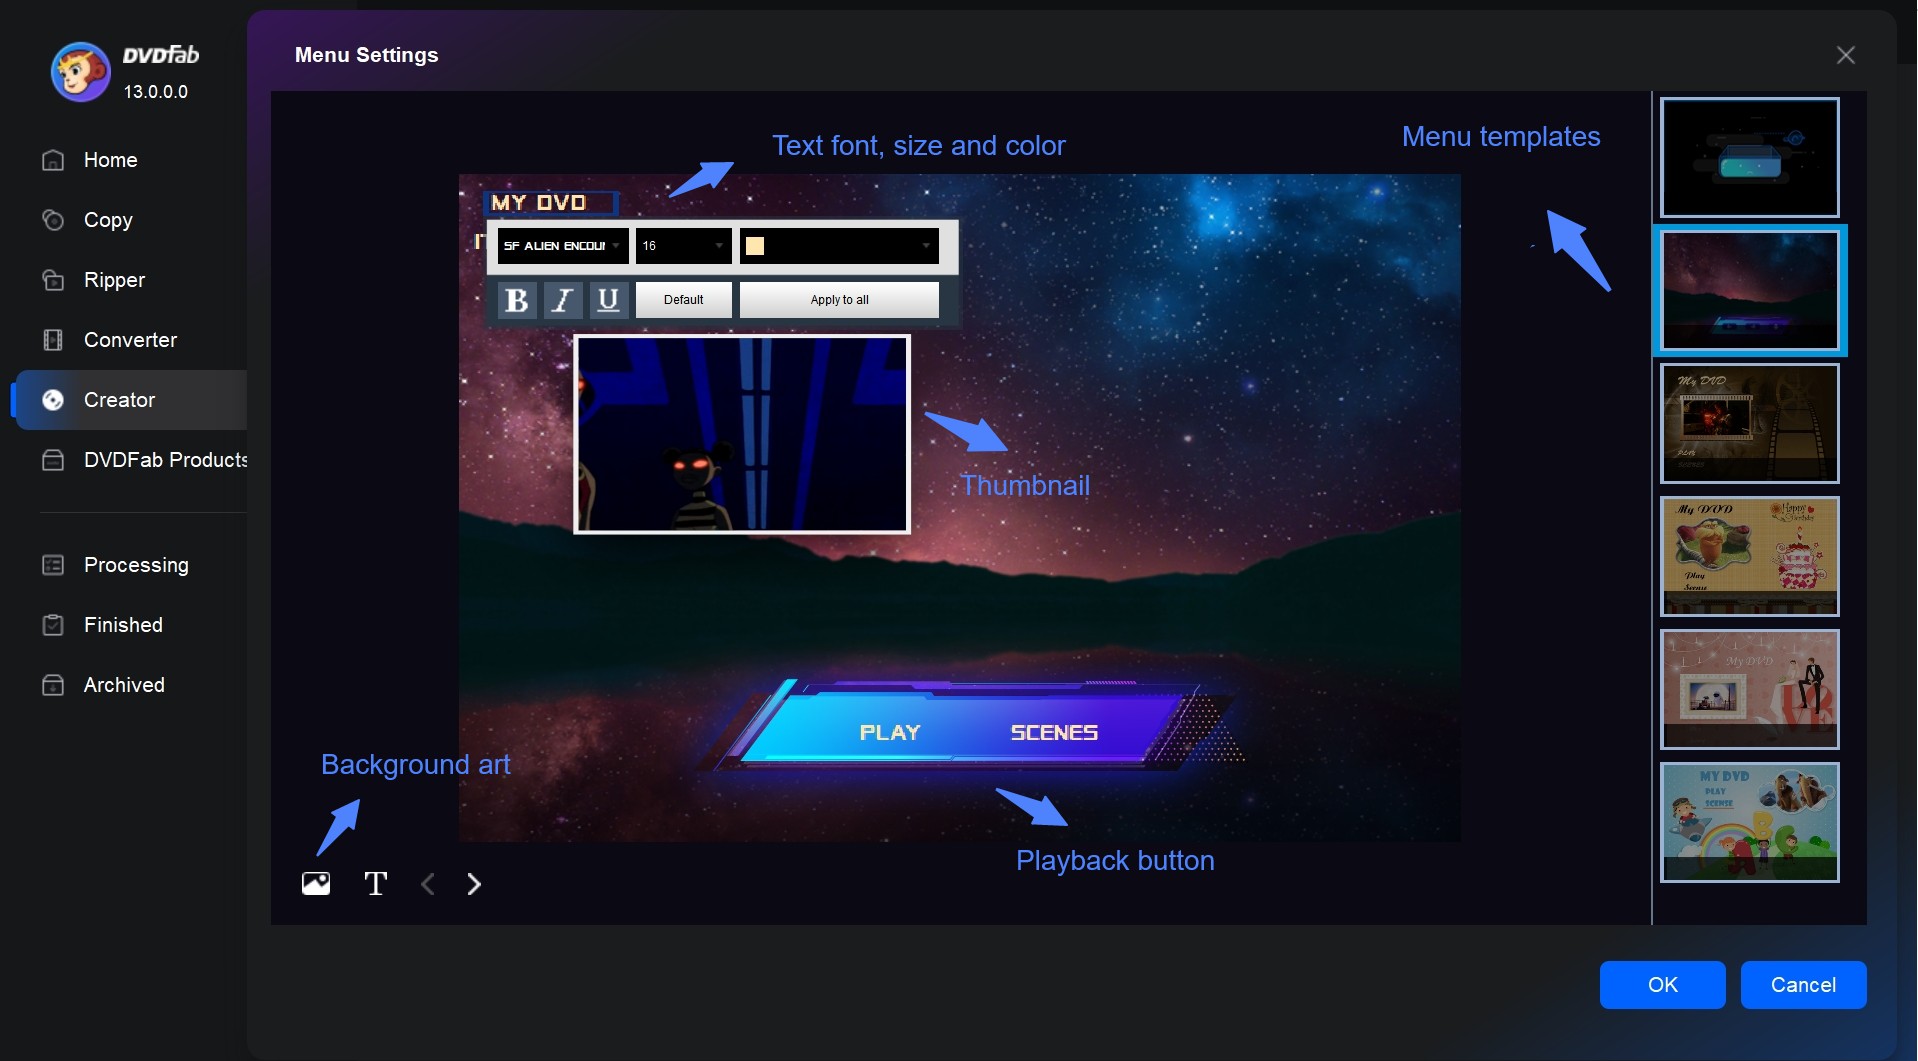
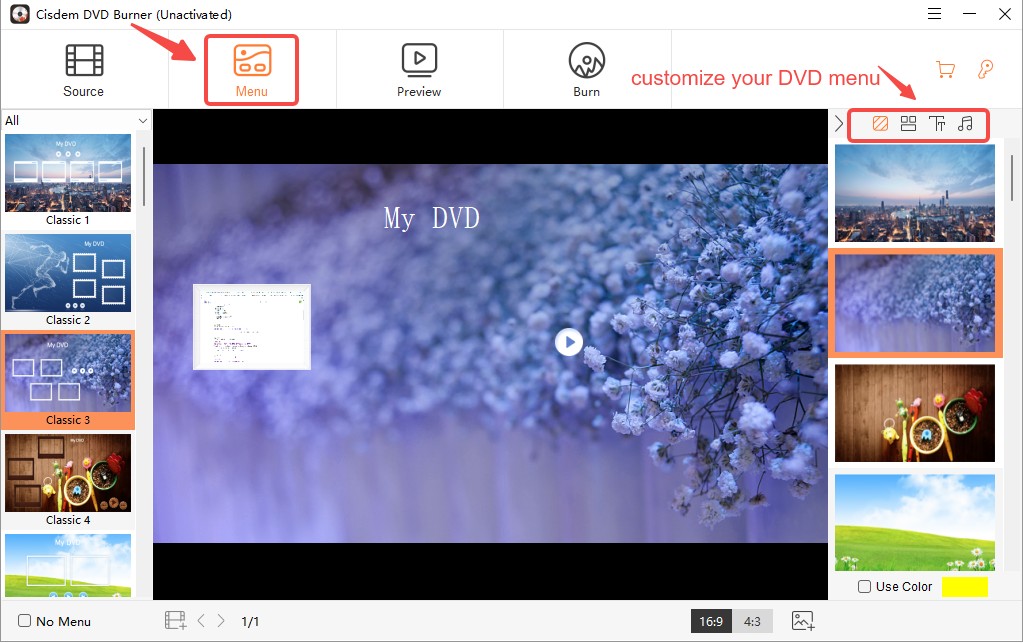
You can also click the Menu Settings to select a free menu templates and customize it, such as adding texts/widget, adjusting the size of the shape, etc.
Step 3: Start burning a playable DVD on Windows 10/11
Select the output directory in Save to Part, and click the Start button to begin burn your DVD on Windows 10/11. This DVD Creator will provide detailed progress information throughout the process.
Burn a DVD on Windows 10 Using Cisdem DVD Burner
Cisdem DVD Burner is a powerful yet easy-to-use DVD burning software designed for Windows & Mac. It allows users to burn videos to DVD discs, create ISO files, and generate DVD folders with high-quality output. One of its standout features is the ability to customize DVD menus, edit videos, and support multiple video formats, making it ideal for both personal and professional DVD creation.
Many authoritative reviews indicate that the Cisdem DVD Burner is a highly rated DVD burning tool for Mac users, offering fast conversion, strong video quality, and customization options. In a Cisdem DVD Burner review in G2, users commend the ease of use, reliable burning process, and custom menu templates of this DVD burning software, but some mention that Blu-ray support is missing.
- Drag-and-drop functionality, suitable for beginners.
- Ensures high-quality video output.
- No need for additional editing software.
- Optimized burning with hardware acceleration.
- Professional-looking DVD playback experience.
- Can add external or embedded subtitles with ease.
- Lacks advanced features such as detailed video/audio settings or support for high-end codecs.
How to Burn DVD on Windows 10/11 using Cisdem DVD Burner
Step 1: Download & Install
- Get Cisdem DVD Burner for Windows or Mac from the official website .
- Install and launch the software.
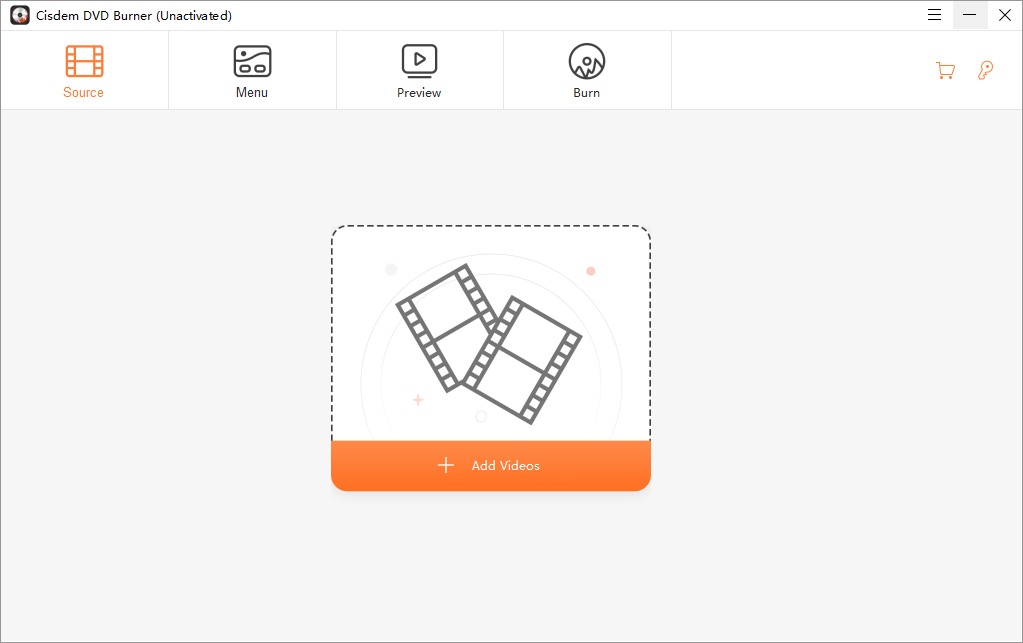
Step 2: Add Videos
- Click "Add Video" to import your files.
- Drag & drop videos directly into the interface.
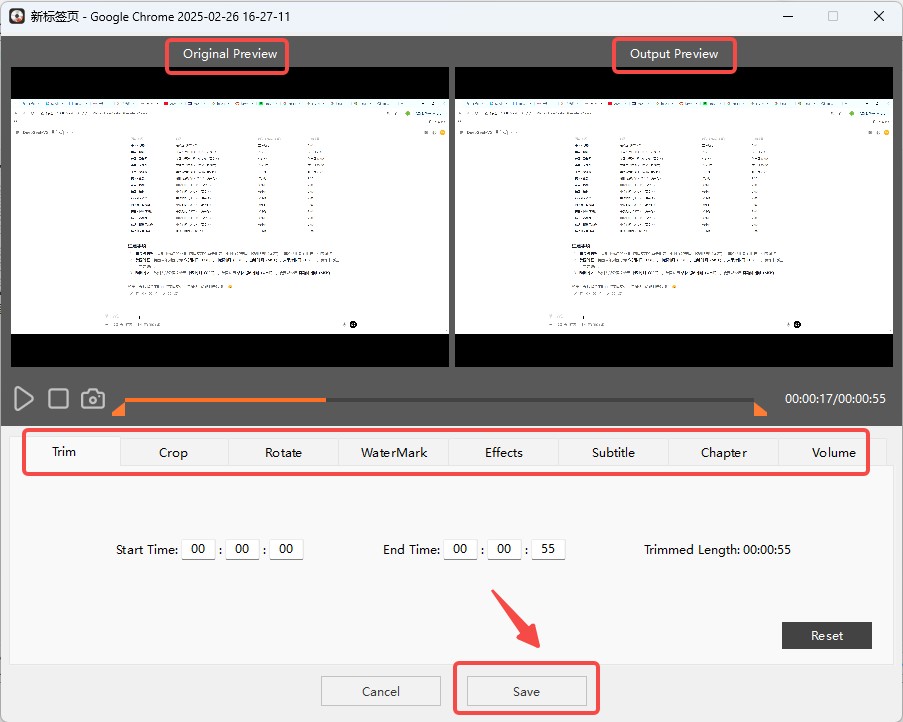
Step 3: Edit Video
- Click the ✏️ Edit button to open the video editor.
- Trim, rotate, crop, add effects, watermarks, and subtitles.
Step 4: Customize the DVD Menu
- Go to the "Menu" tab and select a DVD menu template.
- Customize text, backgrounds, buttons, and music.
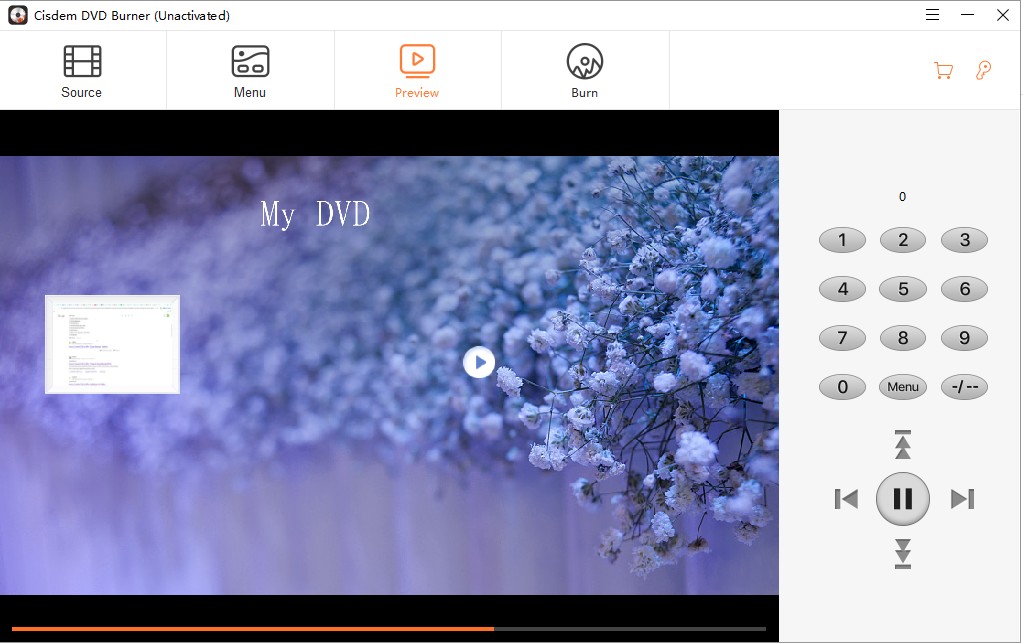
Step 5: Preview Your DVD
- Use preview mode to check for last-minute corrections.
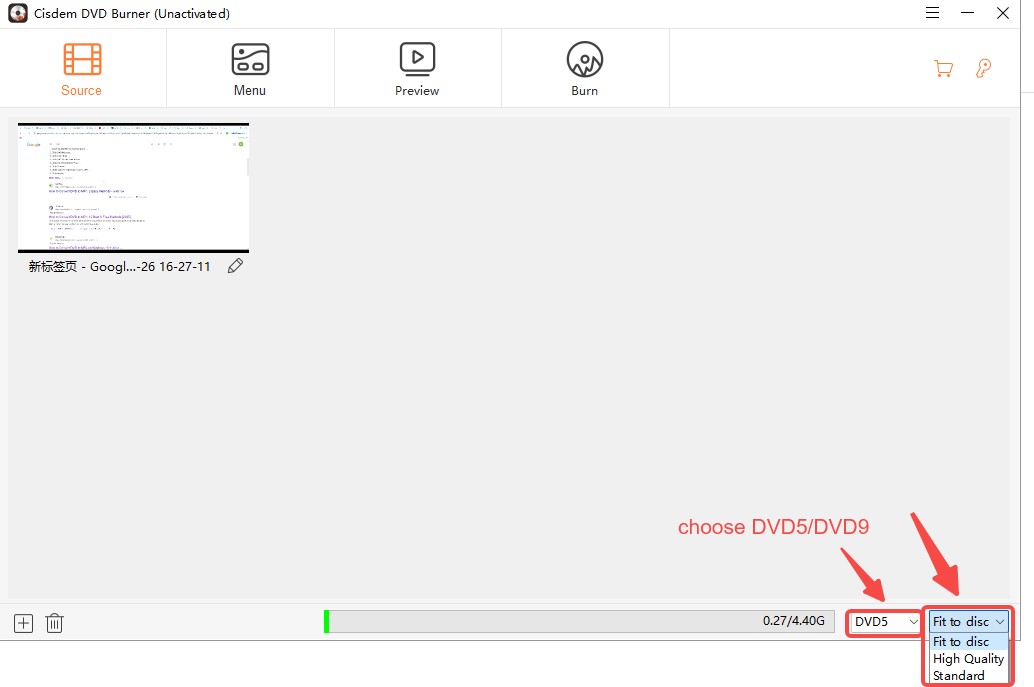
Step 6: Choose Output & Burn
- Customize the settings of Cisdem DVD Burner.
💡Pro Tips:
Cisdem DVD Burner offers three burning modes to balance video quality and file size:
- Fit to Disc – Automatically adjusts the compression to fit the video within the available DVD storage.
- High Quality – Prioritizes the best visual output but may require more disc space.
- Standard – A balance between quality and file size, ensuring decent quality while saving space.
If you have enough storage on your DVD, I recommend using High Quality for the best viewing experience. However, if you need to fit multiple videos onto a single disc, go with Fit to Disc for automatic optimization.
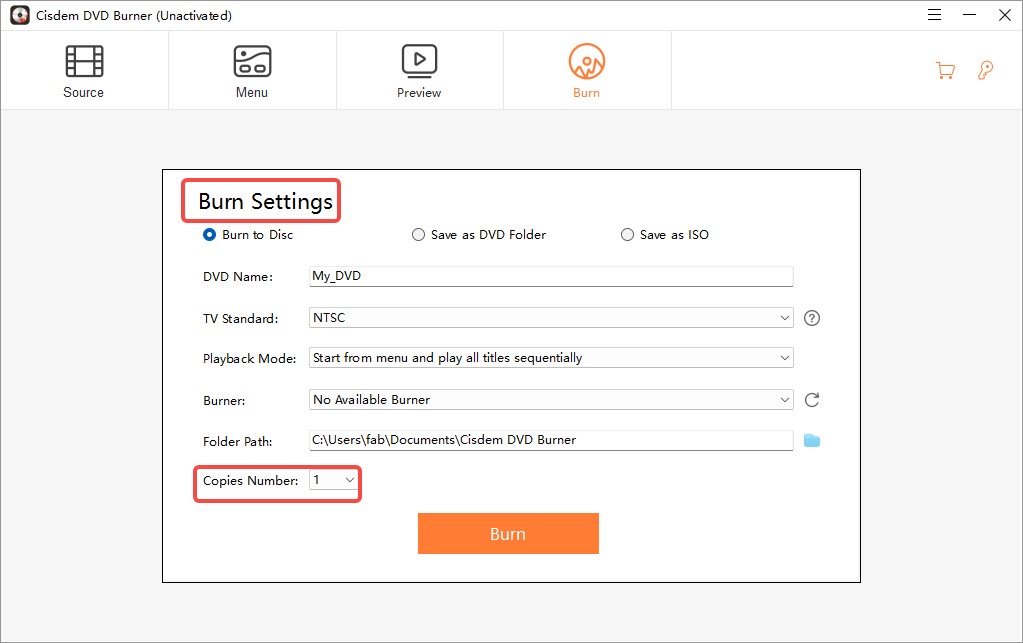
- Configure video quality, resolution, and aspect ratio.
- Click Burn and wait for the process to complete.
How to Burn a DVD with a Free Windows 10 DVD Burner?
✅Suitable Users:
- Users who are budget-conscious and need more features than built-in tools but don’t require professional-grade software.
- Users who need basic DVD-Video creation (playable DVDs).
- Users who occasionally burn DVDs and need menu creation.
- Users who have no idea about Blu-ray burning, advanced editing, or bypassing protections.
Burn a DVD on Windows 10 with WinX DVD Author
WinX DVD Author is a free DVD burning software for Windows that allows users to convert and burn videos to DVD with customizable menus. It supports various video formats, offers basic editing features, and provides a simple burning process. While it lacks advanced editing and Blu-ray support, it is a great option for users looking for a free and easy-to-use DVD creator.
In the CNET WinX DVD Author review, mentioned that WinX DVD Author is among the best free DVD-burning software for Windows, particularly for users looking for a lightweight program without ads or spyware. They appreciate the easy drag-and-drop functionality but note that output speeds can be slower than premium alternatives.
- 100% free DVD burner.
- Easy-to-use interface, great for beginners.
- Supports many video formats. Such as: MP4, AVI, MKV, MOV, WMV, FLV, MPEG, VOB, TS, RM, XviD, etc.
- Allows basic video editing (trimming & subtitles).
- Decent burning speed with good video quality.
- No features like filters, transitions, or multi-track editing.
- No Mac Version – Works only on Windows.
- The interface looks old compared to modern burning tools.
- The DVD menu options are limited.
How to Burn DVD on Windows with WinX DVD Author?
Step 1: Install & Open the Software
- Download WinX DVD Author from the official website.
- Install and launch the program.
❗It takes about 20 seconds to launch the burning software, which is slightly longer than other DVD burners.
Step 2: Add Video Files
- Click "+" (Add Video File) to import your videos.

- Adjust aspect ratio (16:9/4:3) and resolution if needed.
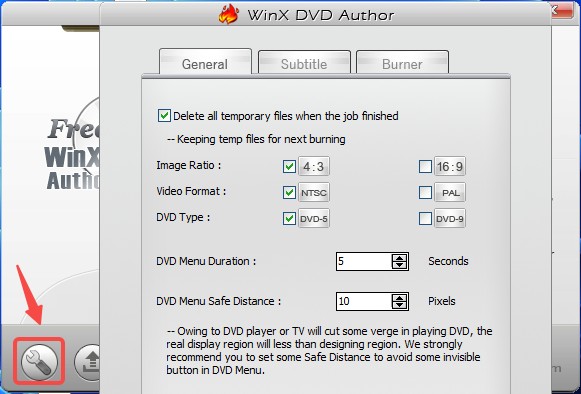
- If your video is widescreen (16:9), set the DVD format to 16:9 to prevent black bars.
- If it’s standard 4:3, ensure the DVD format remains 4:3 to maintain proper display.
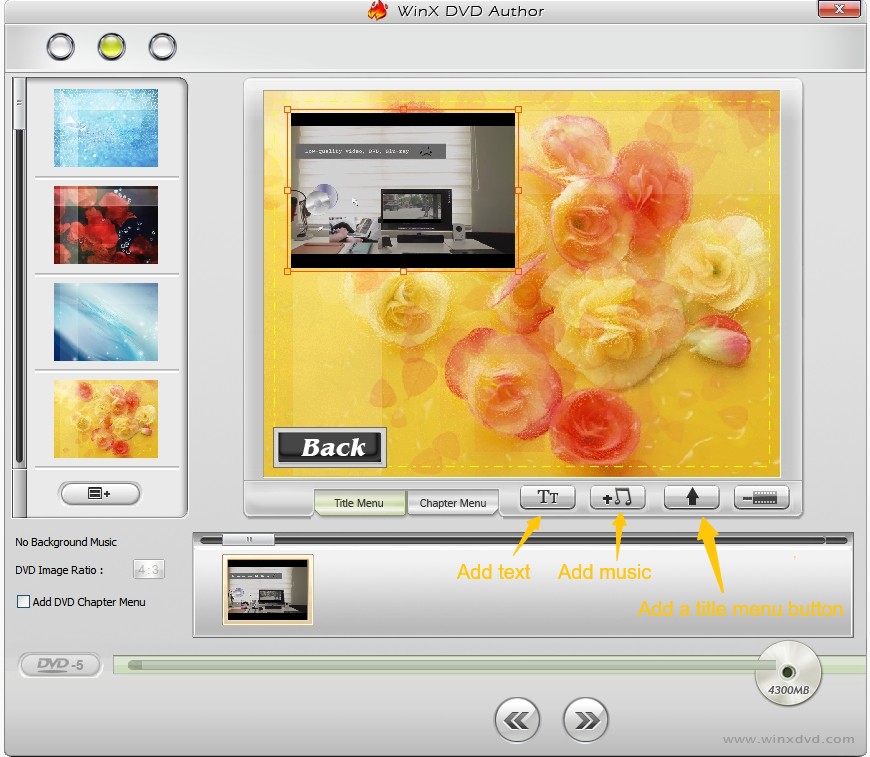
Step 3: Edit Video (Optional)
- Use the trim feature to cut unwanted parts.
- Add subtitles (.SRT format) if necessary.

Step 4: Create a DVD Menu (Optional)
- Choose menu background, text, and navigational buttons.
- Use menu preview to check before finalizing.
Step 5: Choose Output Format & Burn
- Select the output format:
- DVD Disc – Burn directly to physical DVD
- DVD Folder – Save as a folder for later burning
- VOB File – Create an MPEG VOB file for further processing
- Click Start and wait for the burn process to finish.
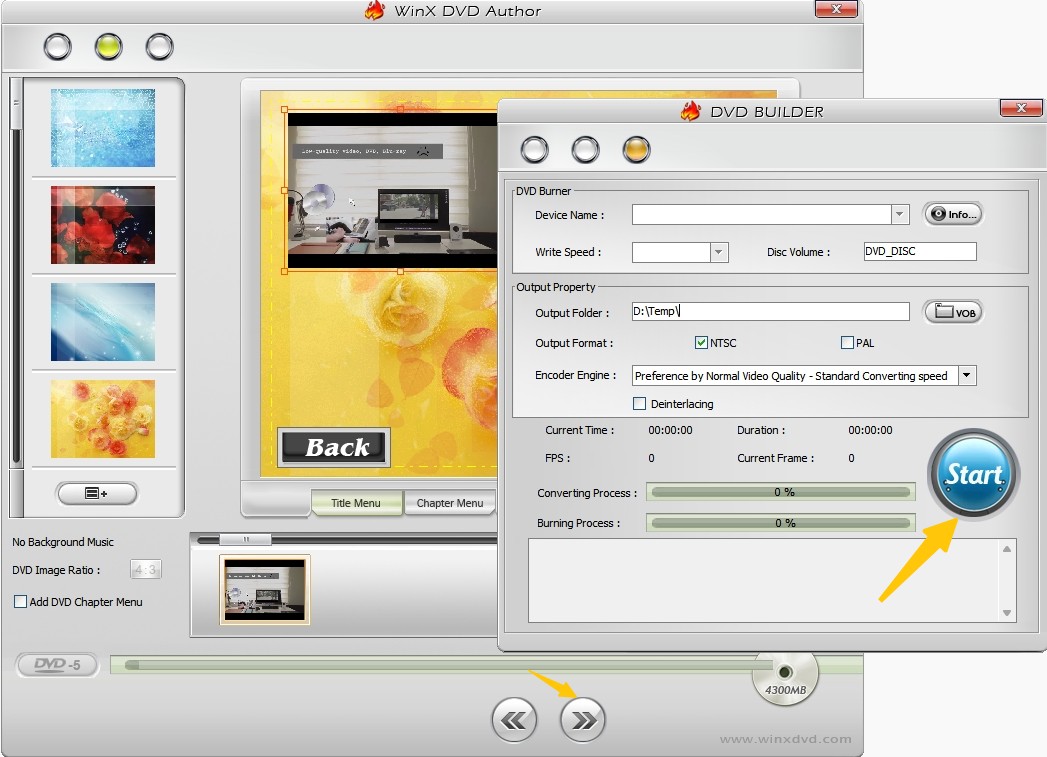
- Don’t use the highest burn speed (e.g., 16x), which may cause:
- Playback glitches.
- Errors on lower-quality discs.
- Instead, burn at 4x or 8x speed for a stable and long-lasting DVD.
How to Burn a DVD on Windows 10 with Built-in Software?
✅Suitable Users:
- Basic users who just need simple data burning.
- Casual users who need to burn files to a data DVD/CD.
- People who want to burn an ISO file (e.g., Windows installation discs).
- Not for users who need DVD-Video, menus, copy protection bypassing, or Blu-ray burning.
Burn a DVD/CD on Windows 10 with Windows Media Player?
The second solution shall be the inbuilt feature of Windows 10 that can burn audio CD, data CD or DVD. Windows Media Player is a digital media playing program developed by Microsoft.
This versatile media player is typically used for playing audio, video, and showing images on computers running the Windows operating system. Additionally, it also includes features to burn CDs and DVDs, rip audio CDs to MP3, synchronize content with a digital audio player, and access to online music stores.
Supported File Formats
- Audio CD: WMA, MP3, and WAV. These files are converted to CDA format during the burning process, allowing them to be played in most CD players.
- Data CD or Data DVD: Any file format can be added as data files. (Image files like JPEG/PNG/GIF, Audio files like WAV/WMA/MP3)
- Windows Media Player does not support burning video DVDs that can be played in a standard DVD player.
How to Burn DVD/CD on Windows 10/11 via Windows Media Player?
Step 1. Launch Windows Media Player. If it isn't installed on your computer, you can download it from the Microsoft Store.
Step 2. Populate your Burn List. Choose the videos, songs and other files you wish to burn, then drag and drop them into the Burn List on the right pane of the Windows Media Player window.

Step 3. Insert a blank DVD into your DVD burner. Make sure it has enough space to accommodate all the files you want to burn.
Step 4. Organize your Burn List. If you want the files to play in a certain order, arrange the files accordingly. The top file in the Burn List will play first.
Step 5. Choose the Burn Options. Click the Burn options button, which is the text to the right of the Burn tab and then choose one of the following options:
- Data CD or DVD: if you want to burn video file(s).
- Audio CD: if you want to burn an audio CD.
Step 6. Start the burning process by clicking on the "Start burn" button.

Step 7. Verify the burn. After the burn is complete, you may need to finalize the disc. Also, make sure that the disc plays correctly in the kind of device you burnt it for.
Burn a DVD on Windows 10 with File Explorer
File Explorer is a file management utility included with the Microsoft Windows operating system. It provides a graphical user interface for accessing and managing the files, folders, and drives on your computer. Also, it can be used to burn DVDs on Windows 10.
- File Explorer comes pre-installed on Windows 10, so there's no need for additional software.
- Simple drag-and-drop interface for adding files to the burn list.
- Supports both the Live File System and Mastered formats, catering to different needs.
- Inability to produce video DVDs that can be played on DVD players; specialized DVD authoring software is required.
- Cannot serve as a DVD menu creator. It lacks advanced features found in specialized burning software, such as creating menus for video DVDs or advanced burning settings.
Steps to Burn a Data DVD on Windows 10/11 Using File Explorer
Step 1: Place a blank DVD-R, DVD+R, DVD-RW, or DVD+RW into your DVD drive. Then press the Windows key + E to open File Explorer.
Step 2: In the navigation pane, click on “This PC” to view your drives. Locate and double-click on the DVD drive.
Step 3: A prompt will appear asking how you want to use the disc. You will have two options:
Like a USB flash drive: Allows you to add and remove files like you would with a USB drive. This option uses the Live File System.
With a CD/DVD player: Prepares the disc to be used with standard CD/DVD players. This option finalizes the disc after burning and uses the Mastered format.
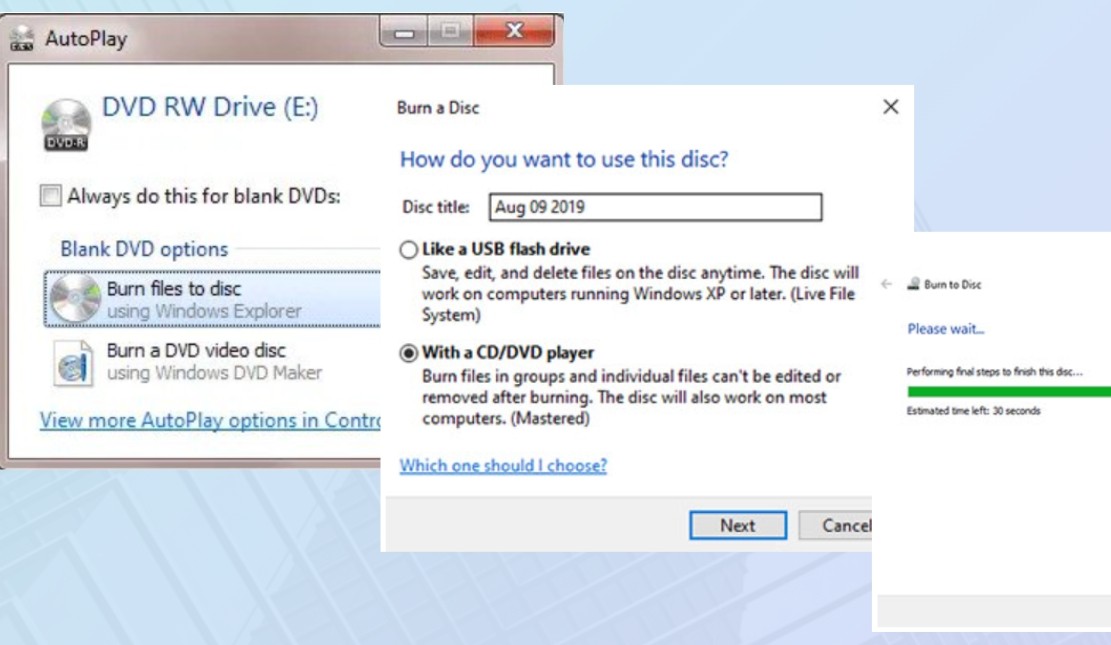
Step 4: Select the "With a CD/DVD player" option and click "Next." After adding files into the open File Explorer window, click on the "Drive Tools" tab, then click on "Finish burning."
Step 5: A "Burn to Disc" wizard will appear. Enter a disc title and select the recording speed, then click "Next." It will start burning the files to DVD on Windows10.
Trouble Shooting
Microsoft Support Community Survey indicated that the most common issue is DVDs not being recognized (35%), often due to driver conflicts or hardware problems. Burn failures from formatting issues (25%) typically stem from incompatible file systems. DVD playback issues (20%) arise when discs are not finalized or burned in the wrong format. Slow burning or freezing (12%) is linked to high-speed settings or system limitations, while software crashes and missing drivers (8%) cause additional failures. So let's explore in detail and find out how to fix these problems.
DVDs Are Not Recognized by Windows 10 (35%)
Windows 10 sometimes fails to detect blank DVDs due to driver issues, outdated firmware, or hardware conflicts.
Solution:
- Check if the DVD drive appears in File Explorer.
- Update or reinstall the DVD driver via Device Manager.
- Use a different type of DVD (DVD-R, DVD+R, DVD-RW) to test compatibility.
Burn Failed Due to Formatting Issues (25%)
Errors occur when the disc is in the wrong format or the burning software doesn't support the selected file system.
Solution:
- Use Mastered format instead of Live File System for better compatibility.
- Ensure the disc is blank and properly formatted before burning.
- Try an alternative burning tool like WinX DVD Author or ImgBurn.
DVD Playback Issues on External Players (20%)
Burned DVDs may not play on DVD players due to format incompatibility or improper disc finalization.
Solution:
- Burn using DVD-Video format, not just as data files.
- Ensure the DVD format matches the player’s region (NTSC or PAL).
- Finalize the disc to make it readable on external players.
Slow Burning Speed or Freezing (12%)
Burning may take too long or freeze due to high-speed settings, hardware limitations, or background processes.
Solution:
- Reduce the burning speed to 4x or 8x for stable results.
- Close unnecessary applications before burning.
- Use high-quality blank DVDs to prevent errors.
Other Issues (Software Crashes, Drivers Missing, etc.) (8%)
Crashes or missing drivers can prevent successful DVD burning in Windows 10.
Solution:
- Update Windows and burning software.
- Check for missing drivers in Device Manager.
- Use a different burning application if issues persist.
FAQs
If your computer cannot burn discs, try to use a different type of disc. The type of disc you use for burning shall be compatible with the type of optical drive in your computer. That being said, you cannot burn a DVD-R disc in a drive that does not support DVD-R technology. Besides, CD-R discs are supported by all recordable disc drives.
You can burn a CD in Windows 10 without software using the built-in functionality of Windows File Explorer. The method of burning CDs with File Explorer is similar to the steps for burning DVDs on Windows 10 described in this article. Please refer to Chapter 3.
Burning a video DVD and a data DVD essentially involves saving digital information onto a DVD. The main difference lies in the type of data saved and its usage.
- Video DVD: These are formatted to play on DVD players. When burning, video files are converted into a recognized format like MPEG-2 and organized according to the Video_TS directory standard, enabling DVD players to properly navigate the content.
- Data DVD: Used for storing or backing up computer files, these DVDs keep the original formats. They can contain various file types like documents, photos, videos, and programs. Typically, they are not compatible with most DVD players and are designed for computers or game consoles.
While some modern DVD players can play specific file types from a data DVD, the most dependable method to play a video on any DVD player is to burn a video DVD.
Conclusion
In this article, we explored three types of methods to burn a DVD on Windows 10/11, highlighting their pros and cons. Among them, we highly recommend DVDFab DVD Creator, a versatile, high-speed, and user-friendly tool that makes DVD burning effortless. Whether you're creating a home movie or backing up important data, this software delivers superior results. If you're also looking for the best Blu-ray burning software for Windows 10, be sure to check out this in-depth guide for expert recommendations!
 Can Wii Play DVDs? Best Methods to Watch DVD on Your Wii!
Can Wii play DVDs? This is probably the most frequent question asked by Nintendo Wii lovers. And you might be disappointed to find out that the answer is No. But thanks to the advancement of technology, you can play DVDs on a Wii as long as you get the right method.
 How to Solve "No Valid Sources are Available for this Video" Error
If you are facing errors like No Valid sources are available for this video android or any similar errors, this means you are having trouble loading your videos. This article will give you all the information regarding the reason behind this error and the best ways to fix it.
 Explore the Most Popular Sites for MP4 Movies Download 2025
Feeling difficult to figure out the most suitable website or tool? This article teaches you how to achieve HD MP4 movie downloads and shows the top sites designed to download MP4 movies easily. Read on to know more.
 Best Alternative to Remini Photo Enhancer 2025
You must have got an idea about what we will be discussing today by reading the title itself. Well, as you have deduced that we will be speaking about the best alternative of Remini AI photo enhancer, wouldn’t it be nice if just have a brief look at Remini first?