How to Burn Blu-rays to Blank Discs with 5 Modes on Windows and Mac
Table of Contents
Copying the contents of a Blu-ray disc to your computer may seem like a difficult task if you’re not a tech savvy person. Not to mention burning said contents onto a blank new disc. Most Blu-ray discs you buy come with some form of protection that prevents users from copying what’s on them. Although there's a good reason why these protections exist, that also means that you can’t make backups or your discs or convert them to digital format for safe keeping. Needless to say, that’s a bit of a bummer.
The good news is that you can find several pieces of software out there that let you to circumvent the protection and removing most of the limitations you would normally have. The best software is this category is undoubtedly DVDFab Blu-ray Copy, a very easy to use tool that offers great bang for your buck.
In addition to making sure you are well informed regarding the product, the main reason we’re mentioning this is because in this article we’re going to focus on the Paid version. That means some of the features we’re going to discuss might not be available if you’re using the Free version, so just keep that in mind. It’s also worth noting that you can upgrade to the Paid version at any time if you’re currently using one of the other variants. More information regarding the different versions of the software can be found on the product page of DVDFab Blu-ray Copy.
Step 1: Select a Copy Mode
Your first order of business is to download and install the DVDFab 13 software suit from the official website if you don’t already have it. Next, open the software and select the Copy module from the top menu to get started. Proceed by selecting the mode you want to use by clicking the button located in the upper left corner of the user interface.
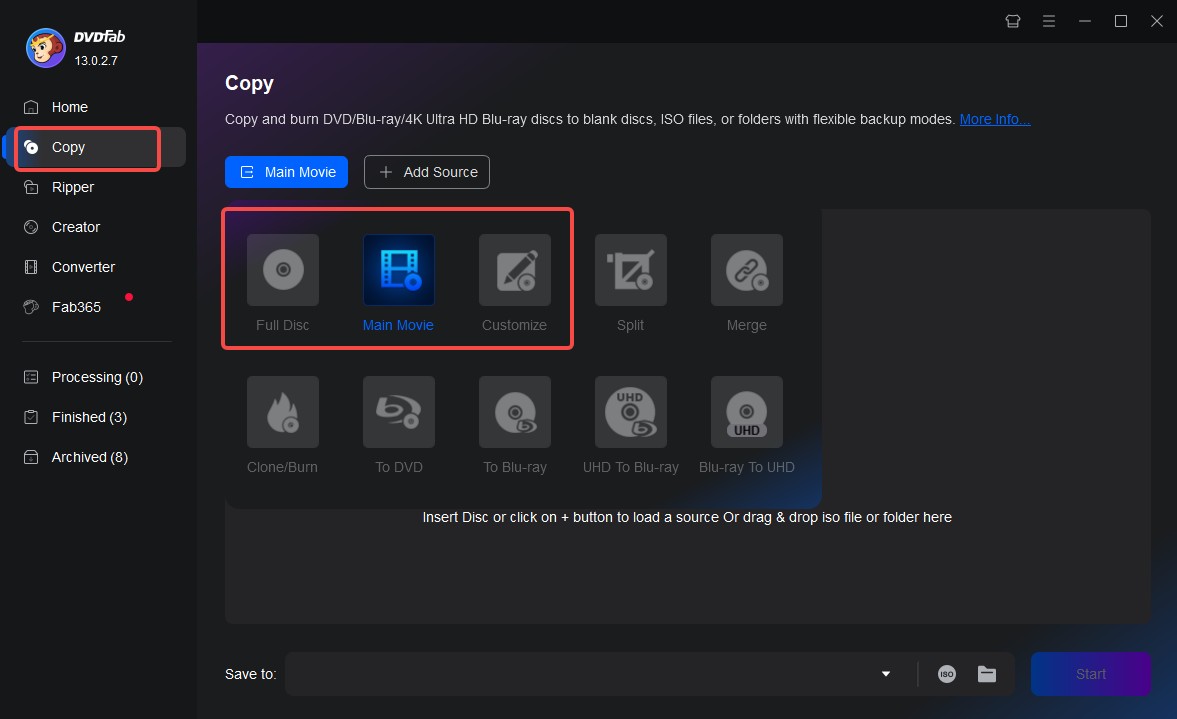
Once you click the button, you’ll notice that the Blu-ray burner and copying software offers quite a few options to choose from. You don’t really have to worry about the last three as those are mainly used for other products offered by DVDFab. Likewise, you’ll want to ignore the Split mode as that one only supports DVDs for the time being. Instead, you’ll want to choose one of the remaining five. Namely, Full Disc, Main Movie, Customize, Merge, and Clone/Burn. Some of these are pretty self-explanatory but we’re going to discuss each of them individually to give you a better idea of what they do.
Full Disc
The Full Disc mode should be used when you want to copy all the contents of your source regardless of whether it’s a Blu-ray disc or a locally stored file/folder. Full Disc doesn’t give you as many options to work with as some of the other modes but you won’t really need them anyway. The purpose of this mode is to provide a faithful copy of the original source and to allow you to compress it should you want a smaller version of the disc.
Main Movie
The Main Movie mode gives you a bit more freedom and will usually save you a bit of space whenever you copy Blu-rays discs. This mode should be used in situations when you only want to copy the movie itself and skip all the extra stuff. Blu-rays nowadays come with additional content all of the time, such as behind-the-scenes footage, interviews, commentaries, and more. While those sort of things can be interesting, sometimes you just want to watch the movie and nothing else.
Customize
Customize is a mode that fulfils two major roles. First off, you can use this mode to select multiple titles you want to copy. It’s a bit similar to Main Movie in some respects but can be used in situations when you want to copy the movie itself along with certain other pieces of content. The other important thing to know about Customize is that it allows you to create your own custom menus. The creation tool is quite in-depth and can be used to create absolutely stunning menus thanks to the wide variety of options available. More on this a bit later on.
Merge
This mode allows you to merge multiple Blu-rays into a singular file or folder. This can be particularly useful when you have several episodes of a TV show or movies from the same series that you want to binge-watch. The mode can be used to merge only certain titles from your sources, so you can remove intros or some of the other extra content mentioned above for a smoother viewing experience. You may want to keep an eye on the resulting file size when using this mode in the event that you want to burn it onto a blank disc afterward. Merging too much content may result in a file or folder that exceeds the capacity of the new disc.
Clone/Burn
This final mode is the one you’ll want to use if you plan on creating perfect 1:1 copies of a Blu-ray. Clone/Burn is similar to Full Movie in that regard with the exception that this mode cannot be used to compress the content. Hence, the resulting discs will always feature the same size and quality as the original source. You can still make digital copies with this mode and store them locally on your computer. If you’re using the mode for creating new physical discs, it’s worth noting that the Blu-ray burner allows you to make multiple copies in quick succession, which is a nice feature to have indeed.
Step 2: Load the Source
Once you have selected the appropriate mode, you can go ahead and load your source. If you want to copy or burn a physical disc all you have to do it insert it into your optical drive and the software will automatically load it up for you after a couple of seconds. If it doesn’t for some reason or if you’re working just with digital content, you can navigate and load your source manually by using the “Add” or “+” buttons. Alternatively, ISO files and folders can also be loaded by simply dragging and dropping them anywhere inside the main user interface.
Step 3: Customization tools
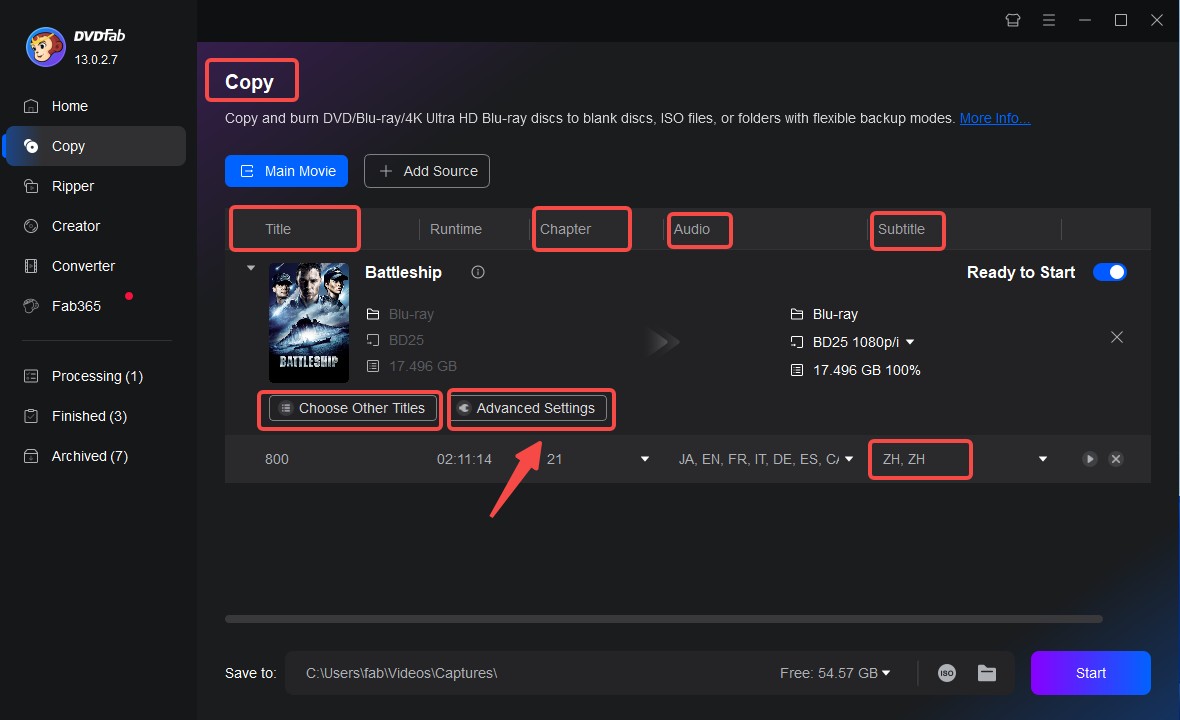
After the source is loaded, you can customize your DVD in your way;
Choose titles, chapters, audio tracks and subtitles.
Advanced settings
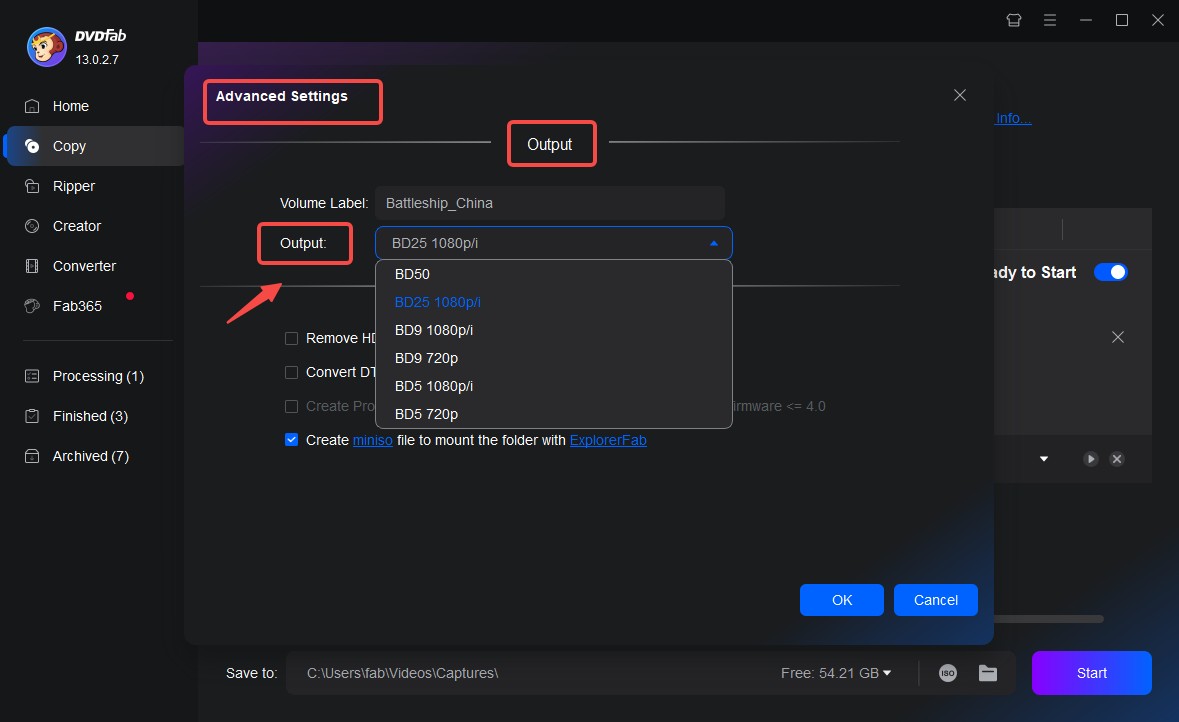
The Advanced Settings menu can be accessed by clicking the wrench icon mentioned during the previous step. Here, you can find a number of optional settings depending on which mode you’re using. For example, the Blu-ray burner along with some of the other modes have a setting that allows you to create mini ISO files that can then be mounted using DVDFab Virtual Drive. Here you can also choose to remove the HD audio or not, and choose the type of output disc – BD25, BD50, and so forth.
Custom menu
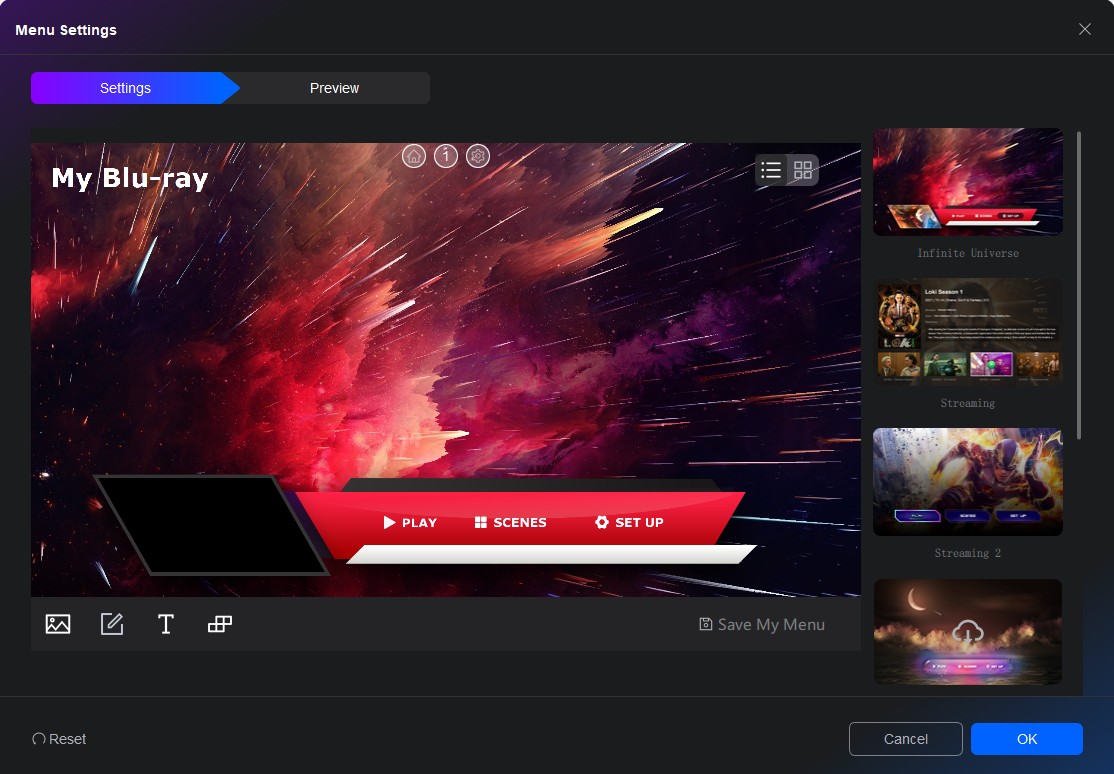
As mentioned earlier, you can also create your own menus by using the Customize mode. This mode also gives you all of these options along with several new ones. To begin, click the wrench icon and select Custom under Menu Mode. A new window will appear with a number of icons found in the lower left corner. We won’t go into too much detail in this article but let’s briefly touch upon some of the most important options just so you know what to expect from the custom menu creation tool.
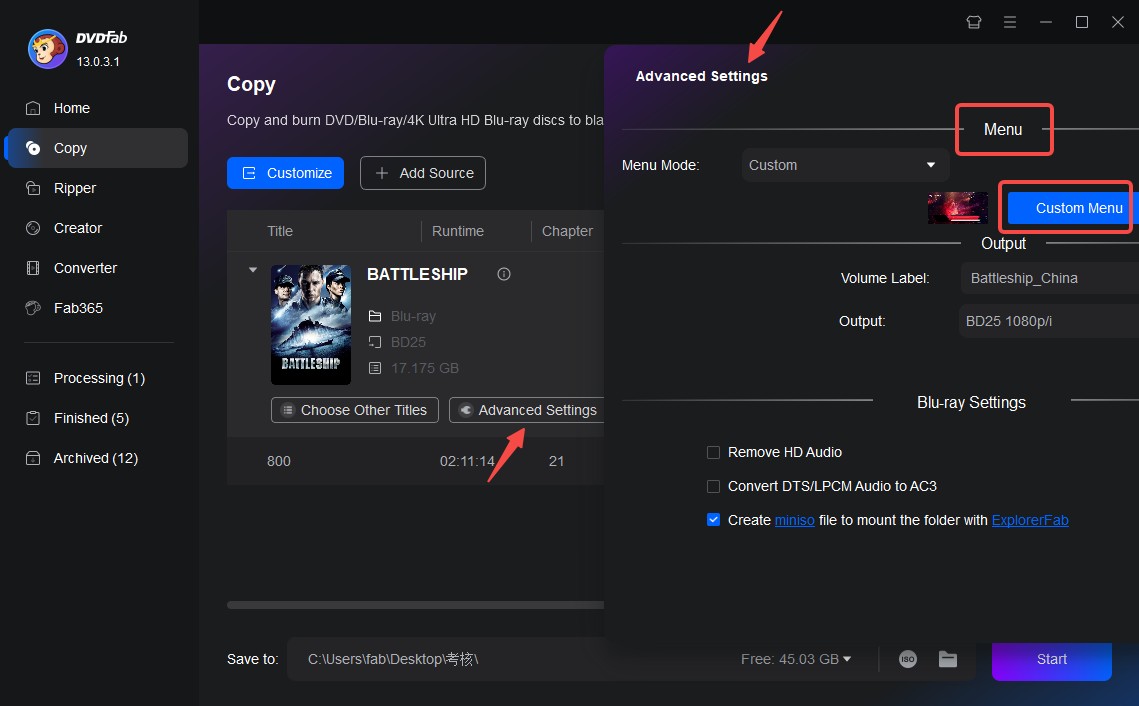
If you’re looking for a quick method of changing the menu you can simply choose one of the beautiful templates included with the software. You can find all available templates on the right side of the UI and you can grab a few additional ones by clicking the “Download More” button. If you’re happy with the selection simply click OK and proceed to the next step. Otherwise, now would be the time to make use of some of the other options mentioned earlier.
For example, you can click the first icon to customize the background art of certain templates by either uploading an image or taking a snapshot of a video. Meanwhile, the third icon lets you add widgets to the template while the fourth one can be used to insert text pretty much anywhere on the menu. Widgets and text boxes can also be moved by simply clicking and dragging them around. Creating a great looking custom menu takes a bit of time and patience so don’t be afraid to experiment.
Step 4: Select the Output Location
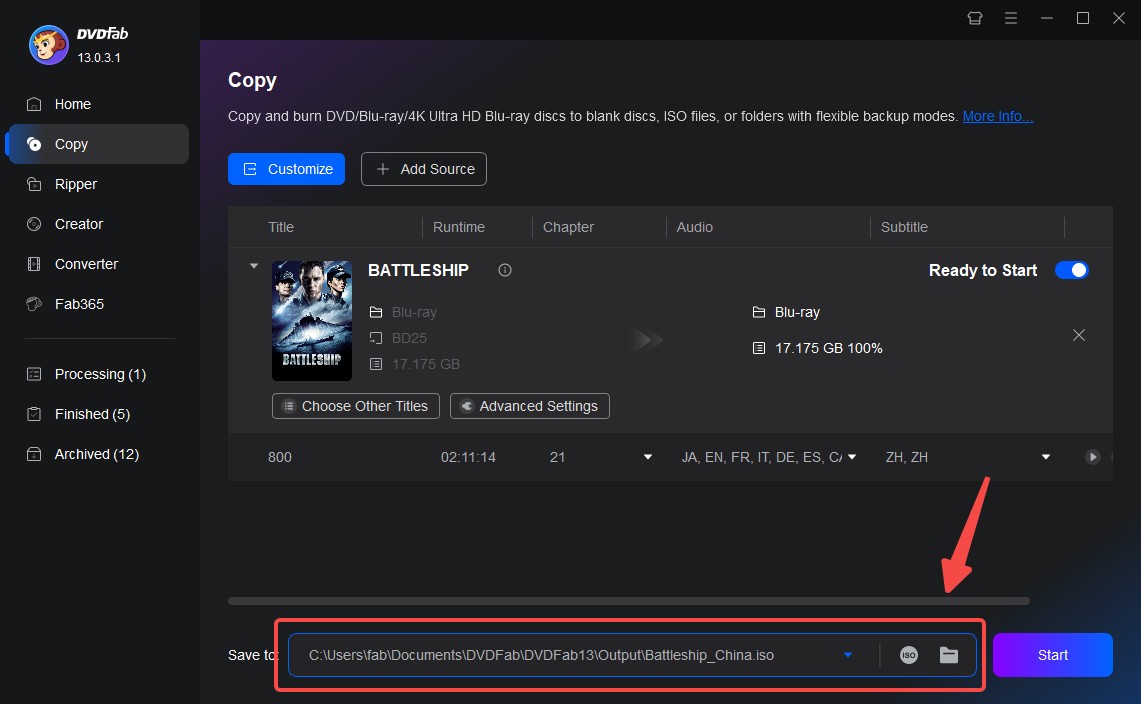
Before you start to copy or burn the Blu-rays you may want to pick a different destination folder for the output. You can do so by using the dropdown menu located at the bottom of the UI to choose an optical drive or a location on your computer. Alternatively, you can also use the icons found next to the menu if you want the output to be saved as an ISO image or folder.
Step 5: Start the Process
Whether you want to copy Blu-rays locally or burn them onto new discs, initializing the process can be done simply by clicking the green Start button located in the lower right corner. You can also press the little arrow next to the button to schedule the task for a later time. Once the process is running, you can use the three green buttons found in the lower right to pause, cancel or schedule the ongoing task for later. Meanwhile, the menu found in the lower left lets you tell the software to exit the program, hibernate or shut down your computer once all current tasks have been completed.
Final Thoughts
DVDFab Blu-ray Copy is an excellent tool for safeguarding your content against the wear and tear that can damage your physical discs. Using the Blu-ray burner to create backup copies of your discs is a great way to ensure that the original doesn’t have to come out of its case as often or at all in the future. Alternatively, you could also copy the Blu-rays and convert them to digital format to be stored on a hard drive along with all your other movies. These are just a couple of examples of why this software is so useful and definitely worth the asking price.
① Burn Blu-rays to blank discs or copy to HDDs as ISO files/folders
② Offer 5 different copy modes to meet versatile backup needs
③ Support all types of blank discs: BD-R, BD-RE, DVD±R and DVD±RW
④ Copy the Blu-rays in a lossless manner or compress them smaller
⑤ Support GPU hardware acceleration to back up much faster
