How to Convert DVD to Digital: 7 Free and Lossless Methods
Summary: Are you tired of lugging around a stack of DVDs or want to watch your favorite movie on a different device? Digitizing your DVD collection can be a game-changer. This post will show you how to convert DVD to digital free for playback on your desired mobile devices.
During the height of the DVD era, many of us invested real time, money, and affection in building film libraries. Today, with phones and tablets everywhere, I'm exploring practical ways to convert DVDs to digital formats, so those classics travel with me. Digitizing DVDs frees up shelf space, keeps everything neatly organized, and lets me watch from any device without internet connection.
In this guide, I walk through how to free convert DVD to digital with 7 best options and compare how each method performs in quality, speed, and convenience.
How We Tested
To ensure fair and consist review on differents ways to convert DVD to digital, we evaluated all of the DVD digitizer software and hardware listed in this blog, as well as used an online DVD to digital conversion service. All hands-on tests were carried out using the following system configuration:
- Operating System: Windows 10 x64
- Processor: Intel Core i7-6700 CPU
- Graphics Card: NVIDIA GeForce RTX 4060 Ti 8GB
- Test Media: The movie 8 Mile (Duration: 1 hour 50 minutes, file size: 6.13 GB)
For DVD to digital software tests, we mainly tracked output file size, audio and video quality, and processing time. You can find each tool's results in its respective section.
Snapshot: Pick the Best Free DVD to Digital Converter
| Method | Best for |
| DVDFab DVD Ripper | Digitize any DVDs in great quality, including encrypted commercial and homemade ones. |
| HandBrake | Convert unprotected DVDs and prefer video compression |
| MakeMKV | Lossless MKV backups preserving chapters, audio, and subtitles |
| VLC Media Player | Occasional, free conversions of homemade, unprotected DVDs |
| Vudu Disc to Digital (Fandango) | People live in the US and Mexico and have a few discs to convert |
| Conversion Services | Prefer not to DIY and are willing to wait |
| DVD to Digital Hardware | Real-time capture from DVD players and tapes |
Tutorials: 7 Ways to Convert DVD to Digital File
1. Convert DVD to Digital Free With DVDFab DVD Ripper
Best For: Movie enthusiasts with large DVD collections who require high-speed transcoding, batch process encrypted DVDs and freely customize output settings.
DVDFab DVD Ripper is the best DVD to digital converter that works with both encrypted and homemade discs. It digitizes DVDs to 1000+ formats for phones, tablets, gaming consoles, and more, covering popular video types like MP4, AVI, and MOV. It also supports audio ripping, such as DVD to OGM, MP3, and FLAC. Bonus features include GPU-accelerated processing that speeds up ripping without sacrificing quality, and a built-in editor that allows you to trim, crop, add subtitles, and alter bitrate to suit each device. In our tests, it recognized tricky discs quickly and delivered clean, consistent output, making it a reliable pick for anyone transitioning a DVD library to digital.
💻Compatible systems: Windows 11/10/8.1/8/7 (32/64 bit) & macOS 10.13 - 15.x
Main Functions:
- Supports the newest released DVDs with protection.
- More than 1000+ audio and video formats are supported for DVD digitization.
- The digitized video is compatible with more than 260 preset devices.
- Adjust video quality, including resolution, codec, bit rate, and frame rate.
- Video editing options: cutting, combining, altering brightness and contrast, etc.
- SRT files are used to extract movie subtitles.
- Digitize DVD collection at once via multitasking mode.
- Serve as DVDFab 2D to 3D converter to rip 2D DVDs to 3D videos.
How to Convert DVD to Digital with DVDFab DVD Ripper?
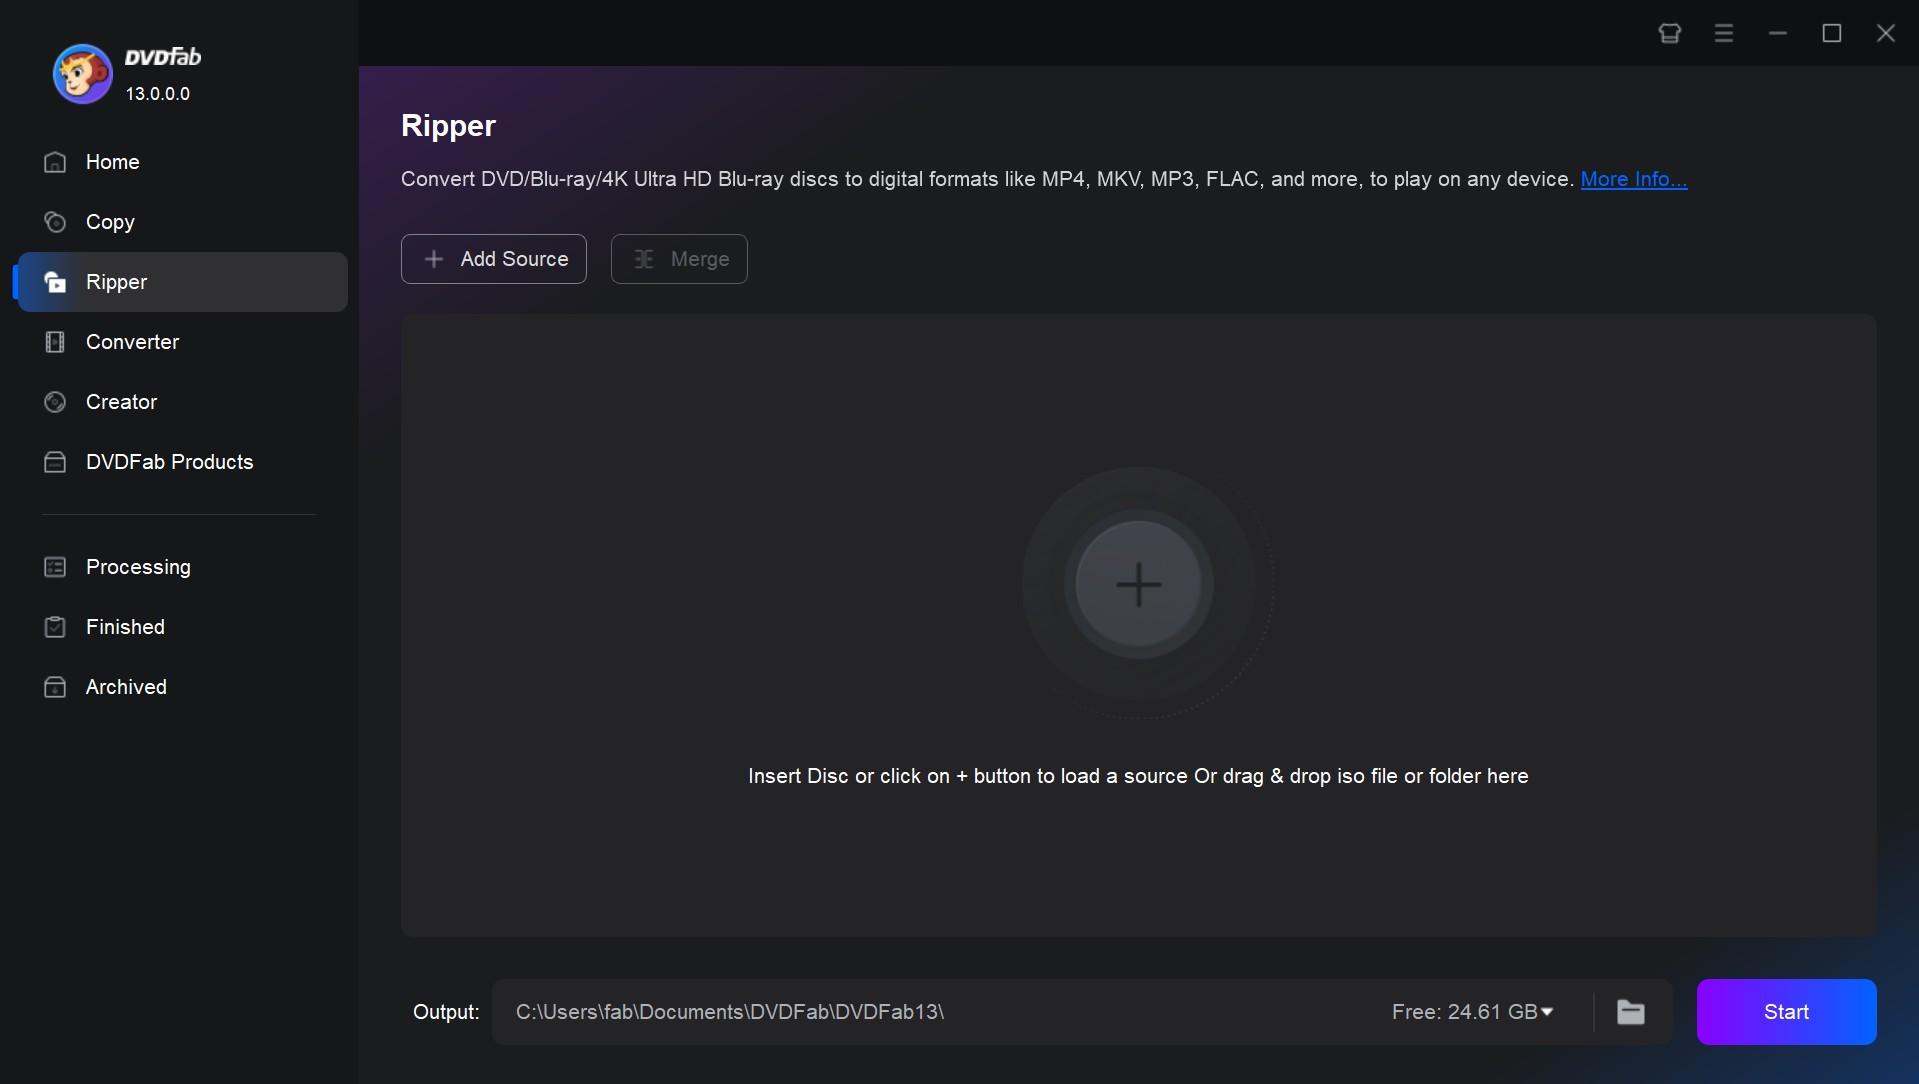
Step 1: Launch DVDFab software and load the source DVD
Free install DVDFab software and select the Ripper module from the drop-down menu. Insert the DVD, ISO or Folder disc into the optical drive by clicking on the Plus sign.
Step 2: Select a profile and change the settings
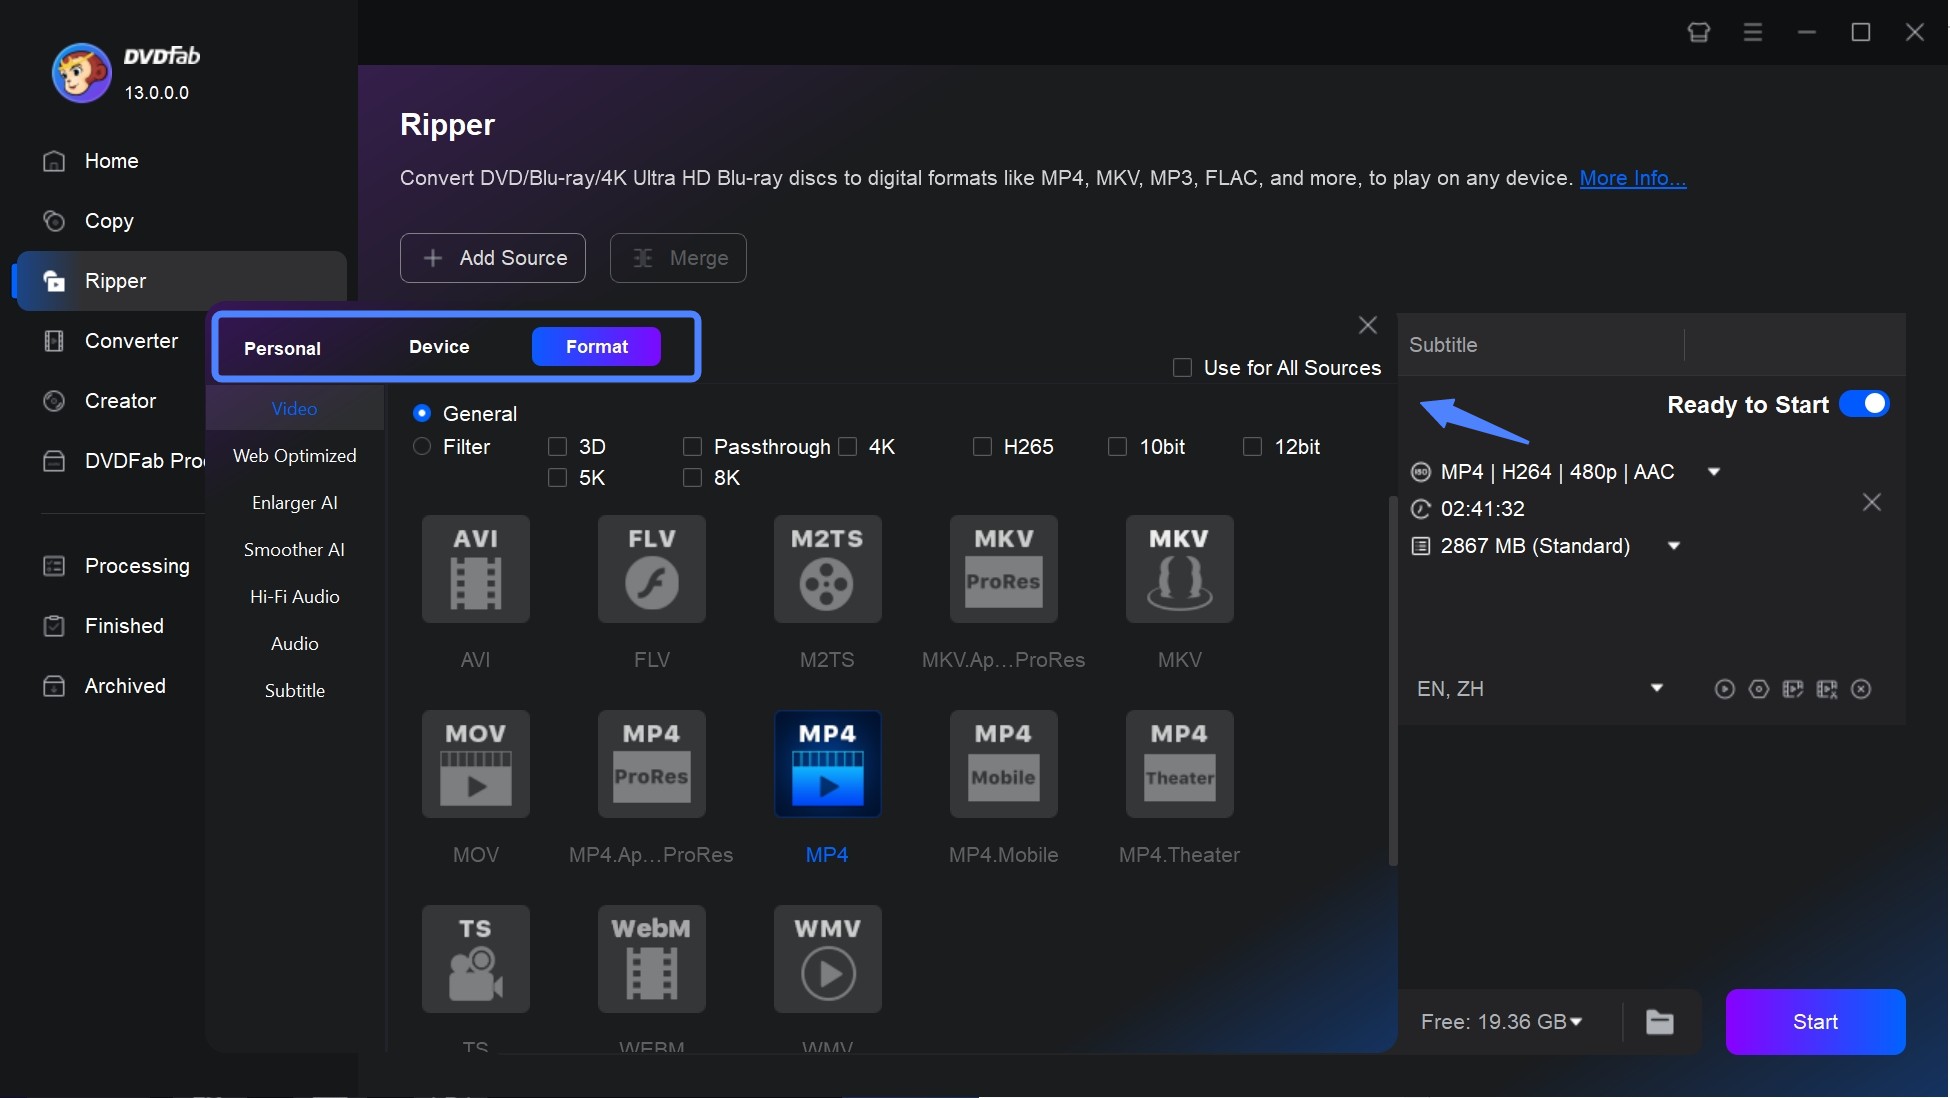
Once you've selected the file you wish to digitize, pick the video format by clicking on "Choose Other Profile" and clicking on the video. You are free to digitize your DVD to MP4 or convert DVD to AVI, MKV and 1000+ other popular digital formats. Choose Format > Subtitles if you want to extract subtitles as SRT files.
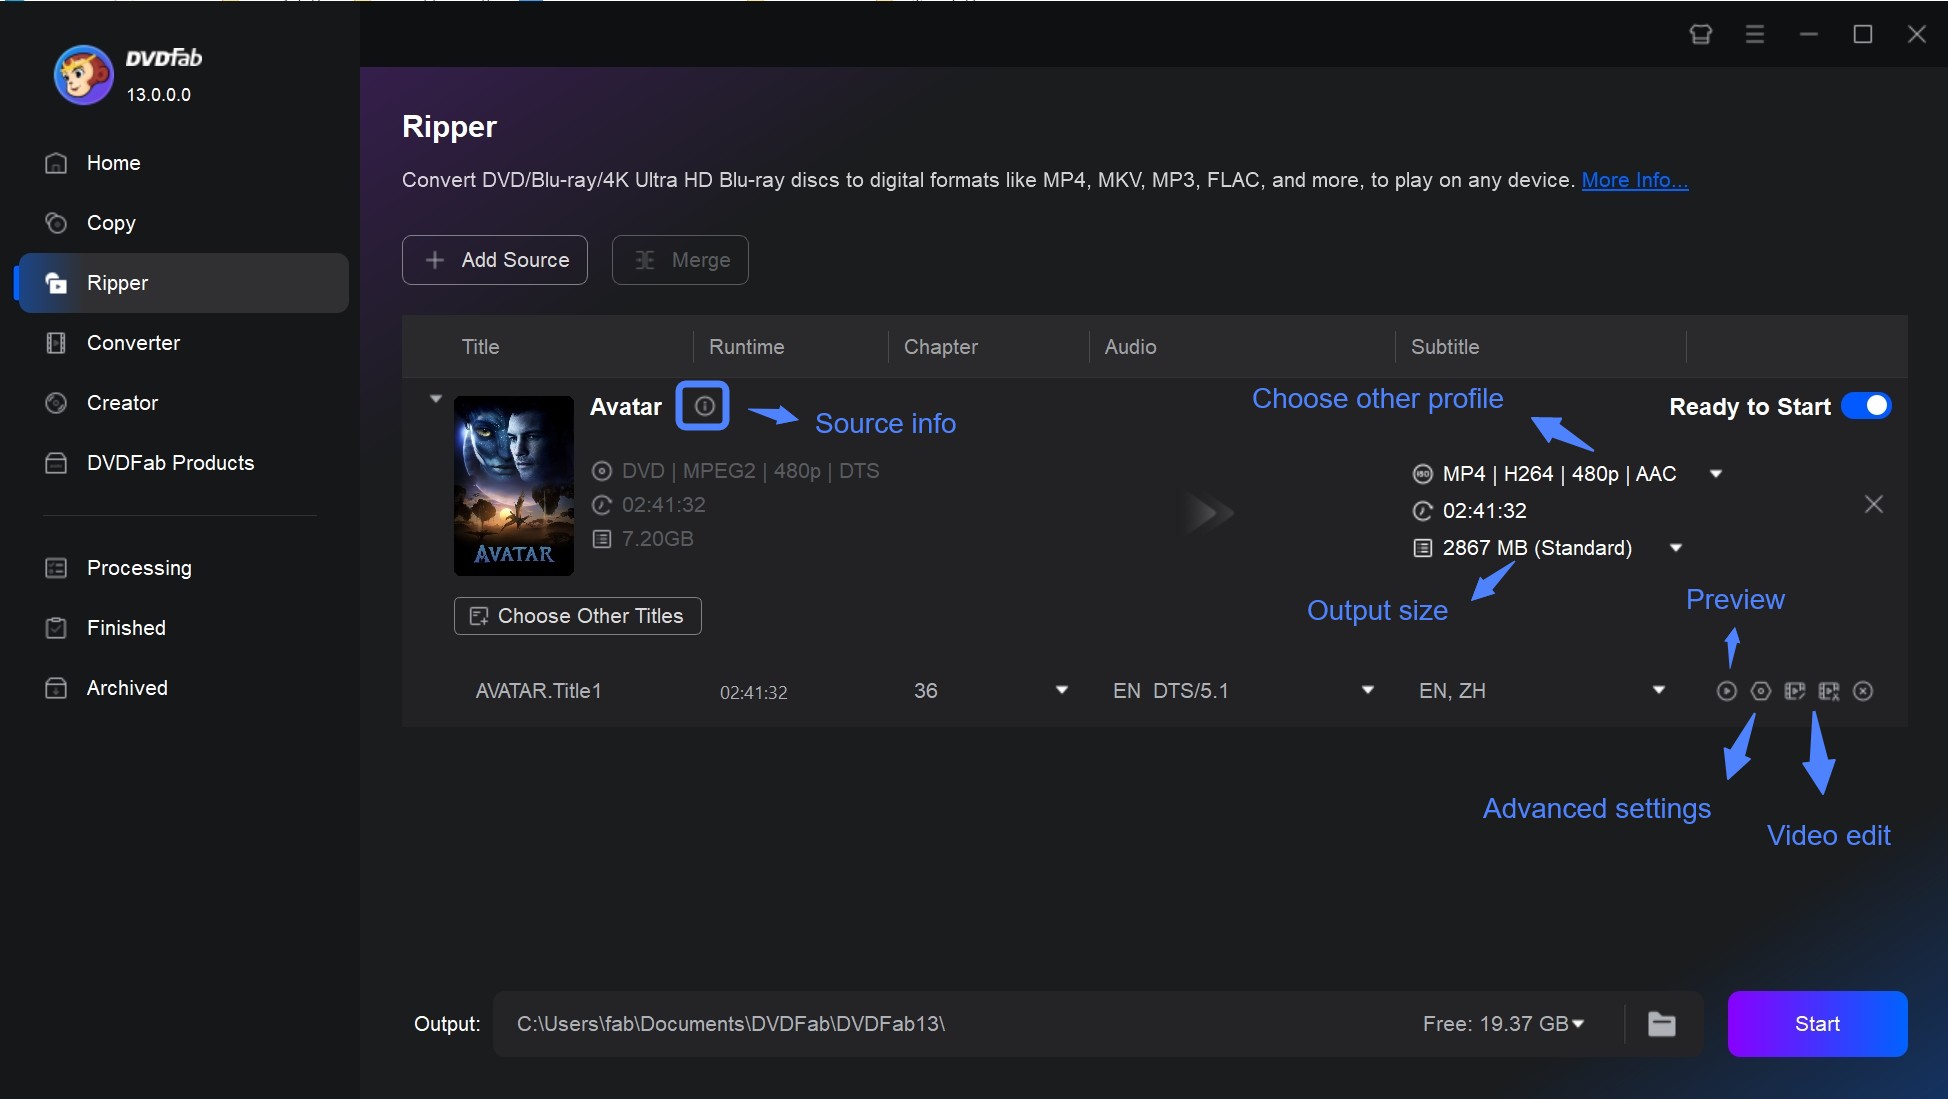
Options for customizing the output will be prominently shown. There are several options available when you click on the Wrench symbol for Advanced Settings. When you click the Pen icon (for the Video Editor), you may retouch your video using various editing options, making it more unique and personal.
Step 3: Start digitizing DVDs free and quickly
After making all the necessary adjustments, click the Start button to convert your DVD to digital formats. Waiting for this top DVD digitizer to finish its work is unnecessary. The conversion can be stopped and resumed at any time. You can set the computer to shut down or hibernate automatically once the procedure is complete if it takes a long time.
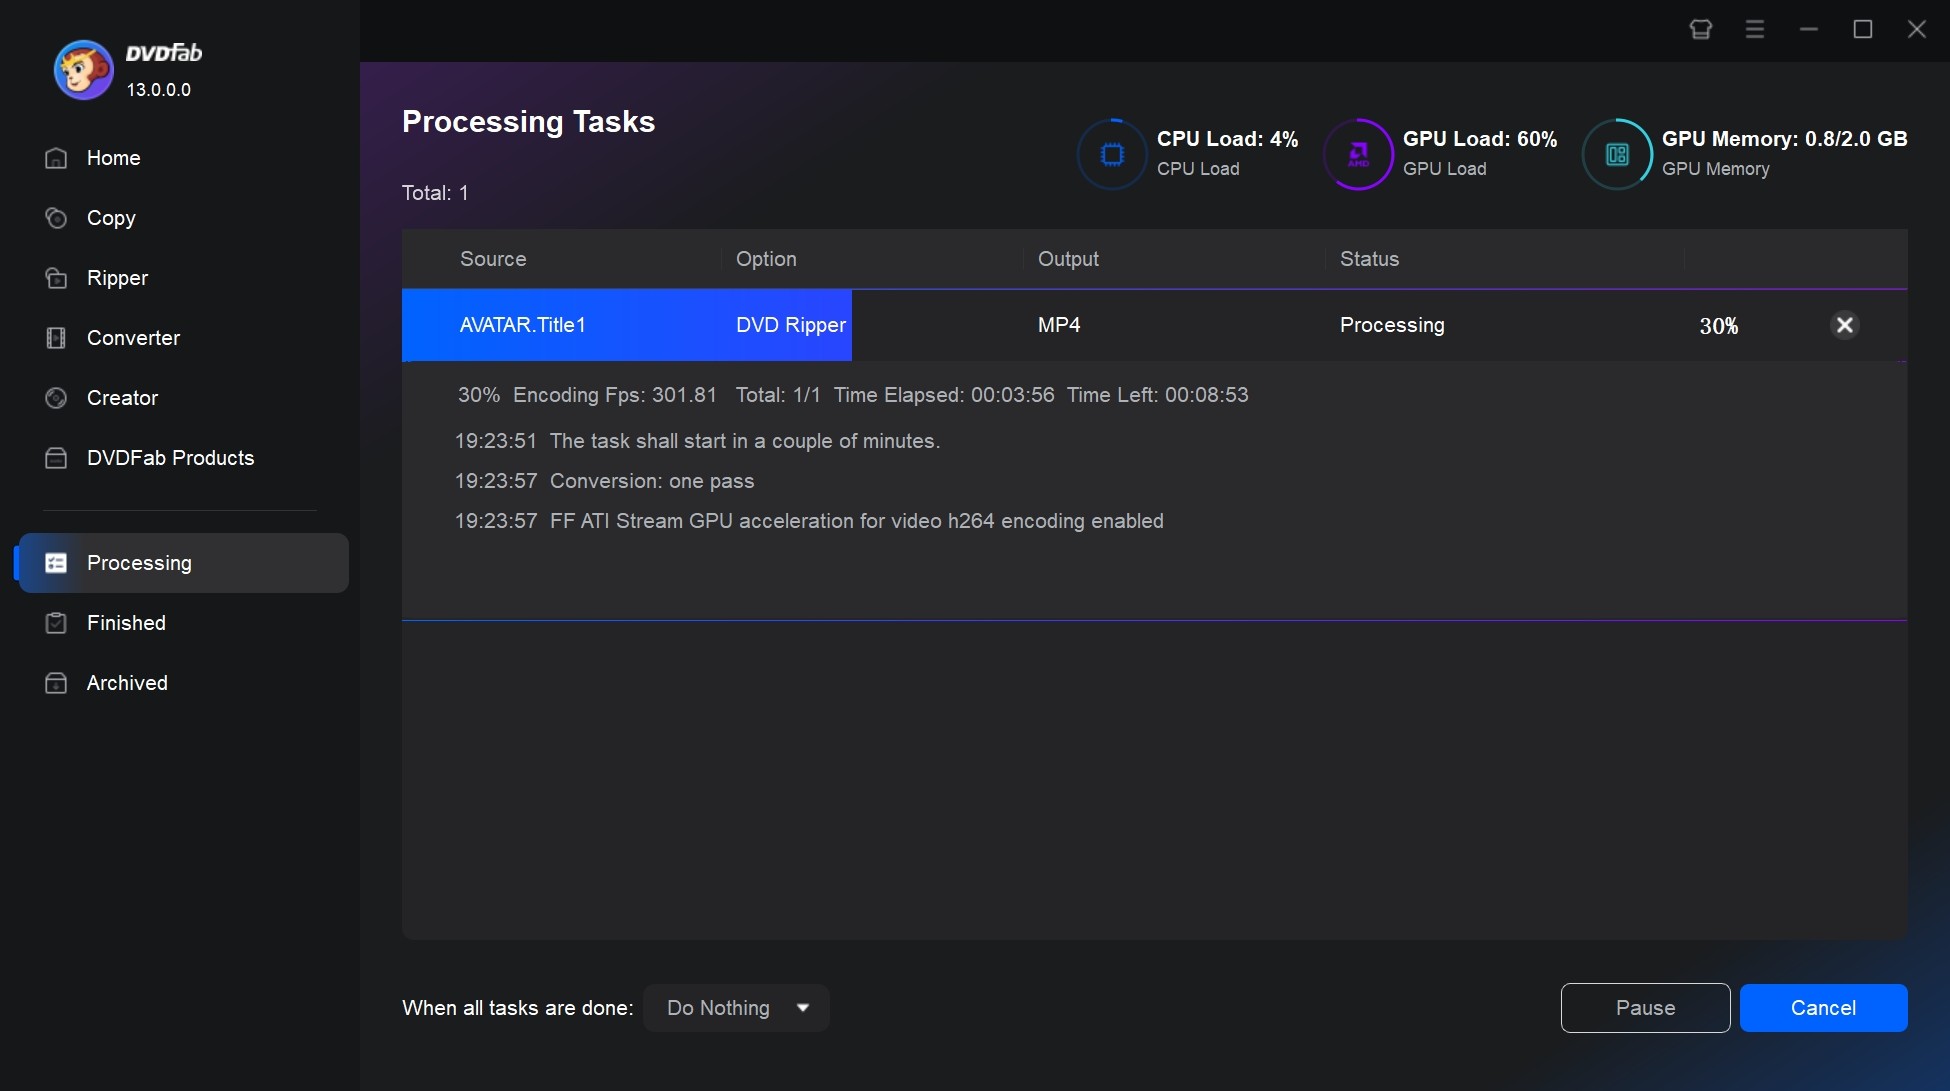

- We tested the film "8 Mile" (runtime 1h50m14s) and solely converted the main feature (source file 6.13 GB). With H.264 MP4 and AAC 5.1 at 720p, the output was 1.91 GB, and the rip time was 5 minutes and 29 seconds. To preserve original quality, the 1:1 MKV option took 1 minute 37 seconds and produced a 5.07 GB file. The output quality and efficiency met our expectations, and along with its extensive feature set, we give it our highest recommendation.
2. Convert DVD to Digital Free with HandBrake
Best For: For tech-savvy users who value customization, HandBrake is a good choice. Not only can it bypass some encrypted DVDs through additional code libraries, but it also significantly reduces file size, though at the expense of image quality.
HandBrake is an open-source and free DVD ripper for Windows 10 and Mac. It is designed to convert DVDs into digital formats such as MP4, MKV, and WebM. This makes the content compatible with a wide range of devices like Android, Apple, Roku, among others. HandBrake also offers advanced settings for customizing file outputs including selection of video encoder, frame rate, bitrate, audio track, subtitles etc.
💻Compatible systems: Windows 10 and later & macOS 10.13 and later & Linux
- Able to read non-protected DVD and Blu-ray
- Support MP4, MKV, WebM and 60+ profiles
- Support batch scanning for DVD videos
- Embedded DVD editing software: deinterlace, denoise, crop
- Supports a limited number of output formats installation on Windows systems
- Cannot digitize encrypted DVDs or Blu-rays
- Large file conversions can take hours or longer to complete
How to Convert DVD to Digital Free with HandBrake
Step 1: Put the DVD that you want to convert into your computer's DVD drive. Once your DVD is on your computer, open HandBrake. Click "Open Source" in the upper-left corner of the HandBrake window, then click your DVD's name in the pop-up menu.
Step 2: Select a conversion preset: When you load a DVD, Handbranke automatically selects the longest title, which should be the main feature. But before you go further, you should also select a conversion "profile" (or preset) that best matches the device you intend to play the video on.
Step 3: In the Output Settings section, choose your desired output format. Then in the main window, click the "Browse" button. This is where you're going to choose where the new digital copy of the DVD will be saved.
Step 4: Finally, click the "Start Encode" button at the top of the window. HandBrake will now convert DVD into a digital copy.
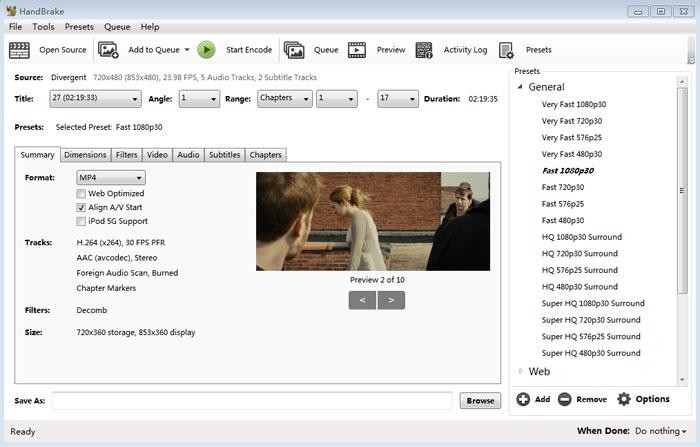

- In our test, using the same test source file, HandBrake stands out for space savings, though with trade-offs. Its H.264 MP4 encode finished in 12 minutes and 28 seconds and shrank the file to 675 MB, with a lower 720×362 resolution and stereo AAC audio.
3. Digitize DVDs with MakeMKV
Best for: MakeMKV is ideal for users who are not sensitive to file size and want to preserve original video quality, chapters, and subtitles. However, its simple interface and ease of use also mean it lacks audio/video parameter adjustment settings.
MakeMKV is the best DVD to digital converter when you want to keep a disc's original video, audio, chapters, and subtitles without re-encoding. This software allows you to convert your physical DVD or Blu-ray discs into a digital format, more specifically a "video_TS" file or MKV file. It can also preserve audio tracks, chapter information, and meta-information.
💻Compatible systems: Windows XP or later & Mac OS X 10.6 and later & Linux x86 or amd64
- Convert discs protected by AACS/BD+
- Convert DVD to digital losslessly
- Preserve chapter and meta information
- MakeMKV is free to use while in Beta
- Only Convert DVD to MKV files
- No video editing options
- It produces video with a large file size
How to Convert DVD to Digital Videos via MakeMKV
Step 1: Insert the DVD that you want to make a digital copy of into your computer's disk drive. Open MakeMKV and select the drive that has your DVD in it. Click the "Open Disk" button and MakeMKV will begin scanning the DVD for titles that can be ripped.
Step 2: Once the scan is complete, MakeMKV will list all the titles found on the disk. Select the titles you wish to rip to your computer. You can choose to rip the entire disk or only specific titles.
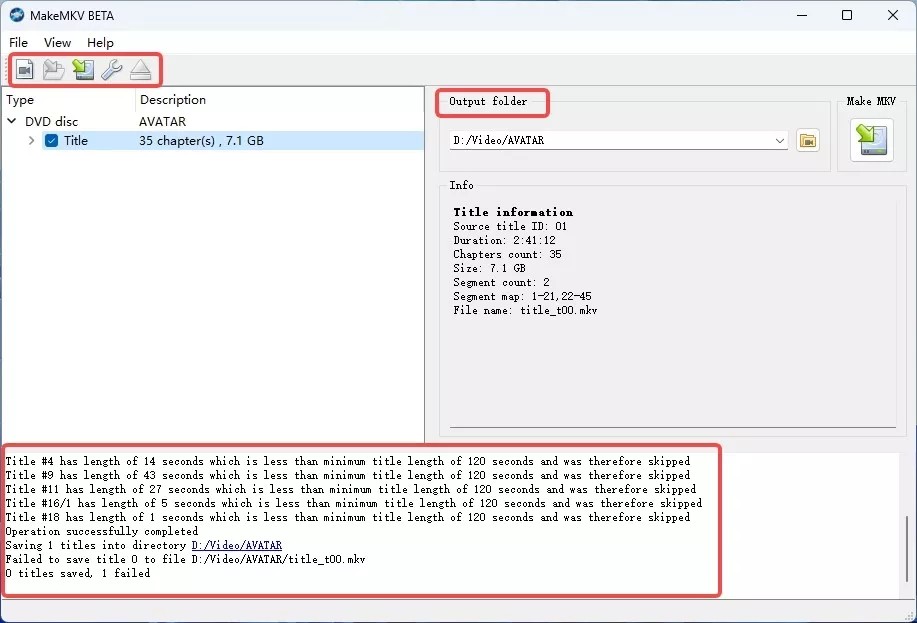
Step 3: Choose the location where you want to save the digital copy on your computer. You can do this by clicking the "Browse" button on the right side of the "Output Folder" field.
Step 4: When everything is set, click the "Make MKV" button on the right side of the program window to convert DVD to digital file.

- MakeMKV ripped a near-identical 6.01GB copy of the source file in 1 minute and 34 seconds. Its retention of the original resolution and AC3 5.1 audio. However, it lacks compression options, so file sizes remain large.
4. Convert DVD Movies to Digital with VLC Media Player
Best For: Casual users with limited budgets who occasionally convert homemade DVDs and don't need advanced video editing features.
VLC's simple interface and robust DVD decoding capability make it an excellent pick for digitizing DVDs. You can convert DVD to WMV, MP4, H.264, H.265, WebM, and various digital formats with this media player. However, there are certain drawbacks. Since it's a dedicted media player with basic DVD-to-digital converter features, it's unable to decrypt a protected DVD, and there is no way to customize the converting process.
💻Compatible systems: Windows, Mac and Linux
- A free option for digitizing DVDs
- Easy to use and suitable for beginners
- Available for multiple operating systems
- Not support copy-protected DVDs
- Compatibility issues with some DVD drives
- Lack advanced features
Steps to Digitize DVDs Using VLC Media Player
Step 1: Download and install VLC Media Player and insert the DVD you want to digitize into your computer.
Step 2: Click on the Media tab in the top left corner of VLC Media Player, and select Convert/Save from the dropdown menu.
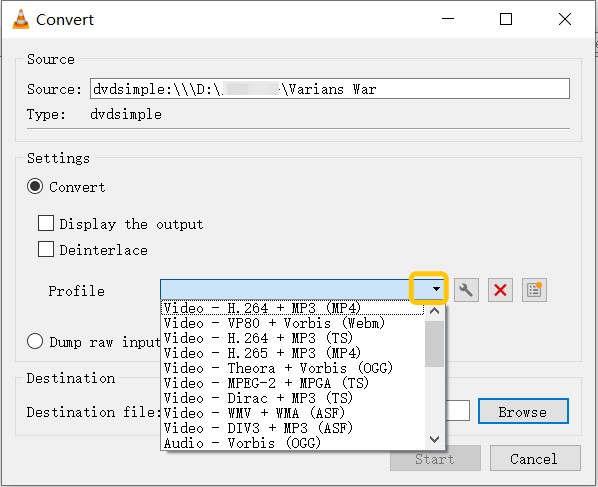
Step 3: In the Convert window that appears, choose a destination folder to save the digitized DVD file, select a video format from the Profile dropdown menu.
💡Tips on how to trim a video in VLC:
To trim a video in VLC, first open VLC and load your video. Activate the "Advanced Controls" by selecting "View" > "Advanced Controls" to reveal additional buttons. Navigate to the starting point of the section you wish to keep and click the red "Record" button, then play the video. Once you reach the desired endpoint, press the "Record" button again to stop. The trimmed segment will be saved in your "Videos" or "My Videos" folder by default. This method allows you to capture and save a specific portion of the video efficiently.
Step 4: Click on the Start button to begin the digitization process.

- Because VLC can not natively decode commercial discs, we utilized a homemade DVD of similar size for fairness and consistency. The rip took about 53 minutes, and we tried four times—the first three failed halfway through. For crucial stuff, I would still use a more specific DVD digitizer, such as DVDFab DVD Ripper.
5. Convert DVD to Digital on Mobile Using Vudu (Fandango at Home)
Vudu Disc to Digital (formerly Fandango at Home) was a service that converted DVD and Blu-ray discs to digital versions. You simply scanned the barcode on your physical movie copies, paid a per-disc conversion fee ($2 to $5 per DVD), and converted them into cloud copies in your Fandango at Home (Vudu) library by scanning the UPC barcode on your phone.
However, due to licensing agreements, Vudu's Disc to Digital service is incompatible with certain DVDs and Blu-ray discs. Copy-protected DVDs, including new releases, Disney movies, and limited edition films, could not be converted. Homemade DVDs cannot be scanned. Additionally, the quality of the disc affected the digital conversion; DVDs could only convert to SD quality, whereas Blu-ray could convert to HD, meaning that the audio and video quality could not be improved.
📲Compatible systems: Android & iOS
- Convert DVDs to digital effortlessly using your mobile device
- No need to use a DVD drive to perform the conversion
- No requirement for manual conversion
- Expensive for a large DVD collection
- Only convert 100 DVDs per year
- Not contain all movies or TV shows in Vudu's library
- Only available in the United States and Mexico
How to Transfer DVD into Digital Using Vudu?
Step 1: To begin, you will need to download the Vudu app on your smartphone or tablet or purchase the Vudu disc to digital conversion software for your computer.
Step 2: Once you have the software or app, simply use the app to scan the barcode on your DVD case.
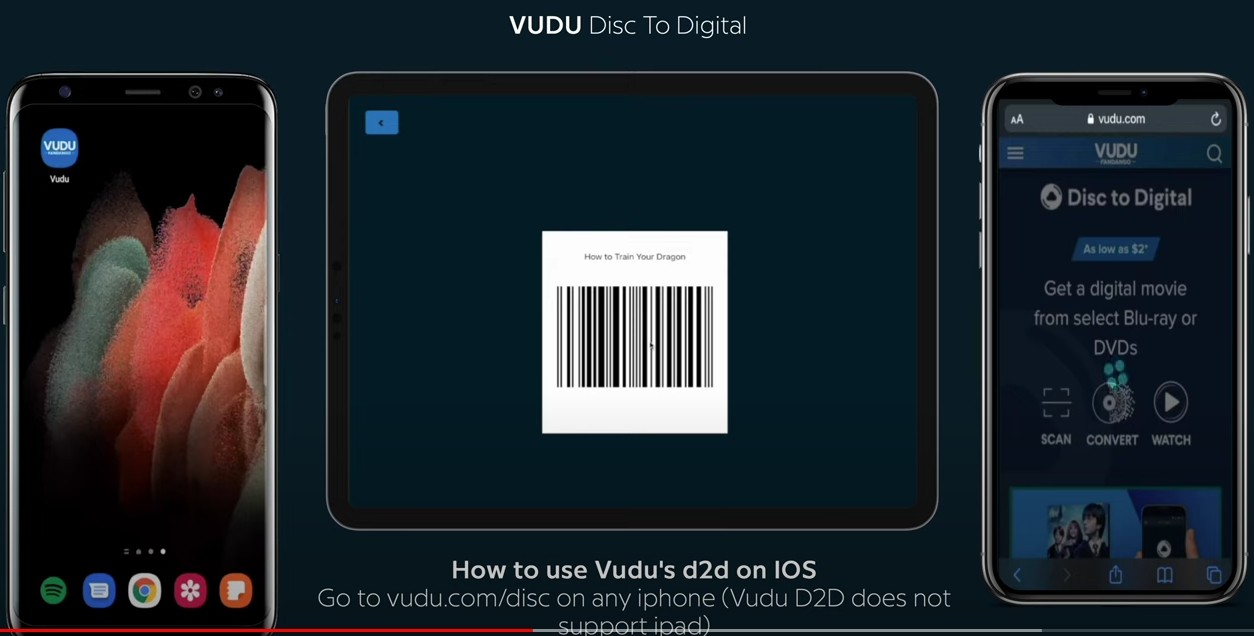
Step 3: After identifying the DVD, you'll have the option to select the conversion quality. You can choose between SD and HDX quality, depending on your preferences.
Step 4: Once you've made your selection, the software or app will convert your DVD into a digital copy. This digital copy will be stored in your Vudu account.
6. Convert DVD to Digital with Conversion Services
Best for: Users who prefer not to handle software themselves lack technical knowledge, and have a small collection of DVD discs. While this service offers a completely hands-off, time-saving solution, it requires a longer processing turnaround.
If you only need to digitize one or two DVDs and don't want to mess with drives or software, professional DVD-to-digital services are a convenient option. Many offer mail-in and in-store drop-off. They typically convert your disc to MP4 and then give you a download link, a USB copy, or upload files to your cloud account. Here are a few well-known providers; for the specific steps on how to digitize DVDs, you'll need to check with each service. The usual flow is: place an order online, mail or drop off the disc, then receive both your originals and the digital files.
- Not limited to DVDs — most services can also handle VHS, VCD, and more.
- No hardware or software setup required
- Pricing is per disc/item, so large-scale digitizing gets expensive.
- Mailing adds turnaround time, especially if you're far from the provider.
- Privacy considerations apply since a third party handles your media.
- Some services may not accept copy-protected commercial titles.
DVDWalmart (Power by Capture)
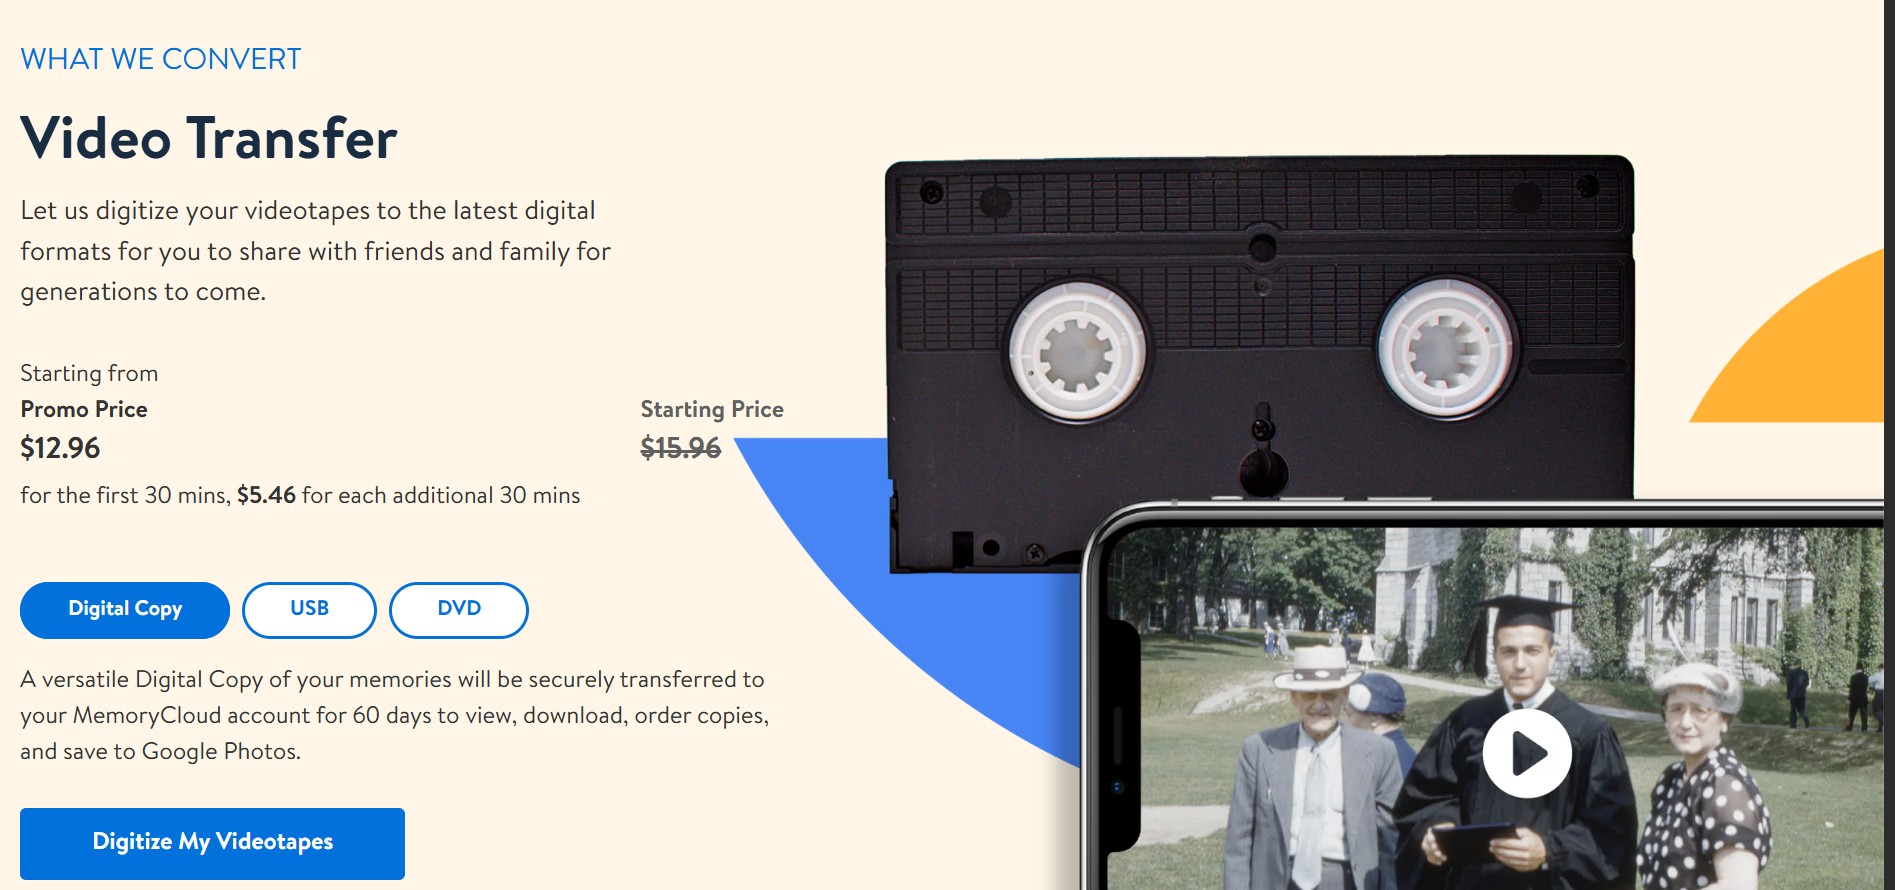
If there's a Walmart Photo counter near you, you can take your DVD there directly and skip mailing time. All you need to do is place an order online or drop the disc at the Walmart Photo/electronics counter; Capture handles the conversion, cloud backup, and return of your originals. You'll get a digital download link, can optionally add a USB copy, and you can save the files to Google Photos for easier album management.
Price: $15.96 (promo price $12.96) for the first 30 minutes per disc, plus $5.46 for each additional 30 minutes
YesVideo

YesVideo provides a mail-in DVD to digital conversion service where you can send in your DVDs, and they will convert them into digital files. You can choose between receiving the digital copies on a USB drive or having them uploaded to an online storage account.
Price: $32.99 (promo price $13.19) per device
Legacybox
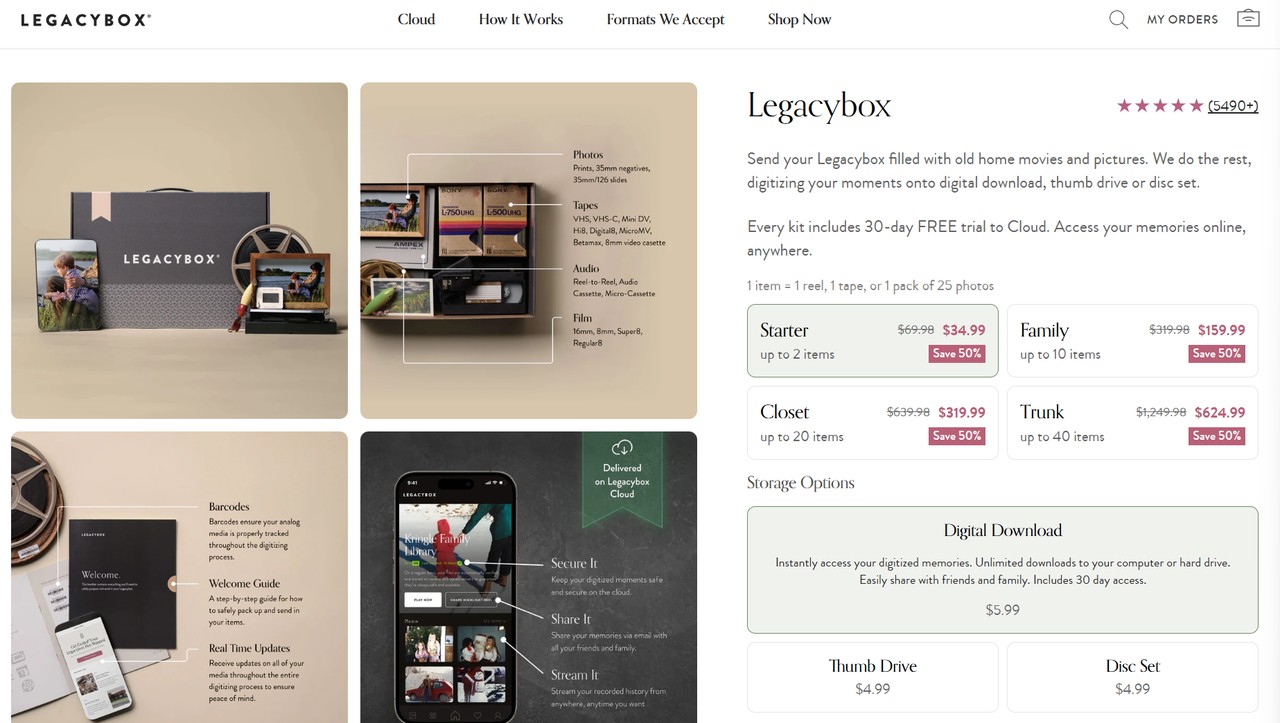
Legacybox offers mail-in DVD conversion services along with other media conversion options. You send in your DVDs, and they convert them to digital format (MP4 files). You can choose to receive the digital files on a USB drive or have them uploaded to the cloud.
Price: Regular pricing shows 2-item kit at $69.98(promo price $34.99); larger kits scale up (frequent promos/BOGO discounts). Pricing is by "item" (1 DVD = 1 item).
iMemories
iMemories allows you to make digital copy of DVD through their mail-in service. Once they receive your DVDs, they convert them to digital files (MP4) and provide you with the option to download the converted files or create DVDs/Blu-rays.
Price: Regularly $29.99 each. The promo price is $14.99 each.

- I placed an order with iMemories to convert three DVDs to digital MP4 files. The results were satisfactory—everything worked properly on both my iPhone and my computer—but it cost me about $45. With that in mind, the value isn't excellent for cinephiles with vast DVD collections; you'd be better off purchasing software and converting DVDs to digital files by yourself, as you won't be paid per disc.
7. Use Hardware to Digitize DVDs with ClearClick Video to Digital Converter
Best for: People who need more than DVD conversions, especially anyone with lots of legacy camcorder tapes to digitize (VHS, Hi8, MiniDV, etc.).
The ClearClick Video To Digital Converter is designed to convert old video tapes, camcorder tapes, VHS, DVD, and more into a digital format. With a recording resolution of SD 720x480 pixels, it enables you to make a digital copy of your old videos from various sources such as VHS, VCR's, DVD Players, DVR's, Camcorders, Hi8, and Retro Gaming Systems. Then you can enjoy your old movie collection on modern devices like your computer, tablet, smartphone, or TV.
- Convert DVD to USB without computer or software
- Smartphone/tablet-friendly MP4 recording format
- Pause or resume while recording
- The machine is expensive
- Unable to convert protected DVDs
- It takes long time to make a digital copy by recording
- No video setting and editing options.
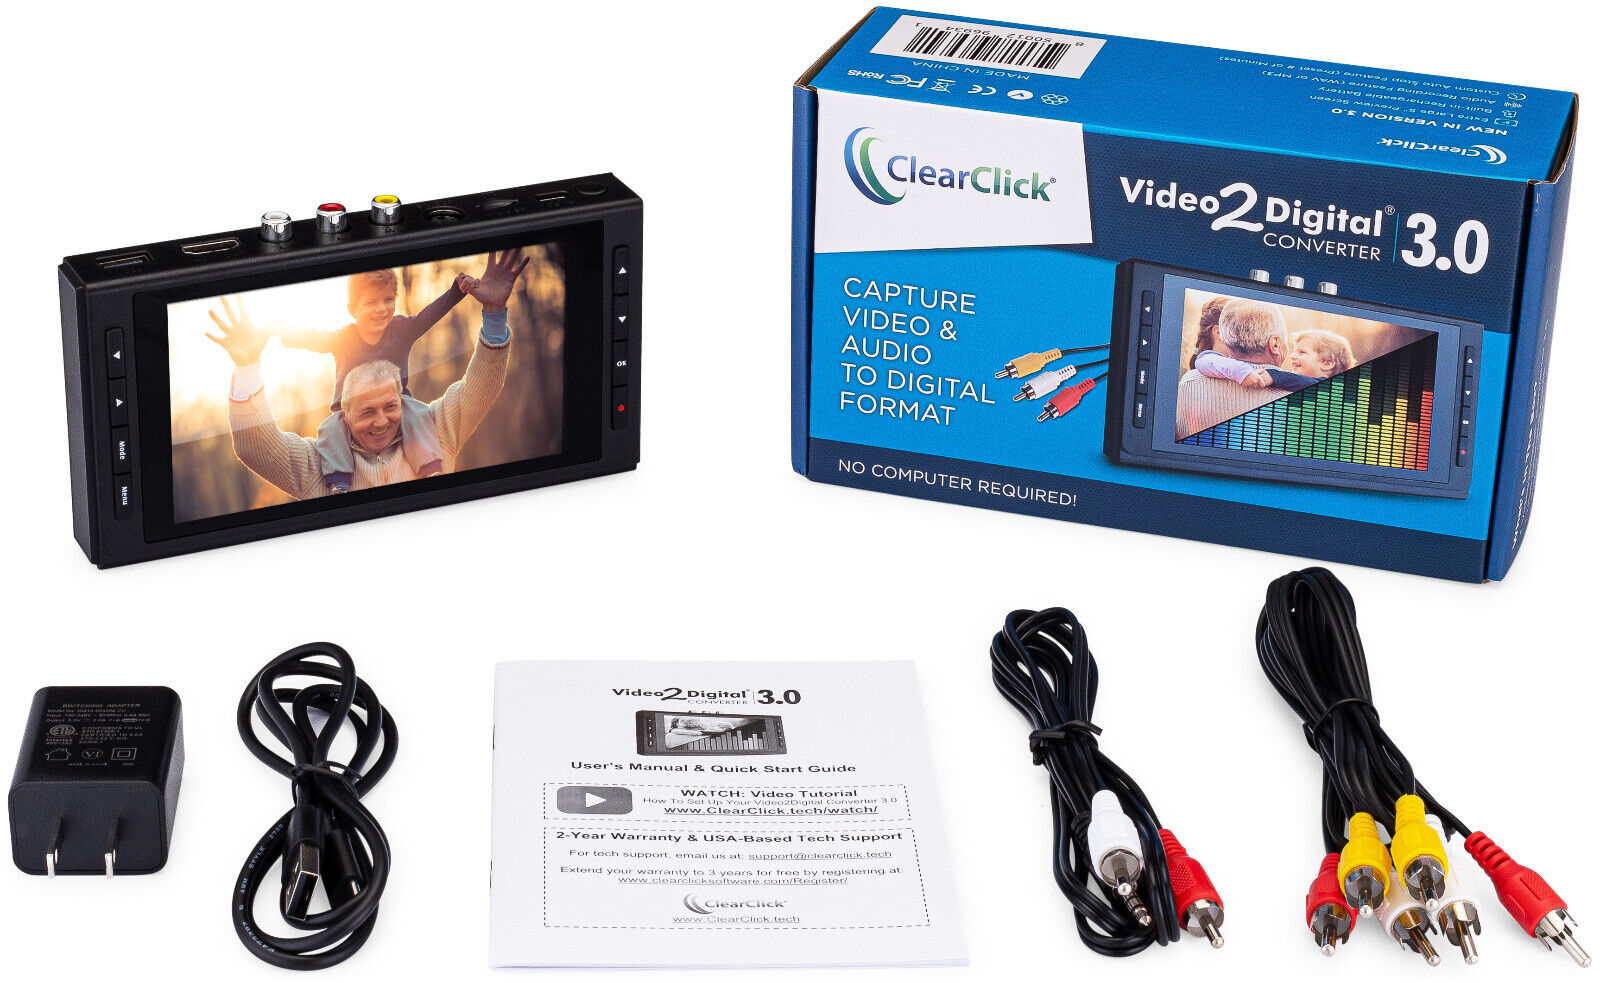
How to Convert DVD to Digital Using ClearClick
Step 1: Connect the Video2Digital Converter 2.0 to your DVD player or any video player with RCA/AV output.
Step 2: Insert a USB flash drive or SD card into the converter where your digital copy will be saved.
Step 3: Press the "Record" button on the converter to start the transfer. You can view the video on the 3.5" LCD screen as it happens. There is no need for a computer in this process.
Step 4: Stop the recording by pressing "Record" again or set the auto-stop to stop recording automatically after a specific time.
Step 5: After stopping, wait 5–10 seconds, then remove the USB/SD card. Plug it into your computer and copy the MP4 files wherever you like and back them up.

- The amount of hardware required makes this solution cumbersome: a DVD to digital capture equipment, a standalone DVD player to load the disc, wires, and so on. It isn't inexpensive, and the transfer is done in real time, so it takes a long time (in our test, including the capturing, it took about three hours). If the gear isn't stored properly, it may also be damaged. Honestly, if you have some basic computer knowledge, you can use user-friendly DVD to digital converter like DVDFab DVD Ripper instead. Today's software workflows are significantly more adaptable: you can change the output quality, apply GPU acceleration, finish in minutes, and there is no additional hardware to store.
Comparison: Which DVD to Digital Method Is Right for You
In the table below, I compare multiple aspects including compatibility, conversion speed, supported DVD types, supported output formats, helping you decide the best way to digitize DVDs.
| Tool | Supported DVDs | Output Format | Devices Preset | GPU Acceleration | Compatibility |
| DVDFab DVD Ripper | Any old or new encrypted DVDs |
1000+ Video & Audio Formats |
260+ | Yes (Intel QSV, NVIDIA CUDA, AMD) | Windows & MacOS |
| HandBrake | Homemade and unencrypted DVD* |
MP4, MKV, WebM | Common device presets | Partial | Windows, Mac, and Linux |
| MakeMKV | Baisc commercial DVDs |
MKV | No | No | Windows, Mac, and Linux |
| VLC Media Player | Homemade and unencrypted DVD |
WMV, MP4, MP3, AVI, etc | No | No | Windows, Mac, and Linux |
| Vudu/Fandango-at-Home | Eligible DVDs & Blu-rays | Cloud copy | N/A | N/A | Mobile app/web (US & Mexico only) |
| DVD to Digital services | Standard DVDs, Blu-rays, and VHS tapes |
MP4, MKV | N/A | N/A | N/A |
| DVD to Digital Hardware | Homemade and unencrypted DVD |
MP4 | N/A | No | Stand-alone device (no PC required to capture) |
| *Ripping copy-protected DVD needs libdvdcss. | |||||
Where to Store Digitized DVD Collection
Digitizing your DVD collection is an excellent way to keep your favorite movies and TV shows accessible and organized. Once you've finished digitizing your DVDs, the next step is to find a way to store them that keeps them safe, secure, and easy to access.
- You can transfer the digitized DVDs to an external hard drive for storage. This is a convenient option as it allows you to access the files easily on different devices.
- You can upload the digitized DVDs to a cloud storage service such as Google Drive, Dropbox, or iCloud. This option provides easy access to your files from anywhere with an internet connection.
- You can also store the digitized DVDs on your computer's internal hard drive. This may be a good option if you have ample storage space available.
- If you have a few DVDs to store, you can use a USB flash drive to transfer the digitized files and keep them safe.
Programs like Plex and All My Movies also come as excellent examples of this type of technology in action. The application will automatically archive and catalog your files if you want to do so.
FAQs
The legality of digitizing a DVD depends on your country's copyright laws. In some countries, creating a digital backup of a DVD you own for personal use is legal. However, distributing or selling that copy is illegal.
On average, a standard DVD takes up 4-9 GB of space. High-definition DVDs may require more space, ranging from 8-15 GB, depending on the output format and quality settings.
You will need a computer or laptop with a DVD drive. In case you don't have it, you can rent a portable DVD drive that can be attached to the computer via a USB port. It's recommended to store the converted files on an external hard drive for easy access and backup.
The most commonly used format for digitizing DVDs is the MP4 format, as it is widely supported by media players and devices. However, you can also choose to digitize your DVDs in other formats such as AVI, WMV, or MKV, depending on your preferences. Some advanced DVD rippers can support many different outputs, and can even convert DVD to Xbox, Wii and other game device, mobile device,etc.
The cost for this service depends on the type of conversion you opt for:
SD (Standard Definition) Conversion:
- DVD to SD: $2 per title
- Blu-ray to SD: $2 per title
HDX (High Definition) Conversion:
- DVD to HDX: $5 per title
- Blu-ray to HDX: $5 per title
Conclusion
Converting DVD to digital is a useful and practical solution for managing and accessing your media collection. Whether you want to preserve your favorite movies and TV shows, or have greater flexibility in terms of playback options, digital files offer numerous advantages.
By following the above-mentioned ways outlined in this article and choosing the right DVD to digital converter like DVD ripping software or hardware, you can easily and effectively digitize DVDs for a more modern and convenient entertainment experience. So, don't hesitate and enjoy the benefits of digital media!

