How to Trim a Video in VLC on Windows and Mac

Summary: VLC can trim a video on both Windows and Mac using its built-in record feature, but the process re-encodes footage and is not built for precise or repeated cuts. This guide walks through the exact steps for each platform, explains the quality trade-offs involved, and notes when a keyframe-based tool such as LosslessCut fits better than VLC.
Table of Contents
VLC is best known as a media player, but it also has a built-in way to cut a clip out of a video without installing anything else. The catch is that the trim tool sits behind a menu most people never open, and the workflow feels unfamiliar the first time you try it. This guide walks through the exact steps to trim video in VLC on both Windows and Mac, what to expect from the output, and when a dedicated tool is a better fit.
How to Trim Video in VLC on Windows
When you use VLC to trim or cut a video, VLC actually records that portion again during playback and saves it as a new file, while the original stays untouched. This is different from a dedicated video editor, which removes parts of a clip directly on a timeline. Here are the steps to trim a video in VLC on Windows.
Step 1: Install the Latest Version of VLC
Visit the VideoLAN website and download the latest version of VLC on your computer.
Step 2: Open Your Video File
Once VLC is installed and launched, open the file you want to trim. There are three easy ways to do this in VLC:
1. Drag and drop the video file directly onto the VLC window.
2. In the main VLC window, click Media > Open File…. Find your video in the file browser and click Open.
3. Press Ctrl + O on your keyboard, find the video file, and open it.
Step 3: Enable Advanced Controls
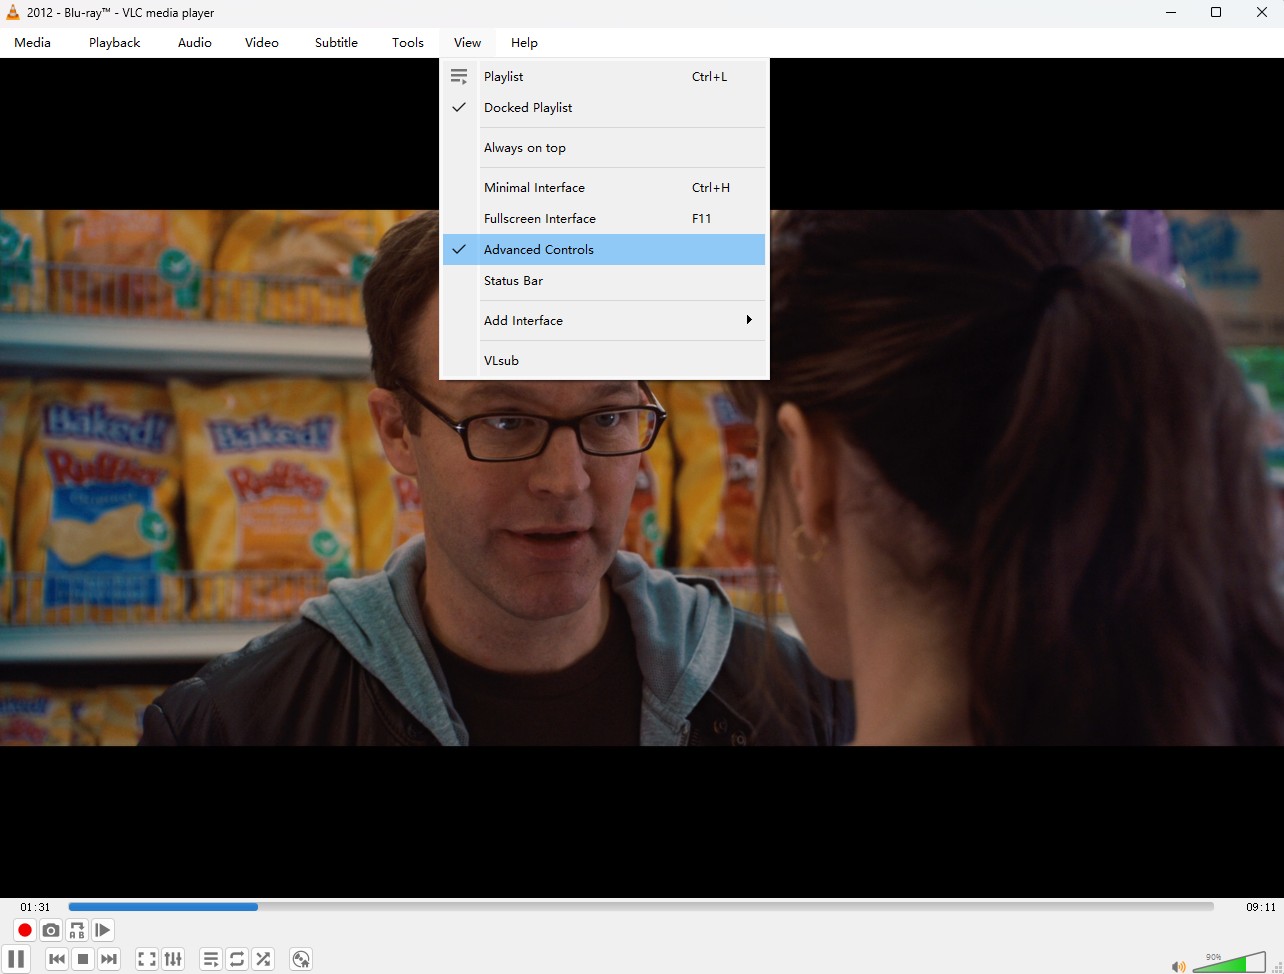
After your file is open in VLC, turn on the module used for trimming. Click View in the menu bar and select Advanced Controls. A new control panel with additional buttons appears just above the standard playback controls.
Step 4: Play and Start Recording
Move to the point where you want the trimmed clip to start. The simplest way is to drag the seek bar to an approximate position. If you do not know the exact time, click Play or press the Space bar to start playback, and pause as soon as you reach the point where you want the recording to begin.
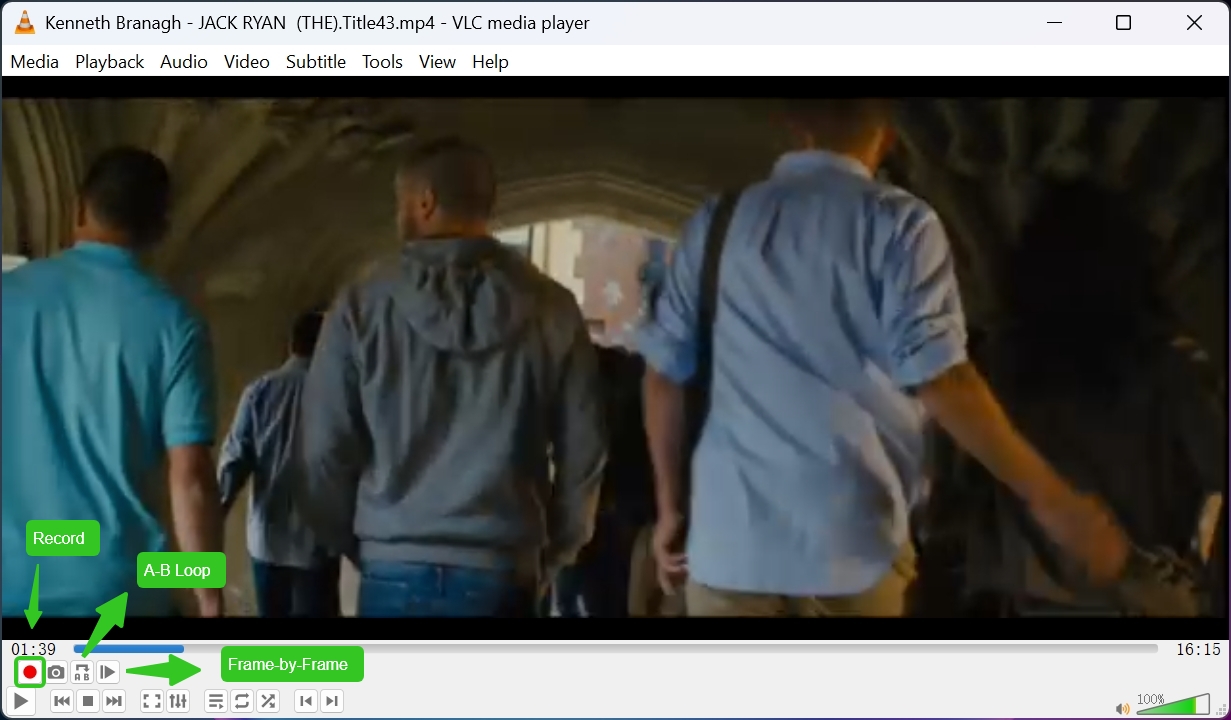
When you have set the starting point, click the Record button or press Shift + R to start recording. After recording starts, the red circle button in the advanced controls changes color, showing that VLC is recording this part of the video for trimming.
Step 5: Stop Recording at the End Point
When you reach the point where you want the trimmed segment to end, press Pause. You can also click Record again or press Shift + R to stop recording.
- You can use VLC's A-B Loop to mark a segment before recording. Click the Loop button, move to your chosen starting point, and press Shift + L to set Point A. Play the video, then press Shift + L again at the desired end point to set Point B. VLC loops between A and B so you can confirm the segment before you start recording that part.
- To trim more accurately, use the frame-by-frame button. Pause the video near the desired start point and click Record, then use the Frame by Frame button (shortcut key E) to move forward one frame at a time. When you reach the exact frame where you want to stop, press Record again to finish the capture. This helps you control the exact end frame of your trimmed clip.
Step 6: Locate Your Trimmed Video
After the recording finishes, VLC does not show a pop-up notification. Instead, it automatically saves the recorded clip to your Videos folder in Windows. The default path is usually C:\Users\[Username]\Videos.
The new file name typically starts with vlc-record-, followed by the date and the original file name, so it is easy to recognize.
If you want to change where trimmed clips are saved, go to Tools > Preferences > Input / Codecs > Files > Record directory or filename, click Browse…, and set a new default save location.
How to Trim Video in VLC on Mac
The steps below show how to trim a video with VLC on Mac.
Step 1: Open VLC on Your Device
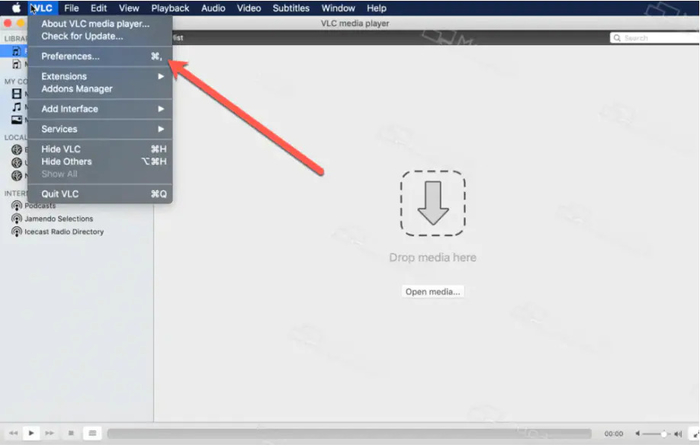
Once VLC is installed using the steps above, open the app to see its main interface.
Step 2: Add the Video to the Playlist
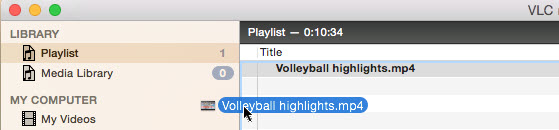
Drag and drop the video into the playlist and start playing it. If playback does not start automatically, double-click the video.
Step 3: Start the Trimming Process

Press the space bar to start playback and move the playhead to the point where you want the trim to begin. Alternatively, open the Playback menu in VLC and click Record. A checkmark appears next to Record, confirming that the start point is set.
To set the end point, press the space bar again to resume playback, pause at the point where you want the clip to end, then click Record again.
Once you set the end point, VLC starts trimming the video in the background, but it does not show a notification when the process finishes.
Step 4: Check the Output Folder
By default, VLC saves recorded clips in the Movies folder on macOS. If you want to choose another location, open VLC > Preferences > Input / Codecs, then set the Record directory or filename field and restart VLC.
Is VLC Really Suitable for Trimming Videos?
Can VLC trim videos? Yes, but VLC is not a full video editor, and it works better for simple trimming tasks than for anything complex. Here are the main limits when you use VLC to trim video:
- There is no batch trimming, so you cannot trim multiple files at once.
- You cannot remove several separate sections within the same video in one pass.
- VLC does not let you split one video into several smaller clips in a single run.
- In practice, trimming in VLC usually means cutting the start and end of a video, not cutting out many precise parts.
There is also a quality trade-off worth knowing about. Because VLC's trim function re-records the selected segment during playback instead of cutting the file directly, the exact start and end points can land a frame or two off from where you paused, and the output goes through a fresh encode rather than a direct copy of the source stream. For a quick, forgiving clip this rarely matters, but it is worth checking the trimmed file's length and audio sync before you rely on it for anything precise.
So VLC can cut video, but both the workflow and the output have real limits. If you need more complex or more precise editing, dedicated video editing software is the better option.
Best Alternative to VLC Video Trimming
Now that you know the limitations of using VLC to cut videos, here are three lightweight alternatives worth considering, depending on what you need most: unchanged quality, DVD support, or a simple free tool.
LosslessCut
LosslessCut takes a different approach from VLC: instead of re-encoding, it cuts directly at the nearest keyframe, so trimming a large MP4 or MKV file takes seconds and the output keeps the source quality unchanged. The trade-off is that a cut can only land on a keyframe, so the exact start or end point may be off by a fraction of a second compared with VLC's frame-by-frame recording method. LosslessCut is free, open-source, and available on Windows, Mac, and Linux, which makes it a solid pick when trim speed and unchanged quality matter more than frame-level precision.
Avidemux
Compared with using VLC's recording feature as a workaround, Avidemux is a tool built specifically for video cutting. It imports common formats such as MP4, MKV, and AVI, uses A/B markers on the timeline to select and remove unwanted parts, and can output in Copy mode for a fast, near-lossless result. Like VLC, Avidemux is open source and free, and it supports Windows, Linux, and macOS, with active nightly builds and codec updates still shipping in 2026.
DVDFab DVD Ripper
VLC can play, trim, and rip DVDs with VLC, but most VLC alternatives, including Avidemux and LosslessCut, do not support trimming content directly from a DVD. For that specific case, what you need is a DVD ripper with built-in trimming features, such as DVDFab DVD Ripper.
DVDFab DVD Ripper converts both homemade and encrypted DVD videos into various formats such as MP4, and it also offers a set of video editing features such as trimming, rotating, and adding filters. It aims to keep output quality high while giving you flexible editing options.
More Features:
- Remove common DVD copy protection for unrestricted access
- Rip DVDs to lossless-quality video and audio, suited for home theater use
- Compress videos to smaller files while retaining maximum video quality
- Rip DVD/ISO/Folder to 1,000+ video and audio formats
- Speed up DVD ripping with GPU acceleration
How to Trim Video with DVDFab DVD Ripper
Step 1: Download and Launch DVDFab DVD Ripper
Free Download macOS 10.13 - 15.x
Step 2: Open the Ripper Module and Add the File
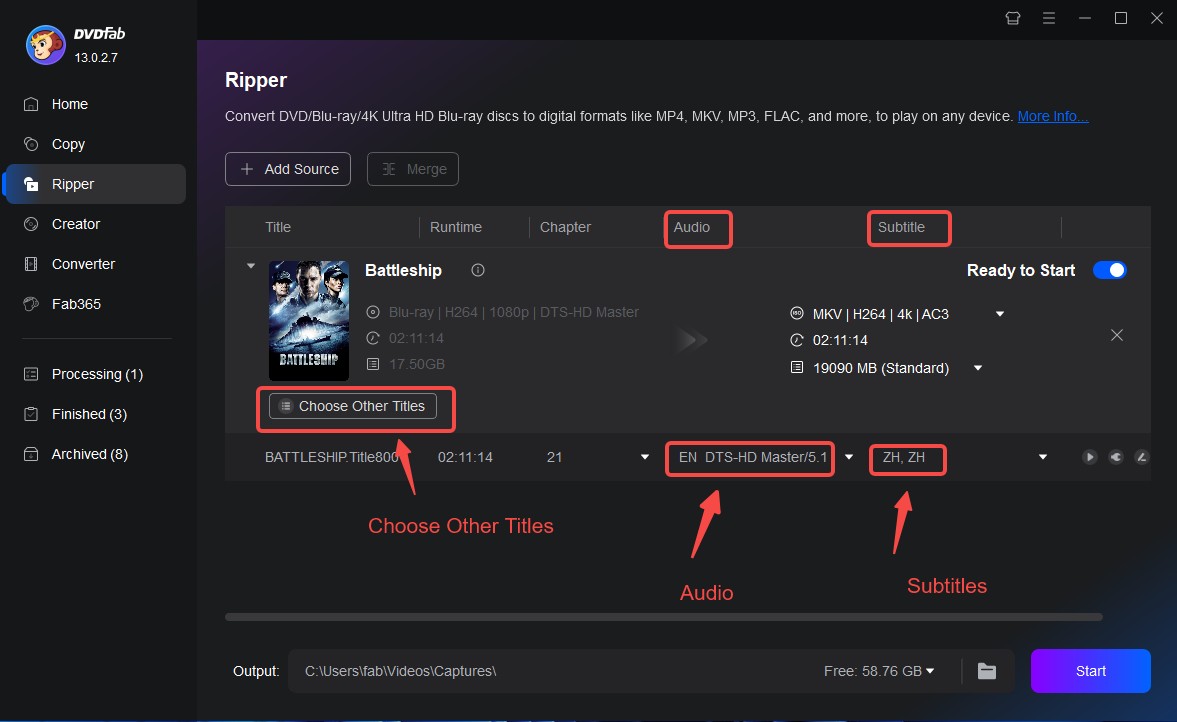
To trim the video file, tap the Ripper module and add the video file using the + icon.
Step 3: Select the Output Video Format
Select the output format from the list of options. You can convert your DVD to MP4, AVI, MOV, MKV, and more. Tick Choose Other Profile before clicking the Start button.
Step 4: Trim the DVD Video
DVDFab lets you rip and edit DVDs in one pass. The main functions of the video editor are as follows.
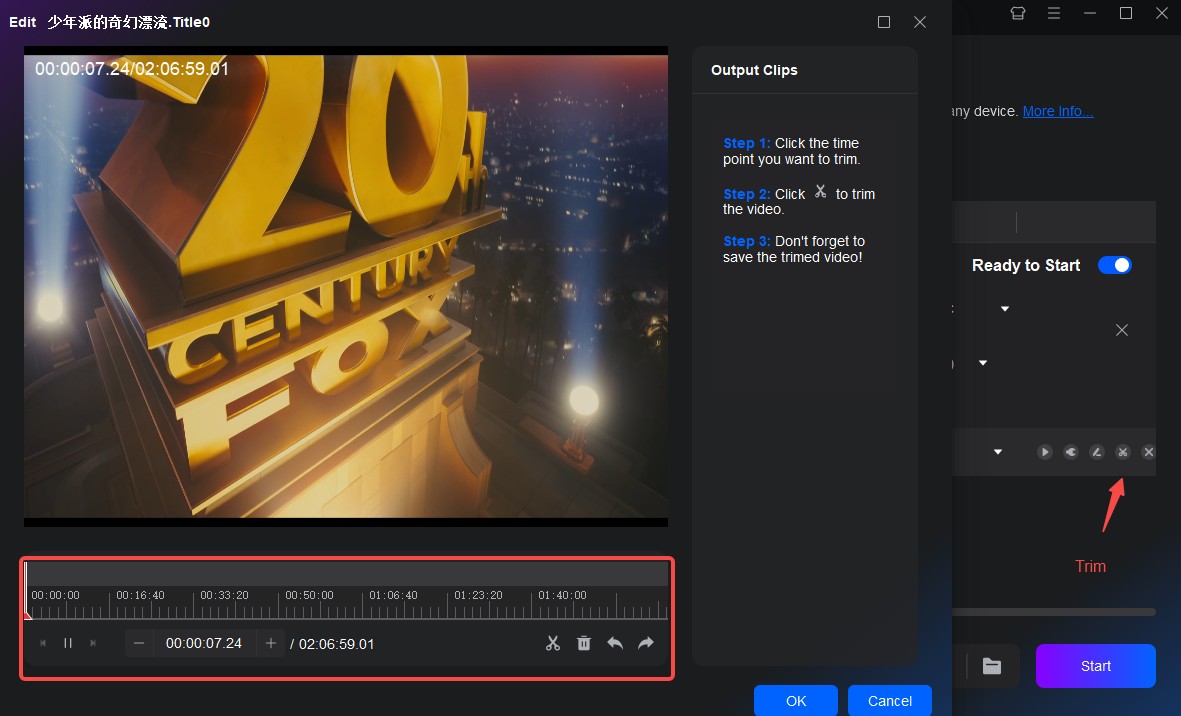
1. Trim: Use this function to remove scenes you do not want in the final ripped video. It also supports multiple trims at once: click the "Trim Tool" button to apply a trim section on the video timeline, move the "Blue T Marker" out of the current trim section, and click the trim tool button again to add another trim section. Use "Trim Invert" to select the video parts outside the trim sections instead.
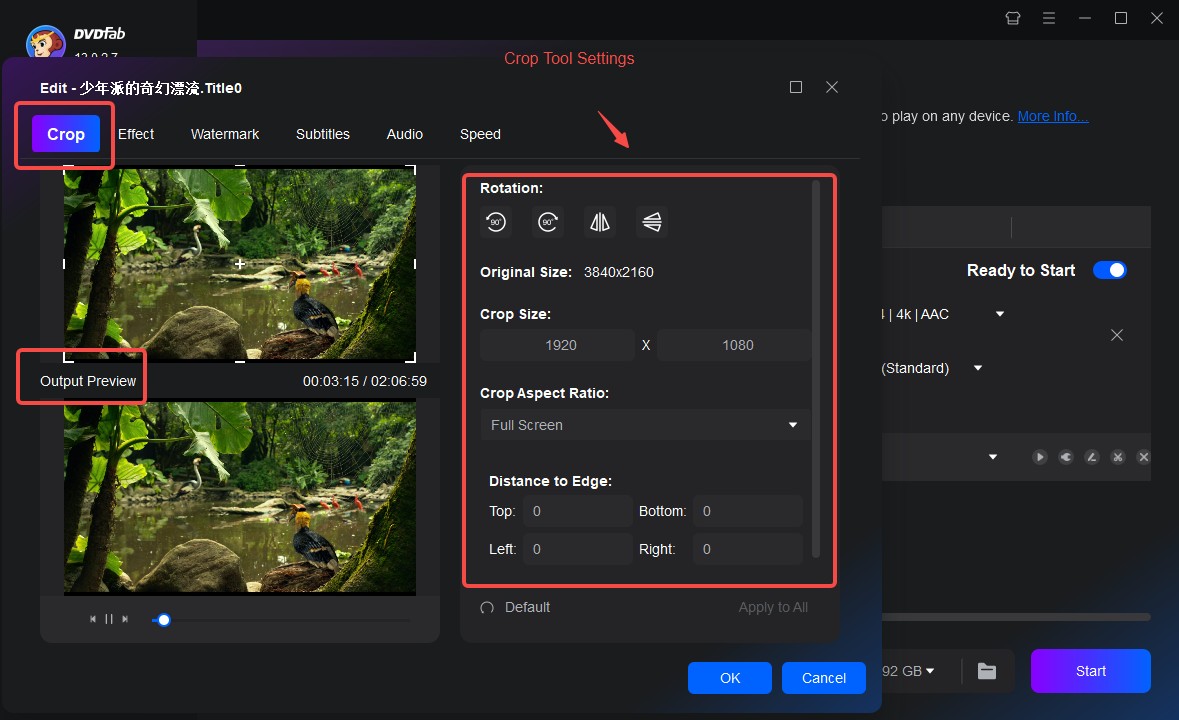
2. Crop: Click Crop and drag the white edges toward the center of the source video's frame to set the crop area. Preview the cropped video on the right side.
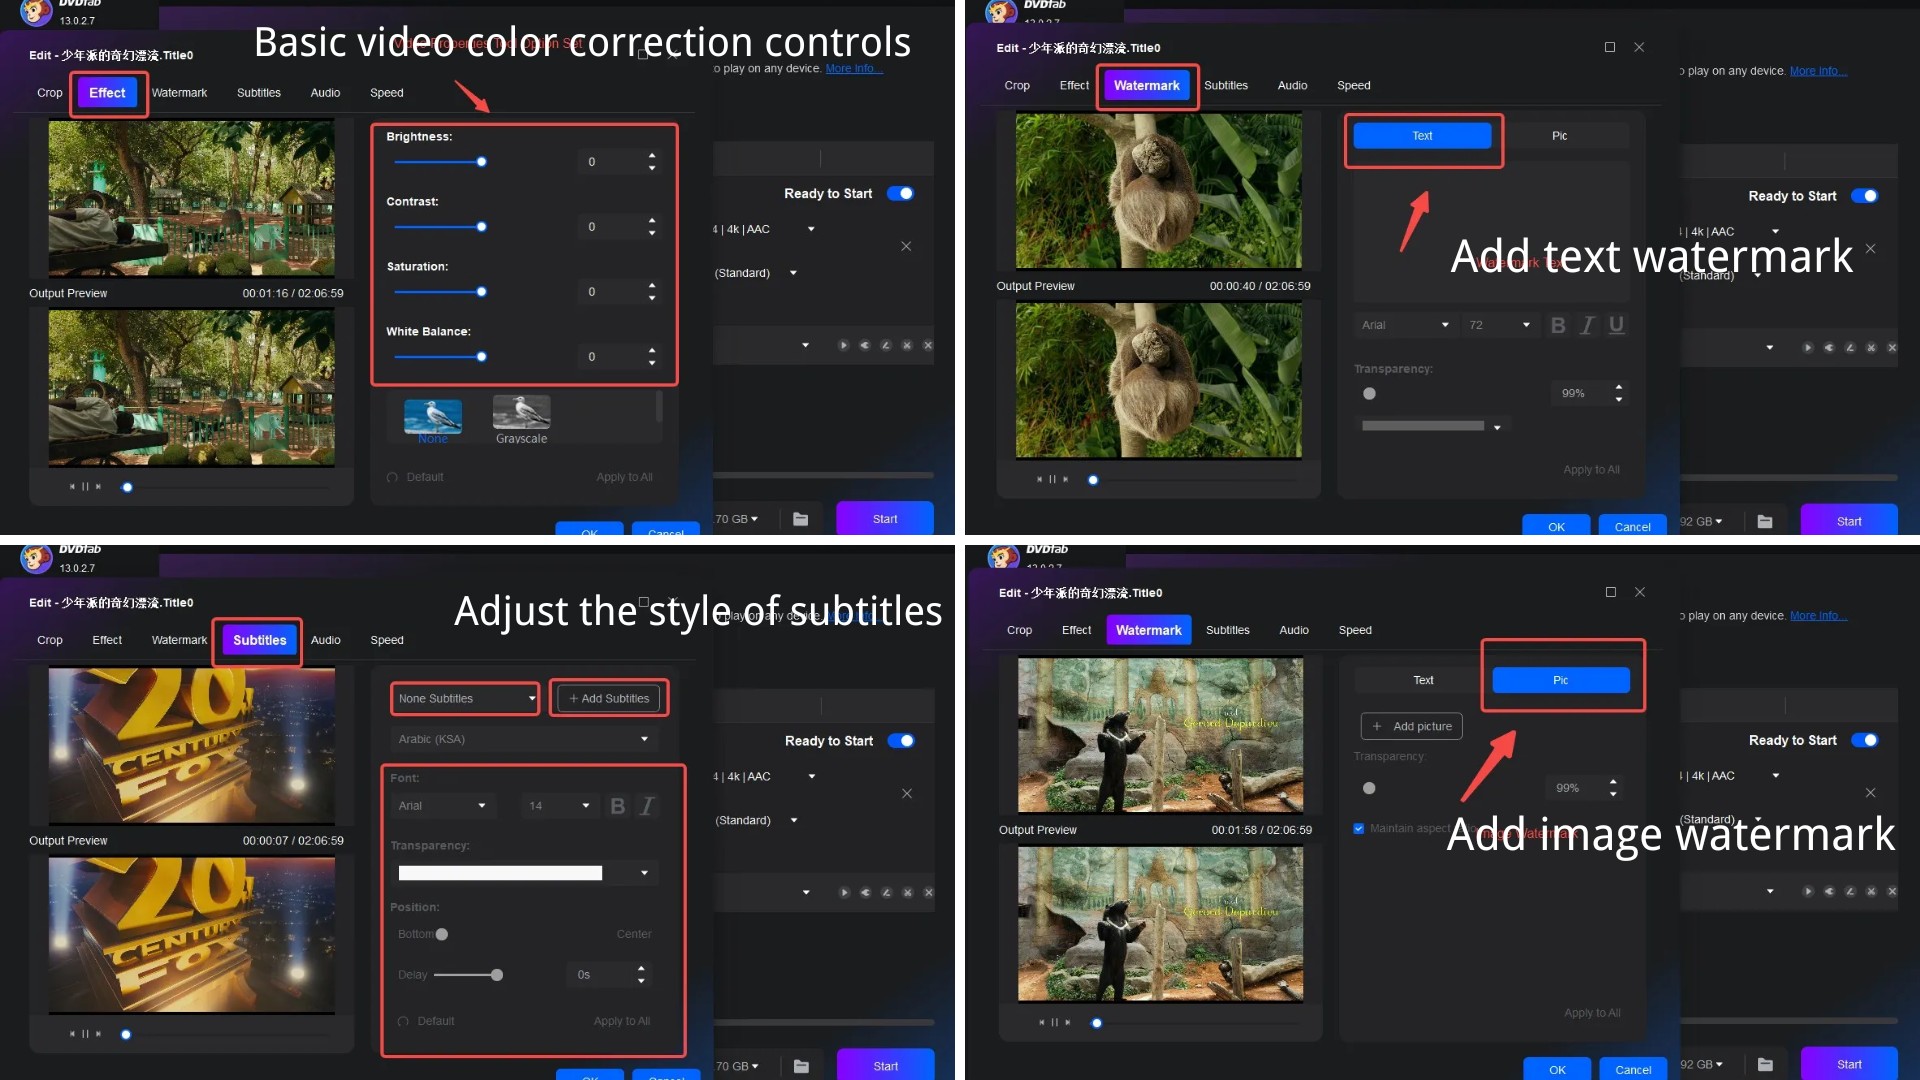
3. Other features in the video edit module: You can add subtitles and adjust their style, change basic video properties such as brightness, contrast, and saturation, and rotate the video 90 degrees left or right. You can also apply text or image watermarks and adjust their style, size, position, and transparency before ripping.
Step 5: Start Trimming and Ripping
Select a target such as Mobile Device, Folder, or Social Media to save the trimmed video, then click Start to begin processing.
FAQs
Can VLC media player perform advanced video editing tasks?
No. VLC offers basic functions such as cropping and simple filters, but it does not include the full set of tools needed for professional video editing, such as special effects and precise control over audio and video.
Does trimming a video with VLC reduce its quality?
It can, though usually only slightly. VLC's trim feature works by re-recording the selected segment during playback rather than cutting the source file directly, so the output goes through a decode-and-re-encode pass. For most everyday clips the difference is not noticeable, but if you need the output to match the source quality exactly, a keyframe-based tool such as LosslessCut skips the re-encoding step entirely.
Can I trim a video frame by frame in VLC?
Yes, within limits. After you start recording, use the frame-by-frame button (shortcut key E) to step forward one frame at a time and stop the recording at the exact frame you want. This gives more control than dragging the seek bar, but it only helps you land one precise end point per recording, not multiple precise cuts at once.
Can I trim video using VLC on a mobile device?
No. You cannot trim video with VLC on a mobile device. The VLC app for Android and iOS is mainly for media playback and does not include the editing features found in the desktop version. If you need to trim videos on your phone, you will need a dedicated video editing app.
Final Thoughts
VLC's trim feature works well for a quick, one-off clip when you already have the player open and do not want to install anything else. Once you need multiple cuts, batch processing, or frame-accurate results, the record-based workflow becomes the bottleneck rather than the video itself.
If output quality and cut speed matter more than a full editing suite, LosslessCut is worth trying first, since it skips re-encoding entirely. For DVD sources specifically, a ripper with built-in trimming, such as DVDFab DVD Ripper, saves you a separate conversion step.

![How to Rip DVDs for Plex: Guide to Formats, Tools, and Library Setup [2026]](https://images.dvdfab.cn/media/Screenshot_2026-09-08_at_18.53.34_j36v3l.png/public) How to Rip DVDs for Plex: Guide to Formats, Tools, and Library Setup [2026]By Diana Smith - Sep 8, 2026
How to Rip DVDs for Plex: Guide to Formats, Tools, and Library Setup [2026]By Diana Smith - Sep 8, 2026![Top 12 DVD to MP4 Converter Software for Win & Mac [2026 Tested]](https://r3.dvdfab.cn/upload/resource/convert-dvd-to-mp4-p2X3.jpeg) Top 12 DVD to MP4 Converter Software for Win & Mac [2026 Tested]By Diana Smith - Sep 4, 2026
Top 12 DVD to MP4 Converter Software for Win & Mac [2026 Tested]By Diana Smith - Sep 4, 2026 10 Best DVD Rippers for Windows & macOS: 2026 TestedBy Diana Smith - Sep 2, 2026
![How to Rip Audio from DVD with 5 Best Free DVD Audio Extractors [2026]](https://images.dvdfab.cn/media/how_to_rip_audio_from_dvd_5r8iyw.png/public) How to Rip Audio from DVD with 5 Best Free DVD Audio Extractors [2026]By Diana Smith - Aug 31, 2026
How to Rip Audio from DVD with 5 Best Free DVD Audio Extractors [2026]By Diana Smith - Aug 31, 2026