How to Rip DVD with VLC Media Player on Windows and Mac
Summary: This article reviews VLC Media Player and provides a step-by-step guide on how to rip DVDs with VLC on Mac and Windows. Moreover, it provides troubleshooting tips for common problems users may encounter when ripping DVDs with VLC.
Table of Contents
VLC is one of the most popular media player applications to date. And what you may not know is that besides letting you play your favorite videos, VLC Media Player also allows you to convert DVD to MKV and other digital files. Apart from MakeMKV and HandBrake, VLC is arguably the third popular free DVD ripper among users.
Here we will provide all the information about how to rip a DVD with VLC. In addition, if you have encountered unfixable errors in the process of using VLC DVD Ripper, we have also provided you with alternative solutions. Therefore, let's get into the main text.
How to Rip DVD with VLC on macOS or Windows
Actually, VLC is not a specialized software for ripping DVDs, so many users can't find the entrance as well as don't know how to perform the complete conversion process. Don't worry. Just follow the steps mentioned below, and you will be able to rip DVD files using VLC with ease.
How to Use VLC to Rip DVD on MacOS
Step 1: Install VLC
Download the latest version of VLC Media Player on your Mac from the official website.
Step 2: Load the DVD to VLC
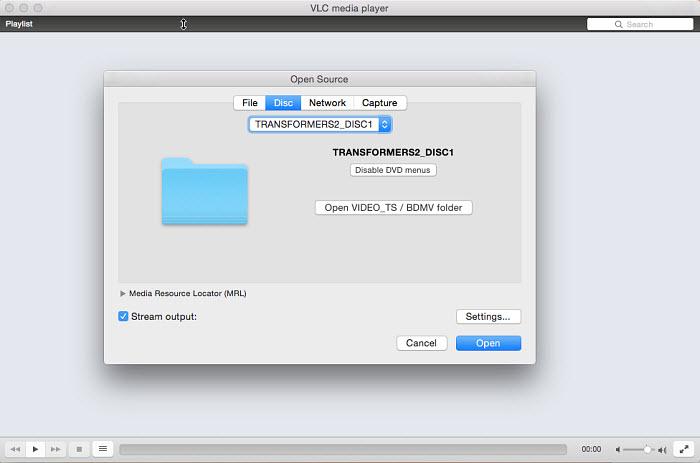
Insert the DVD you want to rip into your Mac's optical drive. Open VLC Media Player. In the main VLC interface, select Open Media. In the Open Source window, click the Disc tab and select the DVD you just inserted into the Mac's DVD drive.
Step 3: Disable DVD Menus
Next, click the "Disable DVD menus" button to prevent VLC from getting stuck in a loop while ripping the DVD menu. Then, enter the correct title and chapter of the DVD. If you're unsure of the title or chapter, you can play the DVD in a player and note the title/chapter number that is currently playing.
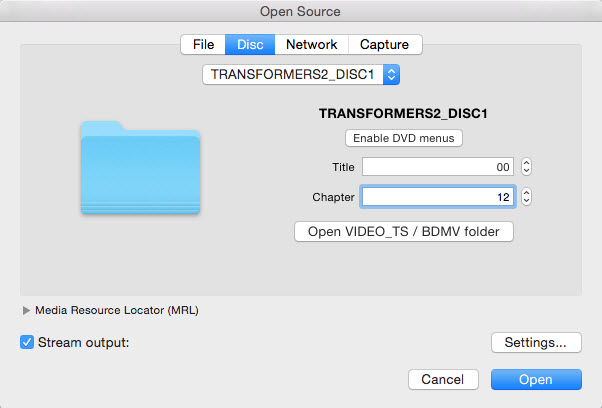
Step 4: Configure DVD Ripping Settings
Next, click the "Stream output" option, followed by the "Settings" button to open the output settings window. Click the "Browse" button to select the destination folder on your Mac where you want to save the ripped DVD video file. Then, navigate to the "Encapsulation Method" and Transcoding options to choose the format you want to use for ripping the DVD with VLC.
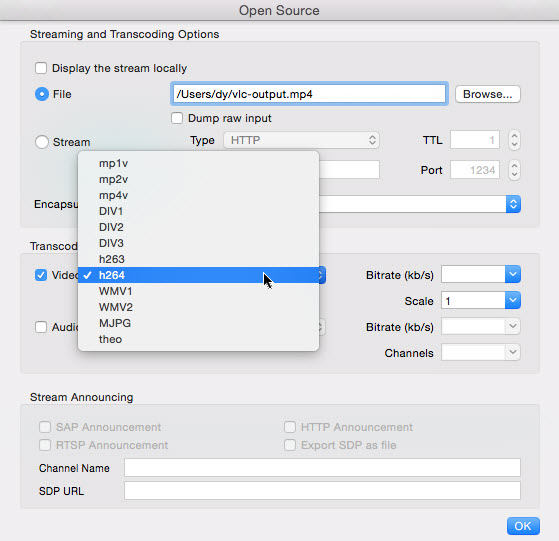
Step 5: Start Ripping DVD
After the above settings, click the "Open" button and VLC will start ripping the DVD. The progress of the ripping process will be displayed in the VLC interface.
How to Rip a DVD with VLC on Windows
Step 1: If you have not downloaded the VLC Media Player on your computer yet, you need to download the setup file first. Once the application has been installed, launch VLC and follow the next steps.
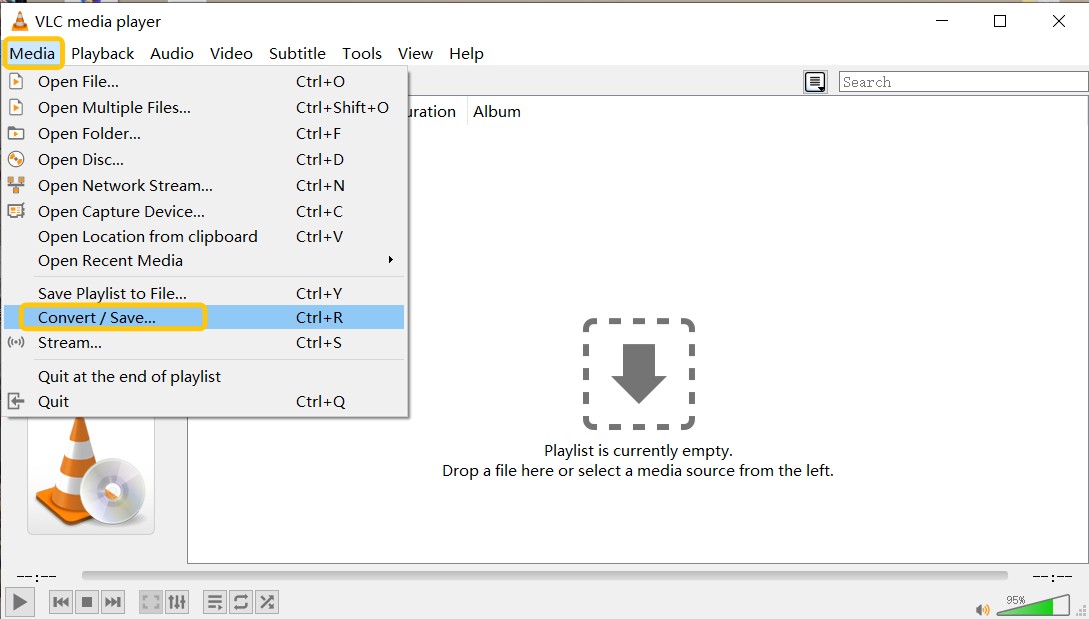
Step 2: Spot the “Media” icon present on the top-right bar. A drop-down menu will appear, and select the “Convert/Save” option displayed towards the end of the menu. Or, you can save the hassle, and simply press the following combination: “Ctrl + R”.
Step 3: Select the “Disc” option present in the “Open Media” window that opened after you selected the Convert/Save option discussed in the previous step.
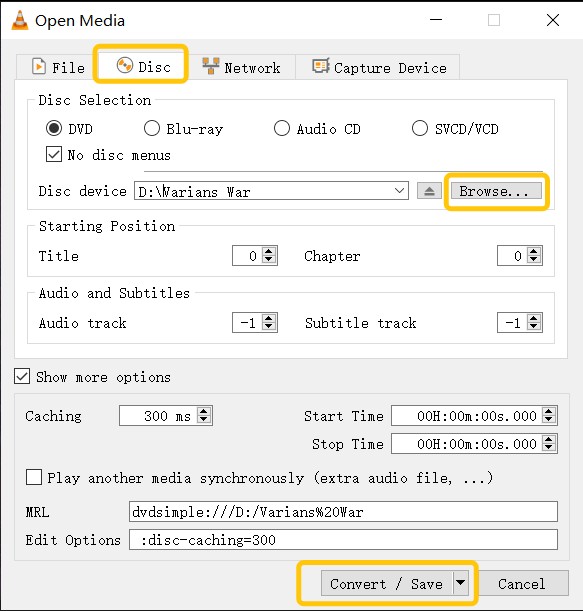
Select the file format that you want to rip. Once you have selected your preferred file format, spot the “Disc Drive” option. Click on the “Browse” option, and select the correct path that actually points to your DVD file.
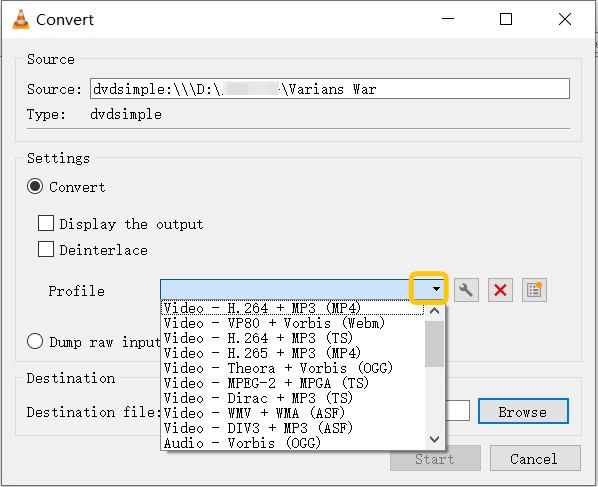
Step 4: After you have ensured the correct file path, manage the other settings as per your own requirements, or leave them as they are if you have no idea how to tweak these settings.
Step 5: Once you have made all the changes as per your needs, and requirements hit the “Convert/Save” option. The VLC Media Player would then start extracting audio from DVDs.
VLC DVD Ripper: Pros, Cons and Troubleshooting
DVD Ripping is a feature within VLC Media Player that allows users to extract content from DVDs. This tool enables the conversion of DVD video and audio into various digital formats, making it easier to store and play on different devices.
However, many users have complained online that using VLC is not as easy as expected, instead they have encountered a variety of errors. Next, we will clarify the strengths and weaknesses of VLC as a DVD ripping software. In addition, we collect the common problems encountered by users and make targeted suggestions.
Pros and Cons of VLC DVD Ripper
- VLC is completely free to use, with no hidden costs or advertisements.
- Available on various operating systems, including Windows, macOS, Linux, iOS, and Android.
- Includes features like media conversion, DVD ripping, streaming, and screen recording.
- It lacks advanced ripping options, such as batch processing or detailed customization of output settings.
- Some users may experience slow ripping speeds or performance hiccups, especially with complex DVDs.
- VLC does not handle encrypted DVDs by default, requiring additional steps or tools to rip protected content.
- The user interface may not be as intuitive for those unfamiliar with VLC or media conversion tools.
Errors and Troubleshooting of VLC DVD Ripper
| Errors | Reasons or Suggestions |
|---|---|
| Cannot enable subtitles |
|
| DVD loading failed | VLC does not support decrypting your DVDs, which requires installing libdvdcss |
| Skipping or Freezing | The ripping process may skip or freeze, often due to scratches or damage on the DVD. |
| Audio-Video Sync Issues | Despite installing libdvdcss, VLC is still unable to access partially encrypted DVDs, and you need a more efficient decryptor. |
| Incomplete Ripping | Check for scratches or other damage on the DVD |
| Slow ripping speed | Please adjust the video resolution, frame rate and other settings to speed up ripping. |
| Ripping DVD video without audio |
|
| Audio and video not synchronized |
|
Best VLC Alternative: DVDFab DVD Ripping Software
We have discussed how to rip DVDs with VLC Media Player, and what to do if the ripping fails. If all the above solutions don't work, then you may have to look for a professional DVD ripper to avoid these problems.
DVDFab DVD Ripper is currently one of the best software for ripping DVD to 1000+ video and audio files. When using this DVD ripping software, you can convert any DVD into popular format as per your requirements or needs in just under 5 minutes. The excellent conversion feature allows you to enjoy your content in notch quality across platforms including computers, home theaters, or projectors.
- Supports multiple output formats with the latest decryption technology
- Users can choose different quality settings for the converted files
- Trim, crop, add subtitles and watermarks to videos before conversion
- Customize your viewing experience by selecting specific audio tracks and subtitles
- Employs advanced GPU acceleration technology that allows users to convert DVDs faster
How to Rip DVD Using DVDFab DVD Ripper?
Now let us have a look at the complete user guide on how to digitize a DVD using this software.
Step 1: Downloading the DVDFab Software
Just head on to the DVDFab official website, and you will see the “Download” button. Or just click on the download button below.
Step 2: Load the DVD, and Select the Ripper Module
Once the application has loaded successfully, spot the “Ripper” option, present on the top of the window.
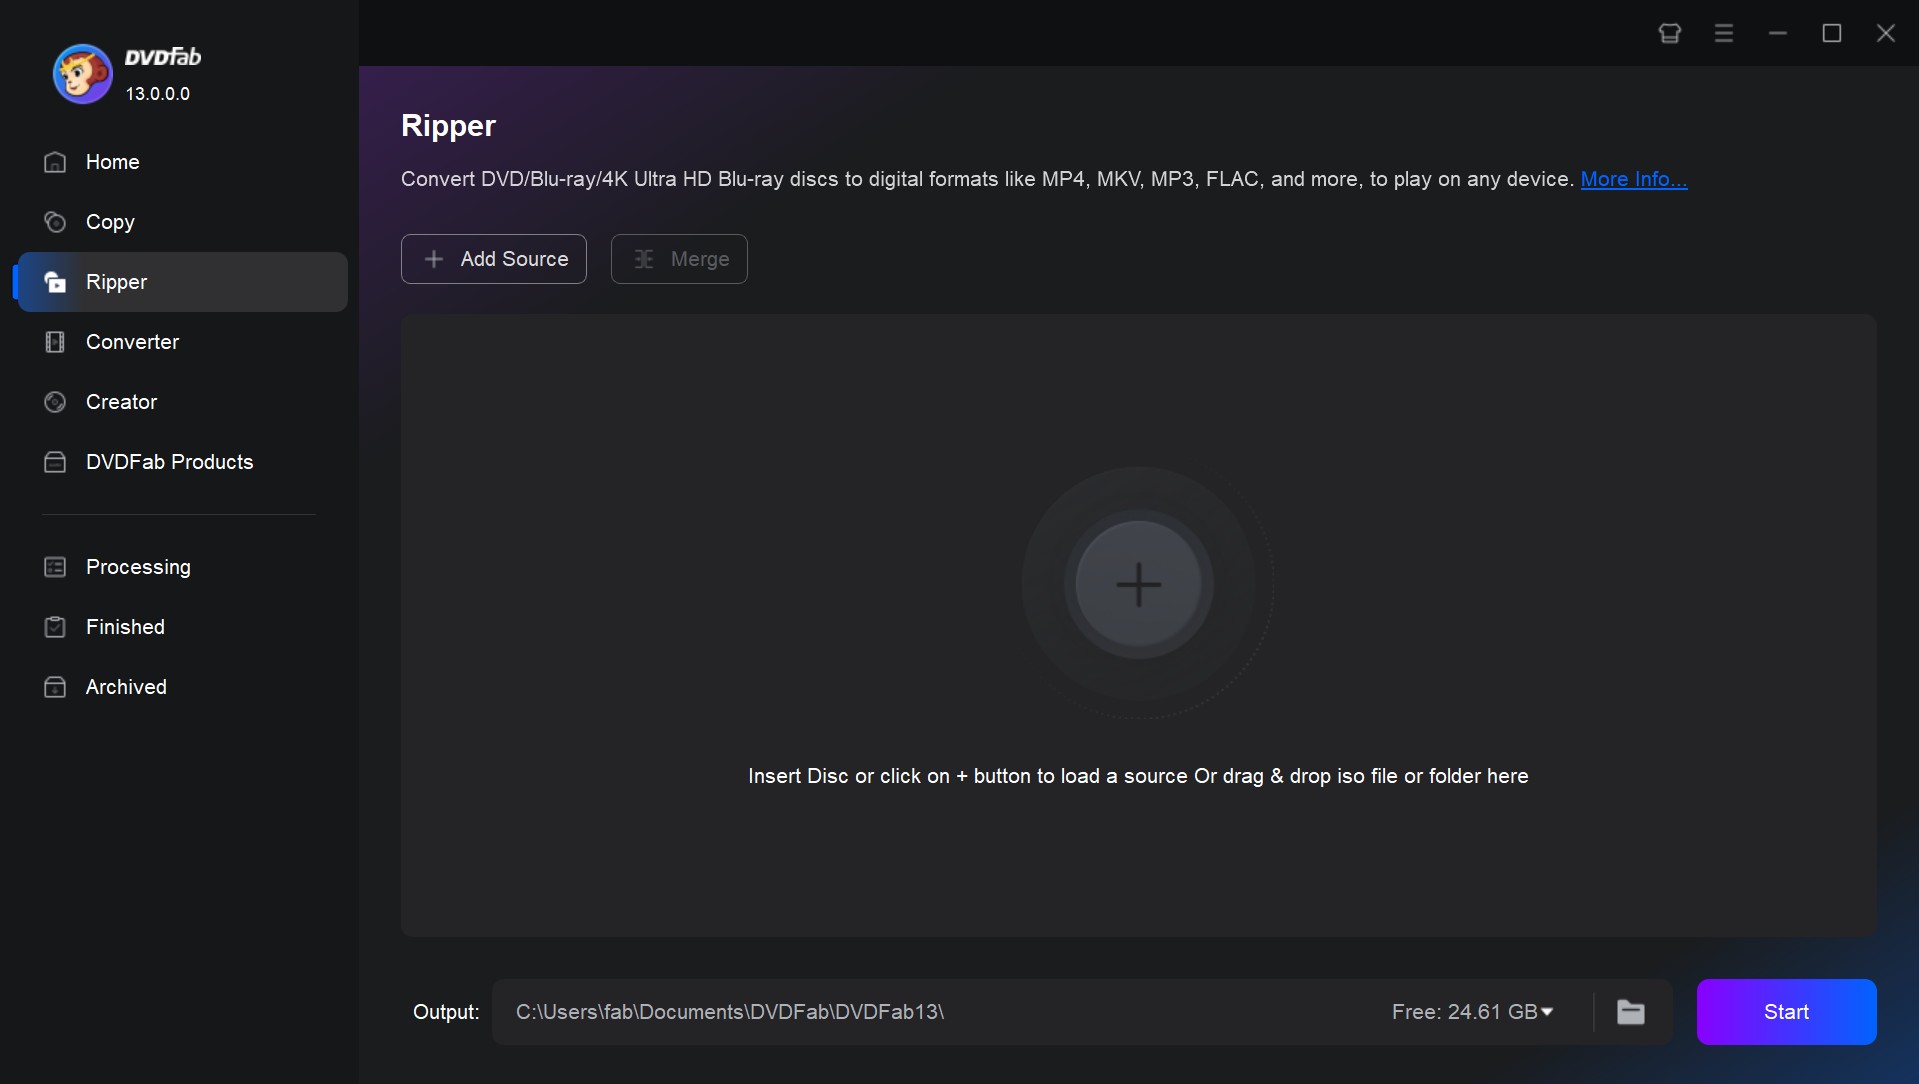
Step 3: Add the DVD Disc or the ISO/folder File
Once you have selected the “Ripper” option, it is time to add the files to the application. When it comes to adding files for the Ripping process, you have two options: you can either select the “+Add” option present on the top-left corner of the window, or you can press the huge “+” icon on the center of the page.
Step 4: Select the Output Video Format
Once you have loaded the files and made the settings, you need to select the output format of the DVD file that you want to rip. To select the output format, select the “Other Profile” Option, and then, click on the “Format” option, followed by the “Video” option. If you have no idea which format to select, converting DVD to MP4 is always a good choice.
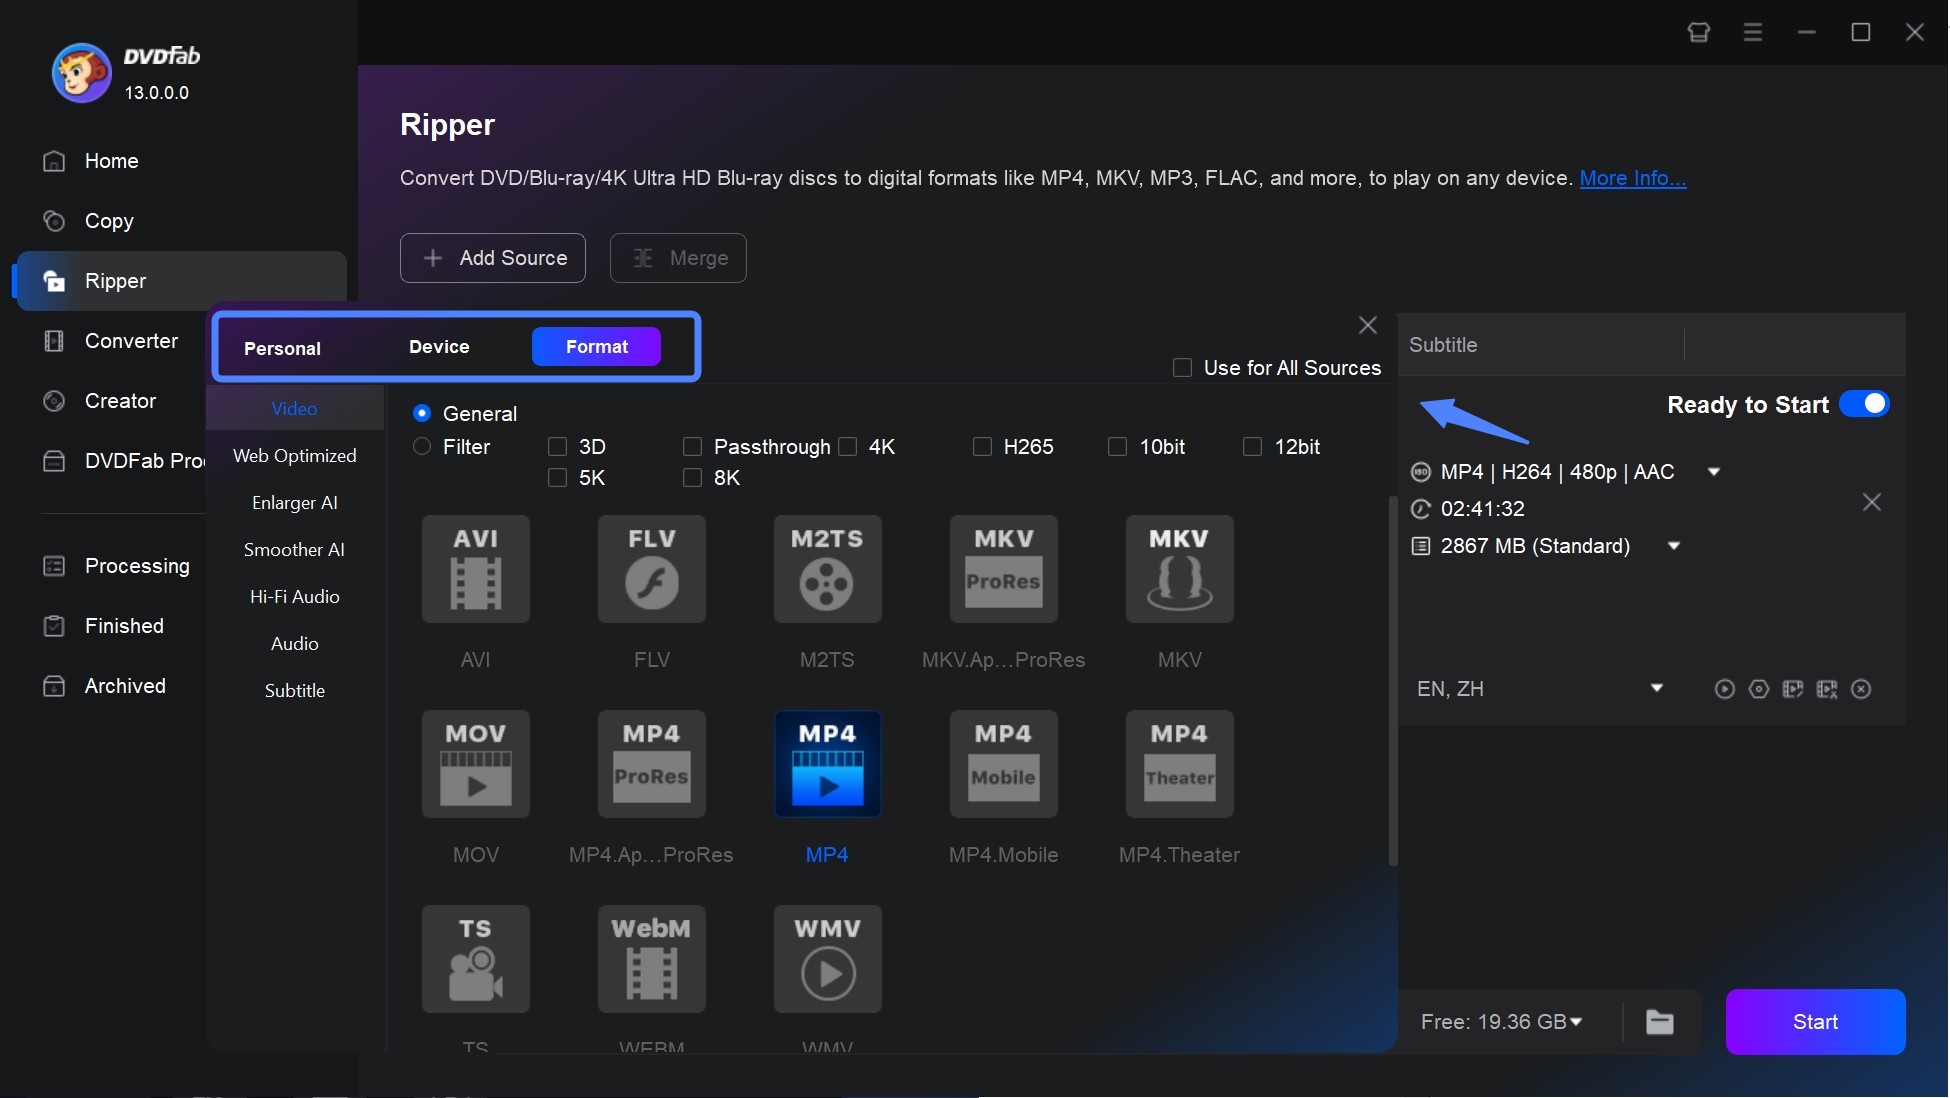
Step 5: Manage the quality of the output video
You also have the option of improving the quality of the output video. If selecting the Advanced Settings option, you will be able to adjust the following settings: Frame Rate, Split, Resolution, Video Quality, Encoding Methods, Bit Rate, Subtitle settings, and more.
Moreover, the Video Edit feature allows you to add images, texts, or subtitles to your video file. It also allows you to trim or merge video files as per your preference.
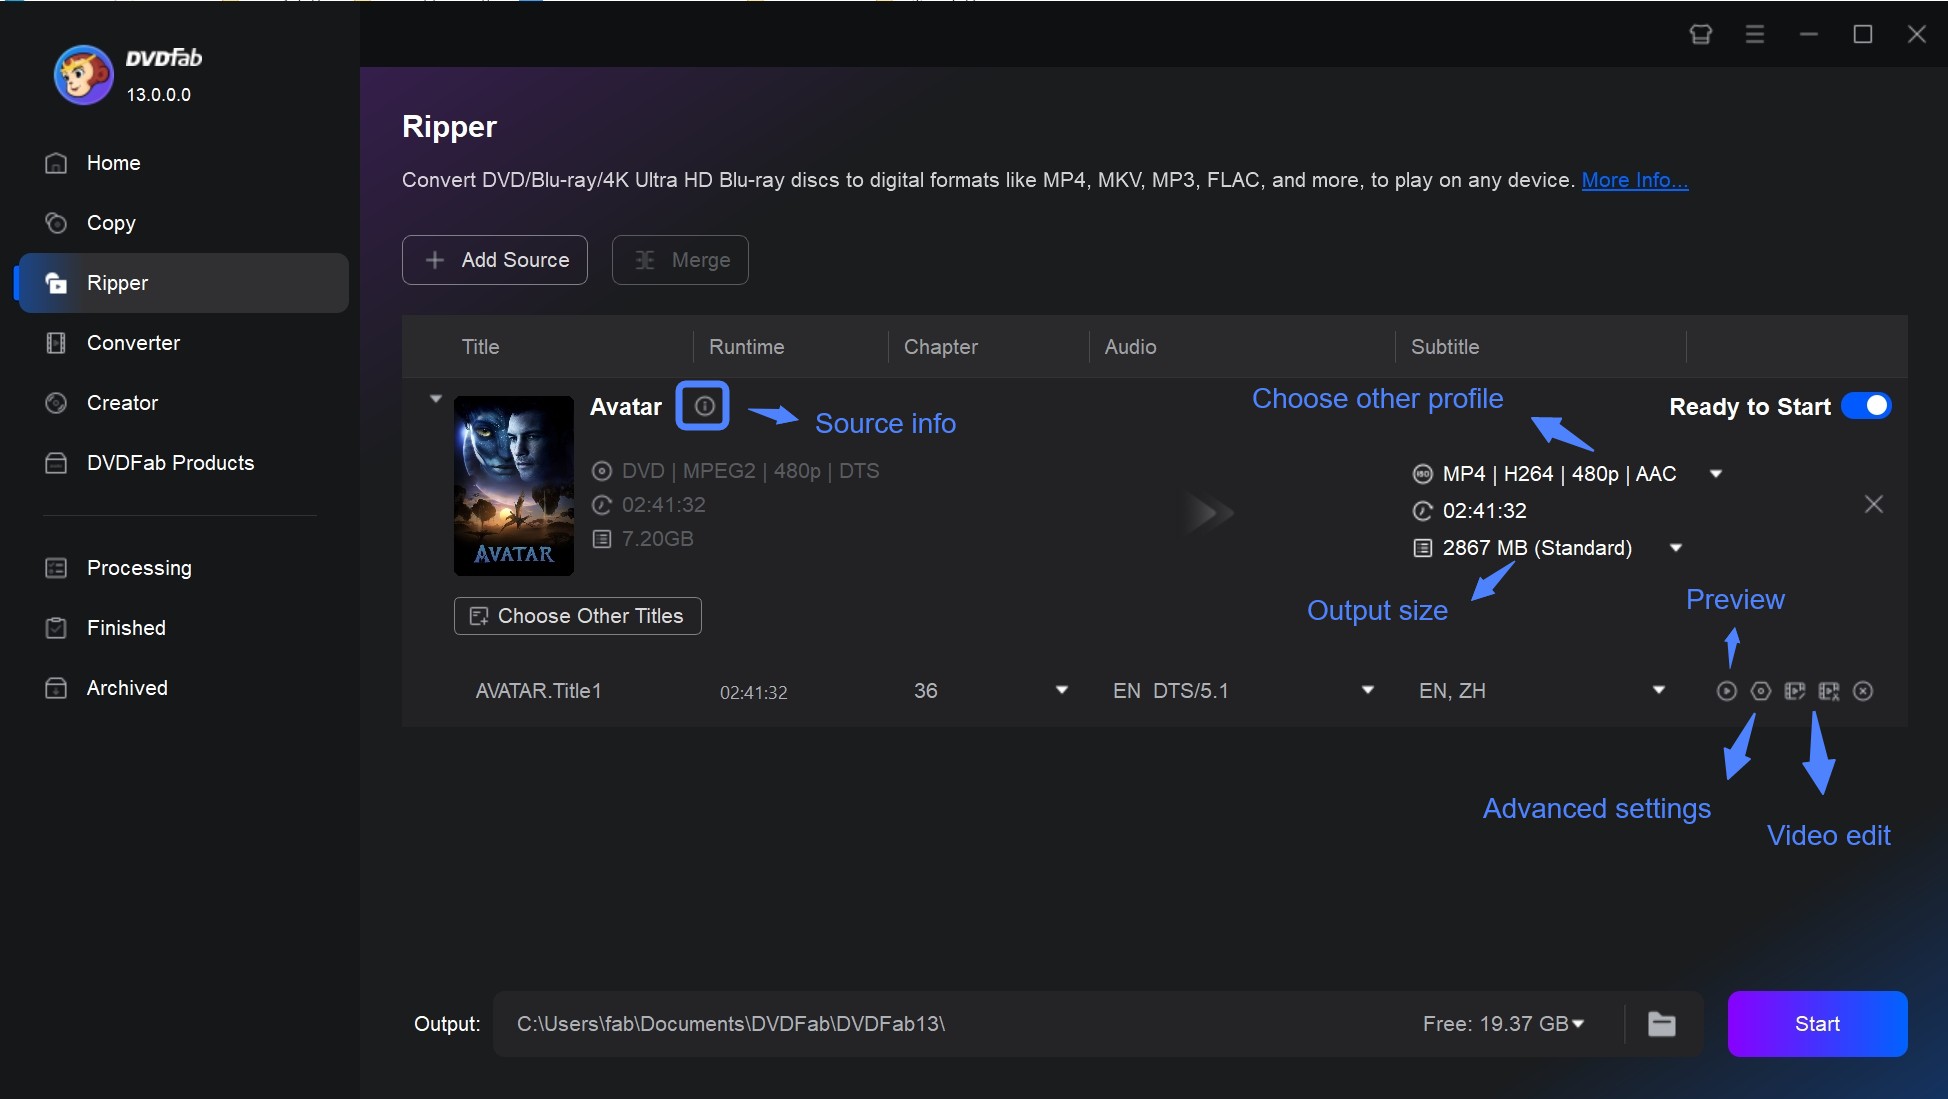
Step 6: Select the Output Path
Once you have made all the settings in the previous step, you need to select the output path. You can store your video on a mobile device or on your HDD. When you click the Start button, the DVD ripping procedure will be displayed.
DVDFab DVD Ripper vs VLC DVD Ripper
| Features | DVDFab DVD Ripper | VLC DVD Ripper |
|---|---|---|
| User Interface | User-friendly and intuitive | Basic and straightforward |
| Ripping Speed | 50X faster | Moderate speed |
| Quality Control | Advanced options for quality settings | Basic quality options |
| Batch Processing | Yes | No |
| DVD Menu Options | Yes (customizable) | No (menus disabled by default) |
| 3D and UHD Support | Yes | No |
| Output Customization | Extensive (subtitles, audio tracks) | Basic options |
FAQs about How to Rip a DVD with VLC
VLC can struggle with ripping protected DVDs due to encryption methods like CSS (Content Scramble System). While VLC itself does not include decryption capabilities for these protections, there are additional libraries (like libdvdcss) that can be installed to enable VLC to bypass some protections. However, the legality of using such libraries varies by region, so it’s important to check local laws before proceeding. If you're dealing with heavily protected DVDs, you might consider using specialized software such as DVDFab DVD Ripper designed for that purpose.
Ripping a DVD with VLC typically takes about the same length of time as the DVD itself, as VLC lacks acceleration techniques. If you're looking for a quicker option, DVDFab DVD Ripper is a great choice. It includes multi-core hardware acceleration, allowing for ripping speeds up to six times faster.
How to Rip Blu-ray with VLC?
Ripping a Blu-ray Disc using VLC is somewhat similar to ripping a DVD, but because Blu-ray Discs use stronger encryption, additional steps and requirements are needed.
Requirements:
- VLC media player: Make sure you have the latest version of VLC installed on your computer.
- libbdplus: This library is required to decrypt Blu-ray Discs.
- KEYDB.cfg: The key database for decrypting Blu-ray AACS. It can usually be found on VLC forums or other support sites.
Steps to rip a Blu-ray Disc using VLC:
Step 1: Download the KEYDB.cfg file and place it in the following directory depending on your operating system:
- Windows: C:\ProgramData\aacs\
- macOS: /Users/YourUsername/Library/Preferences/aacs/
- Linux: /home/YourUsername/.config/aacs/
Step 2: Insert the Blu-ray Disc into the Blu-ray drive. After launching VLC media player, click “Media” from the top menu and select “Convert/Save”.
Step 3: Go to “Disc” tab > Select the disc type as “Blu-ray”
Step 4: After picking the title you want to rip, click the “Convert/Save” button at the bottom. In the “Convert” window, select the format and destination where you want to save the ripped video.
Final Thoughts
In this article, we have provided you with a detailed guide on how to rip DVDs with VLC Media Player. Additionally, we have told you about the DVDFab DVD Ripper, and what makes it one of the best DVD to MP4 converter Mac in the market. We have also included a detailed user guide on how you can use the software to rip your favorite DVD files.
