How to Burn DVDs with VLC and Better DVD Burner Alternatives
Summary: Burning a DVD with VLC is possible, but the process is not straightforward because VLC cannot complete the disc burn on its own. This guide walks through the correct way to use VLC for DVD preparation and explains why many users prefer dedicated DVD authoring tools when accuracy, menus, and ease of use matter.
VLC Media Player is widely used for video playback, and it also has a built-in function that can convert videos to the DVD-compatible MPEG-2 format. This makes it possible to create DVDs starting from VLC, but the software cannot complete the full burning process on its own. In the sections below, I explain how VLC fits into a DVD workflow and show the additional tools you'll need to finish creating a playable disc. I also introduce several alternatives if you prefer a more direct DVD-authoring solution.
How to burn DVD with VLC media player?
Convert Video to DVD-Compatible MPEG-2 with VLC
Step 1: Open VLC and open the "Media" menu, selecting "Convert / Save".
Step 2: In the Open Media window, add the video files you want to include for the DVD.
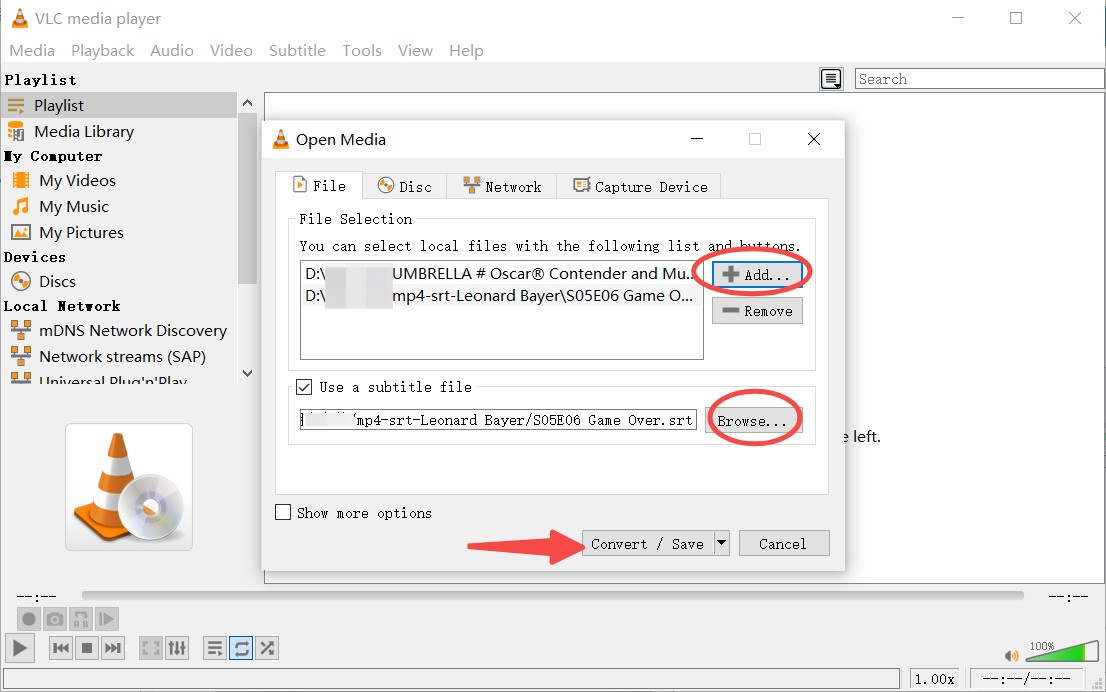
Step 3: Click "Convert / Save" again, then open the Profile edition window, and choose MPEG-PG as "Encapsulation". Adjust the video codec and audio codec if needed.
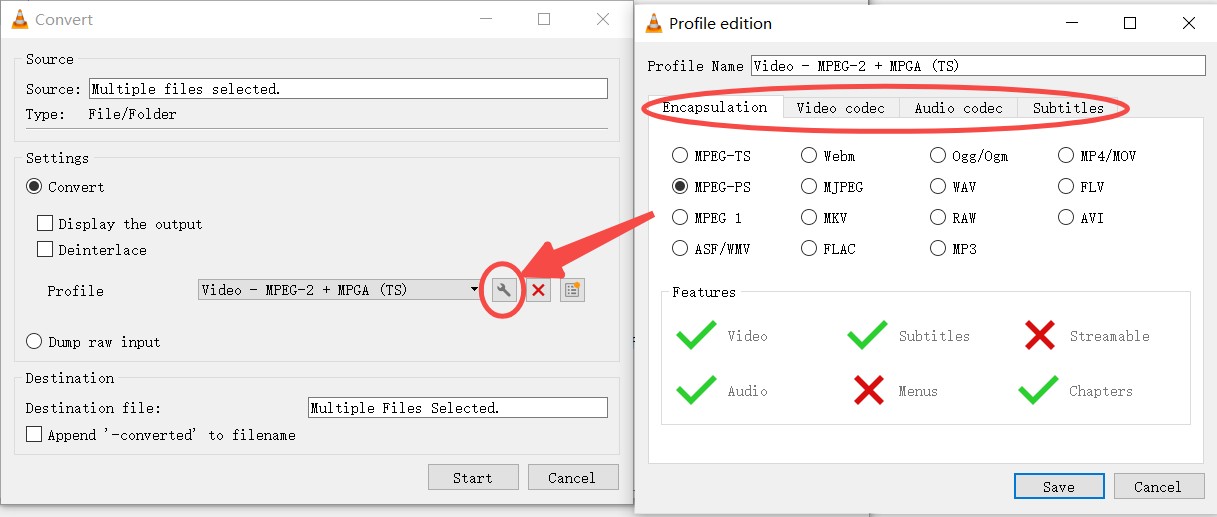
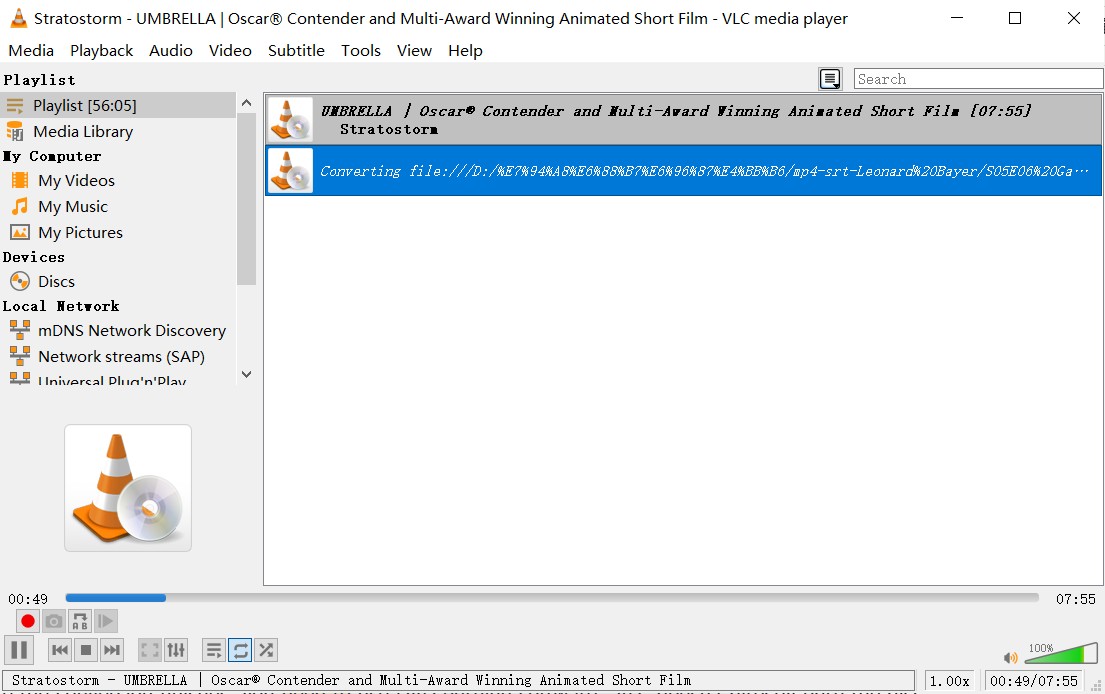
Step 4: Save the settings, go back to the previous window, and click Start. Then, wait for VLC to complete the process.
Use Additional Tools to Burn the MPEG File to a DVD
VLC cannot build a DVD-Video structure or burn a blank disc. To create a playable DVD, you'll need software that can author a VIDEO_TS folder and complete the burning process. DVD Flick is a commonly used free tool that can take your MPEG-2 file and produce a proper DVD layout, then pass the project to ImgBurn to finish writing the disc.
Step 1: Download DVD Flick from the official site, install it, and open the program. Make sure you also install ImgBurn when prompted.
Step 2: Click "Add title" and select the MPEG-2 file created by VLC. DVD Flick accepts other formats as well, but using an already converted MPEG-2 file reduces the amount of re-encoding needed. You can rearrange titles if you plan to include more than one video on the disc.
Step 3: Open "Project Settings" → "Video" and confirm that the format matches your region. You can also choose:
- Target size (4.7GB for single-layer DVDs)
- Encoder priority (faster vs. higher quality)
- Bitrate settings if you need to fit longer videos
These options help prevent issues like oversized projects or playback problems on older DVD players.
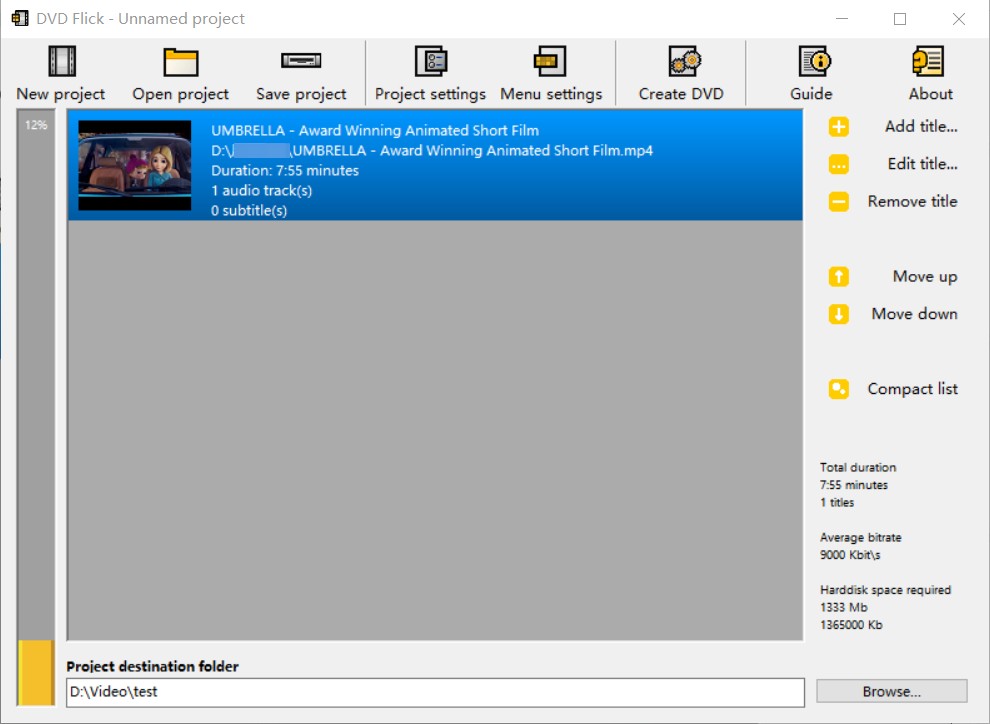
Optional: DVD Flick supports basic templates. Go to Menu Settings, enable a menu, and choose a style. While not mandatory, menus make navigation easier if you include multiple videos.
Step 4: Click "Browse" next to Project destination folder and pick a location with enough space. DVD Flick will create a full VIDEO_TS folder here, including IFO, BUP, and VOB files required by DVD-Video. Press "Create DVD".
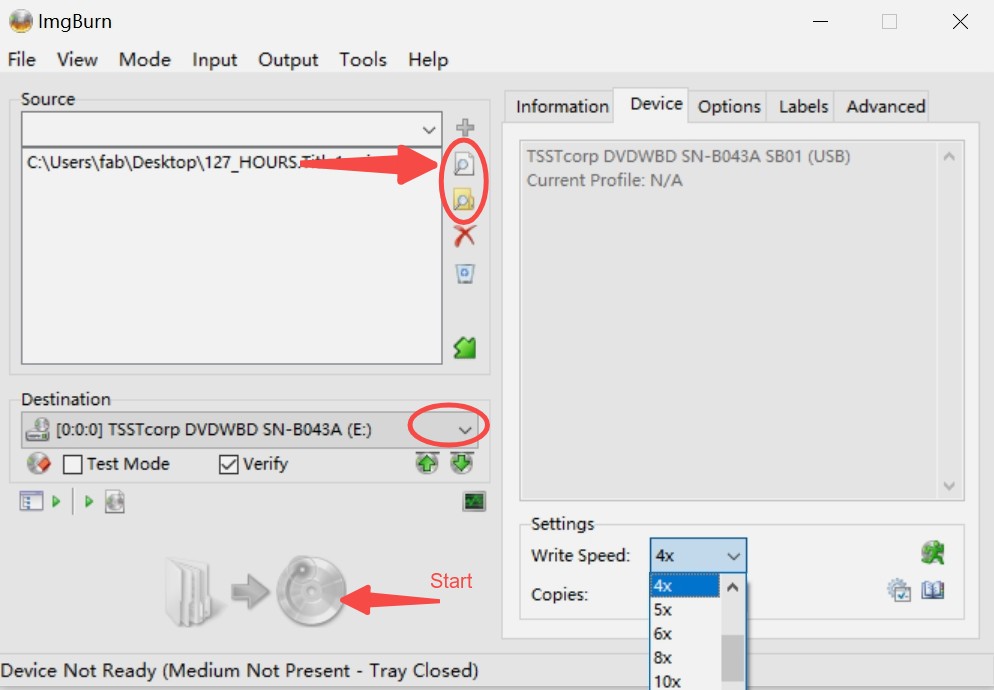
Step 5: ImgBurn will open with the VIDEO_TS folder already loaded. Before burning:
- Select your DVD burner in Destination
- Insert a blank DVD-R
- Set Write Speed to 2x or 4x for fewer burning errors
Finally, click Write to burn the disc.
Pros and Cons of Using VLC DVD Burner
VLC is easy to access and works well as a video player, but its role in DVD creation is limited. Before relying on it for disc projects, it helps to know where it performs well and where it falls short.
- Supports many input and output formats, including conversion to MPEG-2 for DVD use.
- Lets you embed external subtitle files before conversion.
- Free, open source, and compatible with multiple platforms.
- No editing or DVD authoring tools such as chapters, menus, or layout control.
- Cannot build a DVD-Video structure or burn a disc without extra software.
- When converting to MPEG-2, VLC may repeatedly prompt you to overwrite existing files.
Best Alternative to VLC for Burning DVDs
Burning a DVD through VLC requires several extra steps, so many users prefer a tool that can handle the entire process. DVDFab DVD Creator is one option that simplifies DVD creation and is easier for beginners to use.
1. DVDFab DVD Creator (Windows and macOS)
- • Disc Compatibility: Supports standard DVD-5 and DVD-9 discs.
- • Wide Format Support: Accepts more than 200 video formats for input.
- • Allows adding external subtitles in formats such as *.srt *.smi *.ass *.ssa.
- • Menu Templates: Includes preset menus with adjustable backgrounds and button layouts.
- • Basic Editing Tools: Offers trimming, cropping, and other simple edits before burning.
How to burn a DVD with DVDFab DVD Creator
Step 1: Install DVDFab (the latest version is DVDFab 13) on your computer.
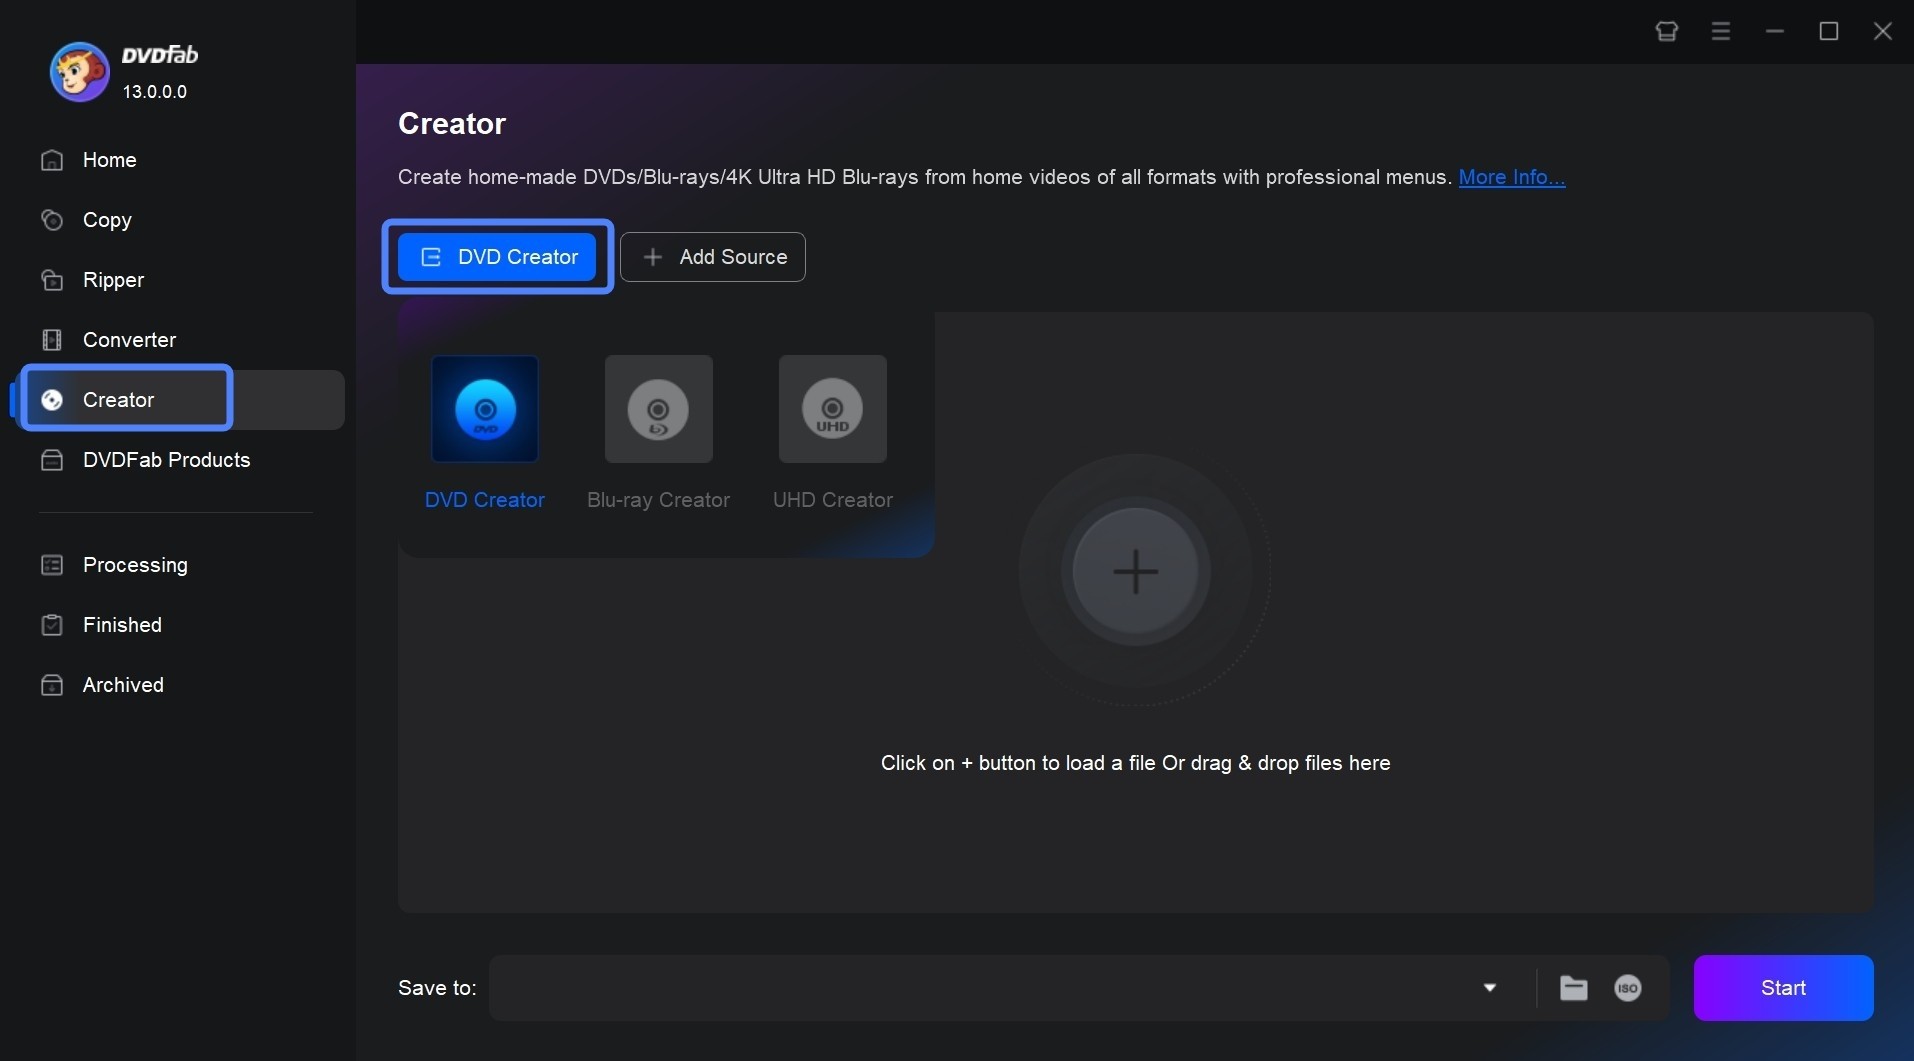
Step 2: Open the program and switch to the Creator module. The default mode should be DVD Creator.
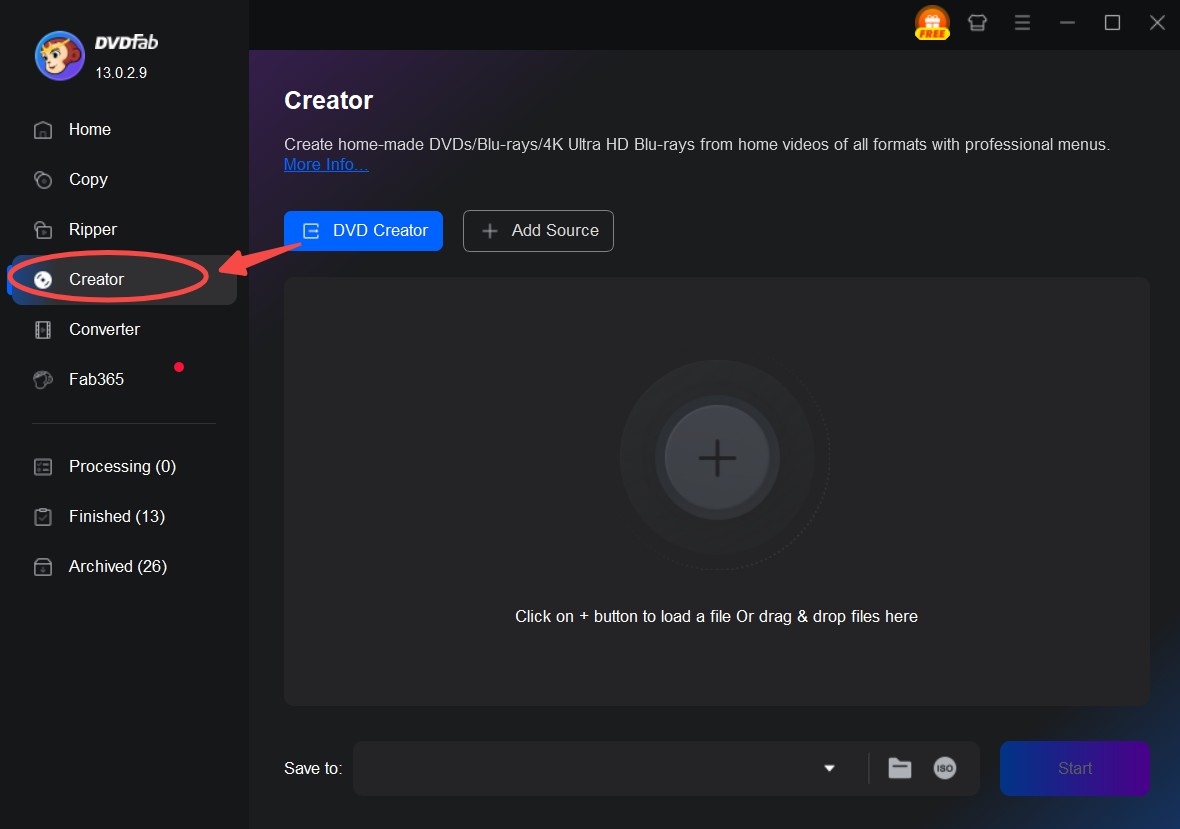
Step 3: Use the Add Source button to add video files, or drag and drop those videos you want to create a DVD. Add external subtitles to the video if needed.
Step 4: Open the Advanced Settings panel to set video quality. You can customize the size or choose "Fit to Disc" and set the output to DVD-5 or DVD-9.
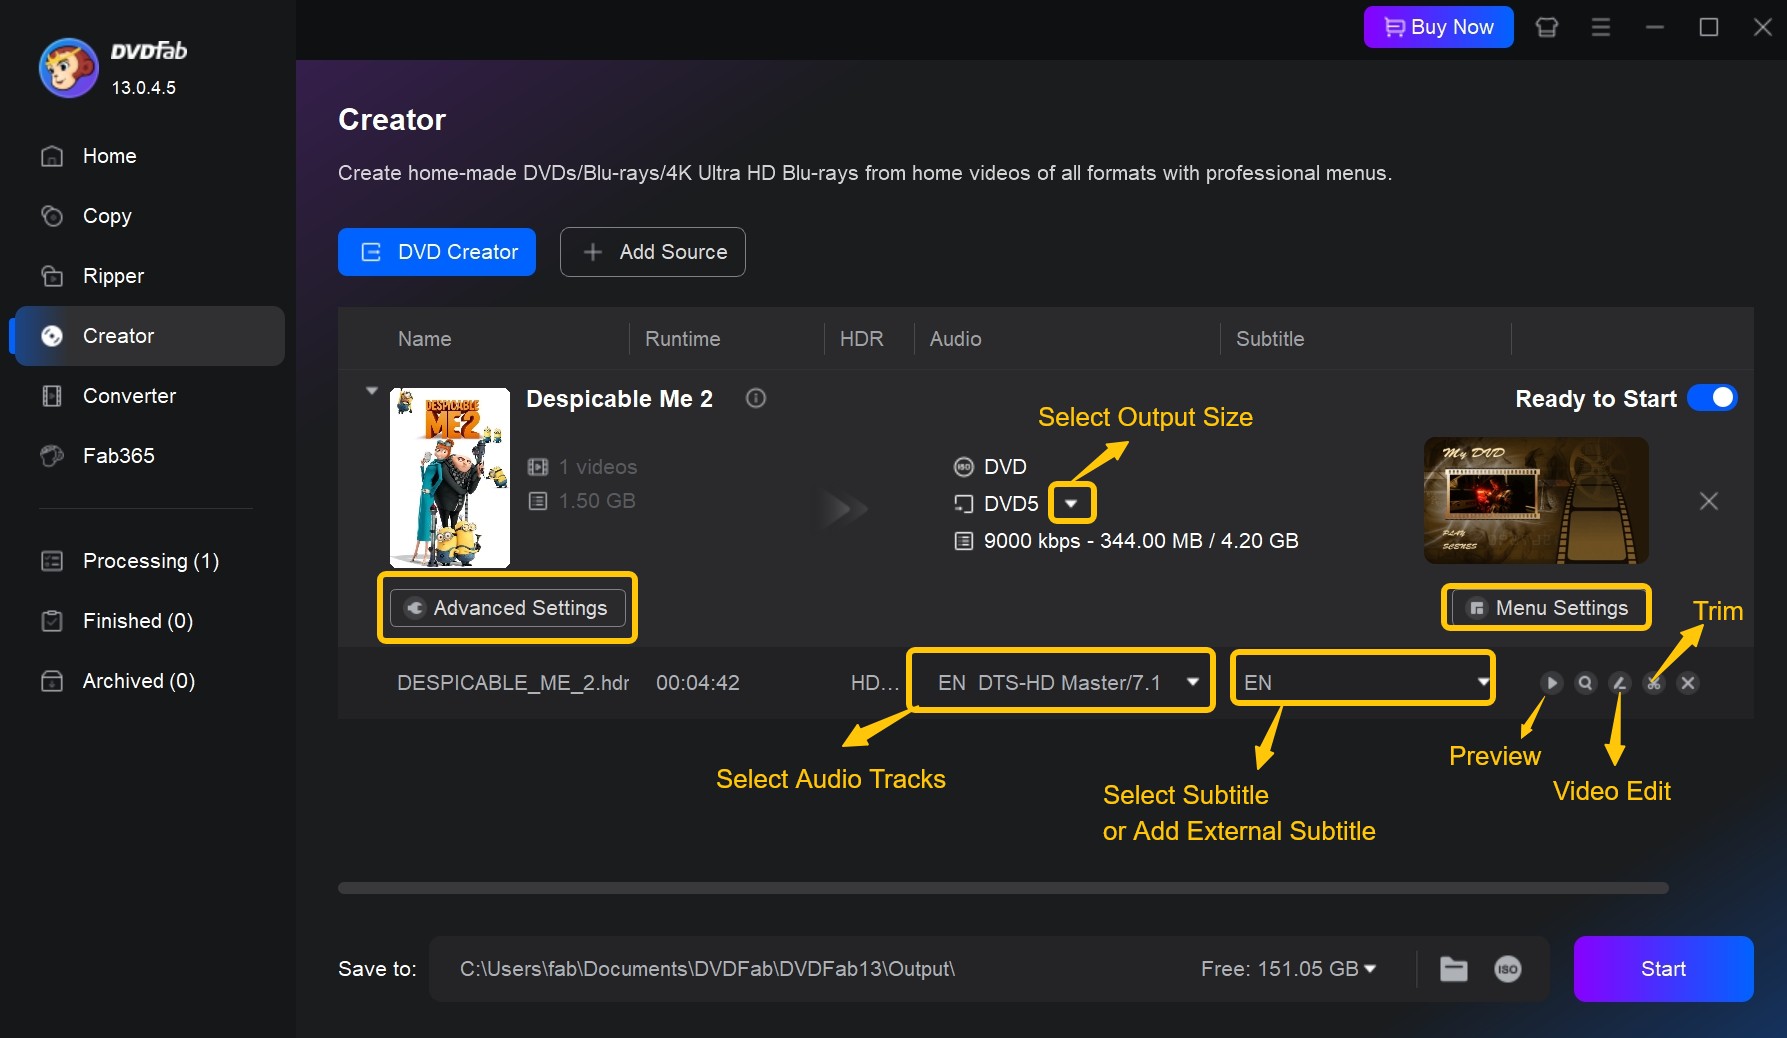
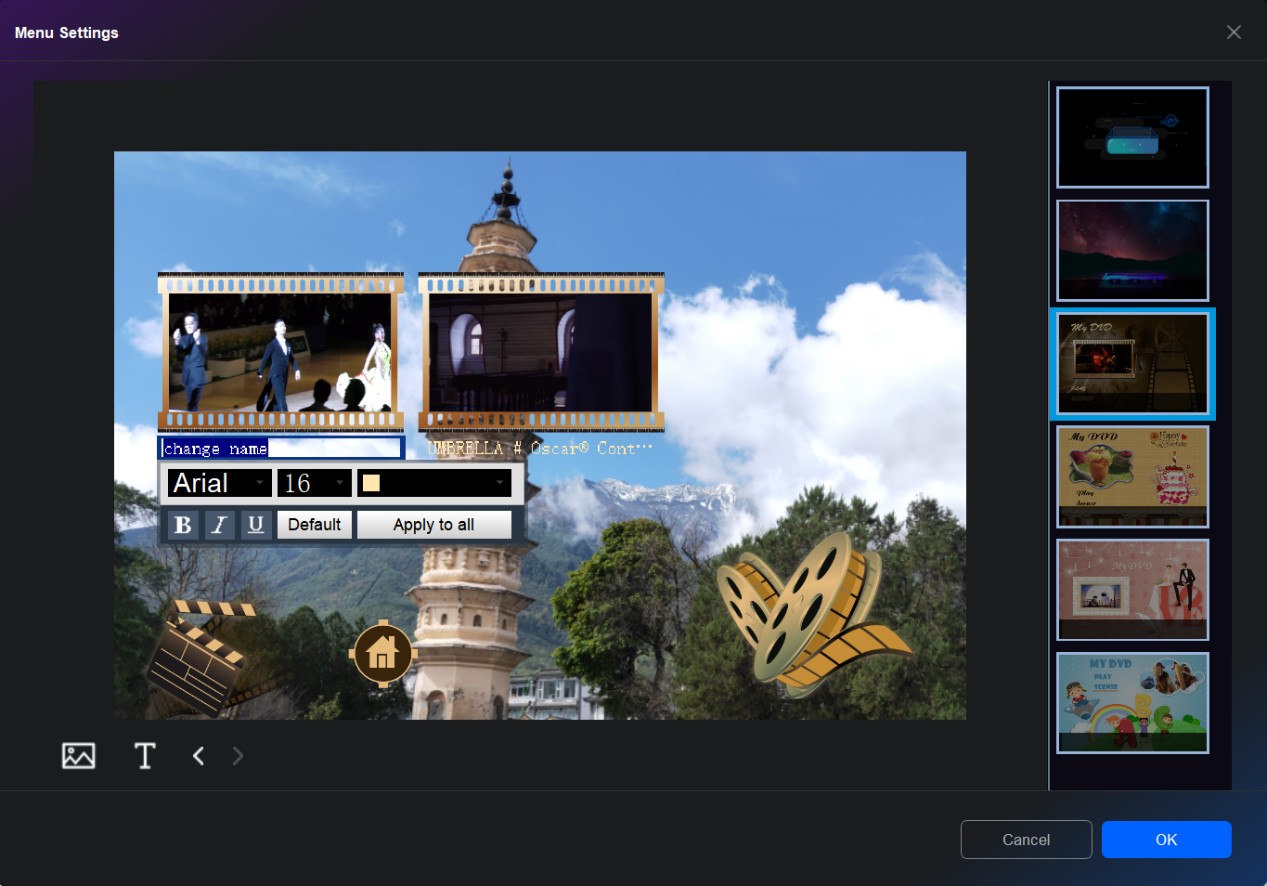
Step 5: In the Menu Settings panel, you can change the title name, add text, or change the background.
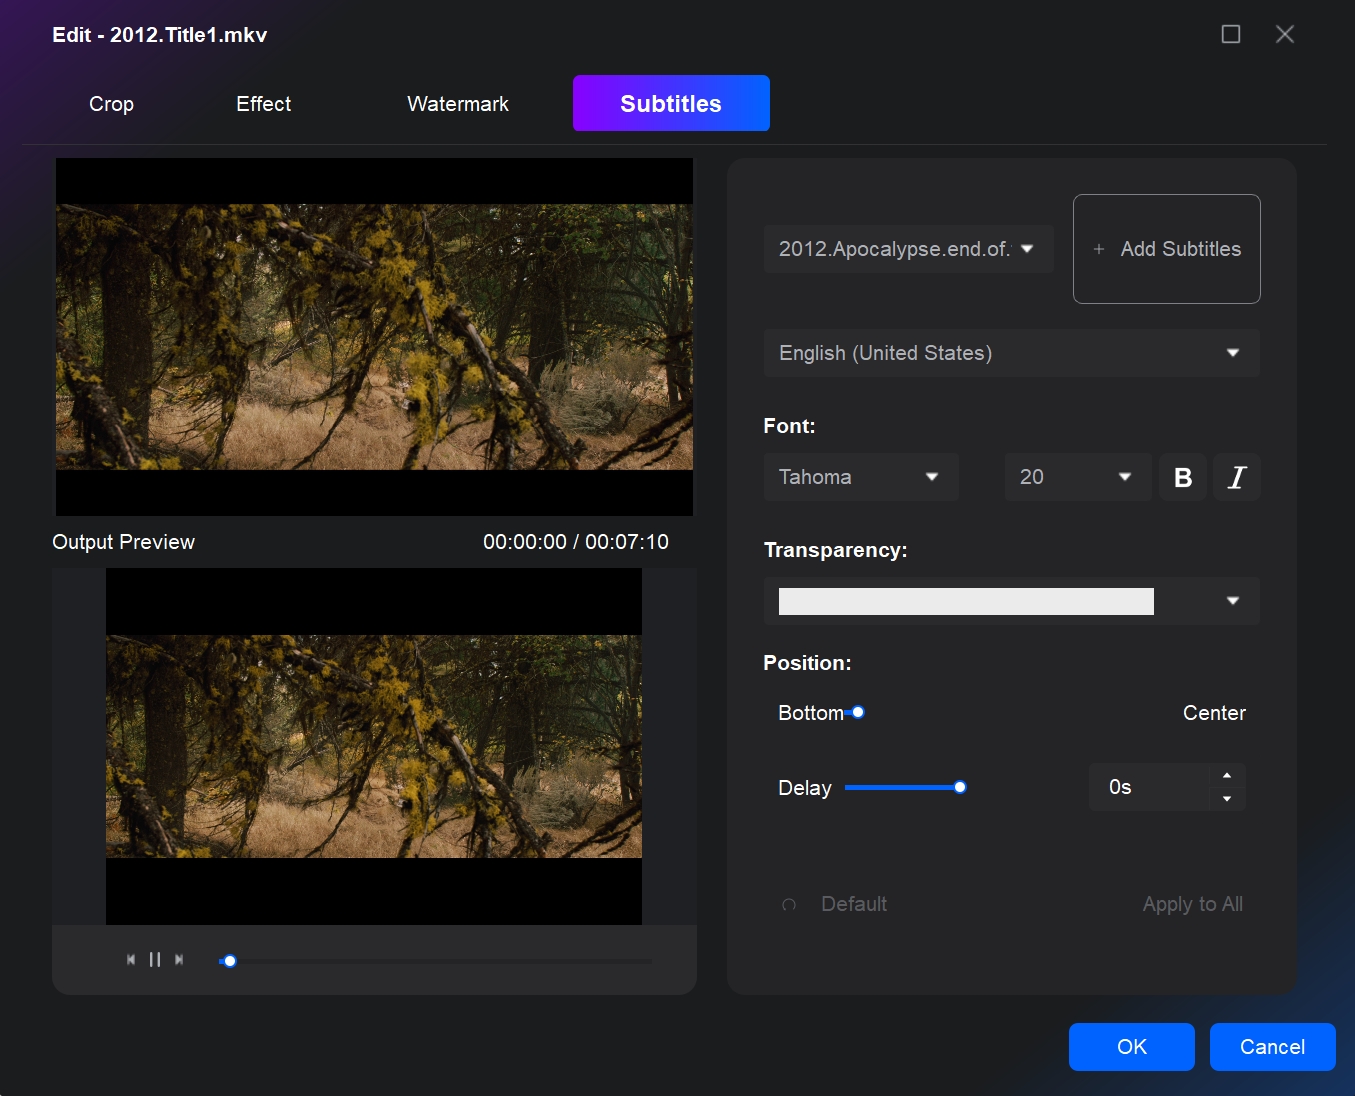
Step 6: In the Video Edit and Trim module, you can crop, rotate and trim your footage, adjust color effect and adding watermarks to your DVD.
Step 7: Choose your burner in the target field in the lower area. Besides burning to blank DVDs, you can also save the DVD as a folder or ISO image file on your hard drive. If you meant to burn to the blank, be sure to insert a suitable DVD to start the process. Either DVD5 or DVD 9, depending on the output you selected in the previous step.
Step 8: Wait till the process is completed. You will get a DVD Video disc that is compatible with various DVD players.
2. DVDStyler (Windows)
DVDStyler is a free and open source DVD burner software that allows users to create DVDs (PAL and NTSC) using multiple video formats. With its intuitive interface, you can easily customize DVD menus. The software offers a range of built-in templates in addition to personalized DVD menu design. DVDStyler continues to be the first choice for many users looking for a lightweight DVD-video authoring solution.
Here is how to burn DVD using this DVDStyler:
Step 1: Install and launch DVDStyler on your Windows PC.
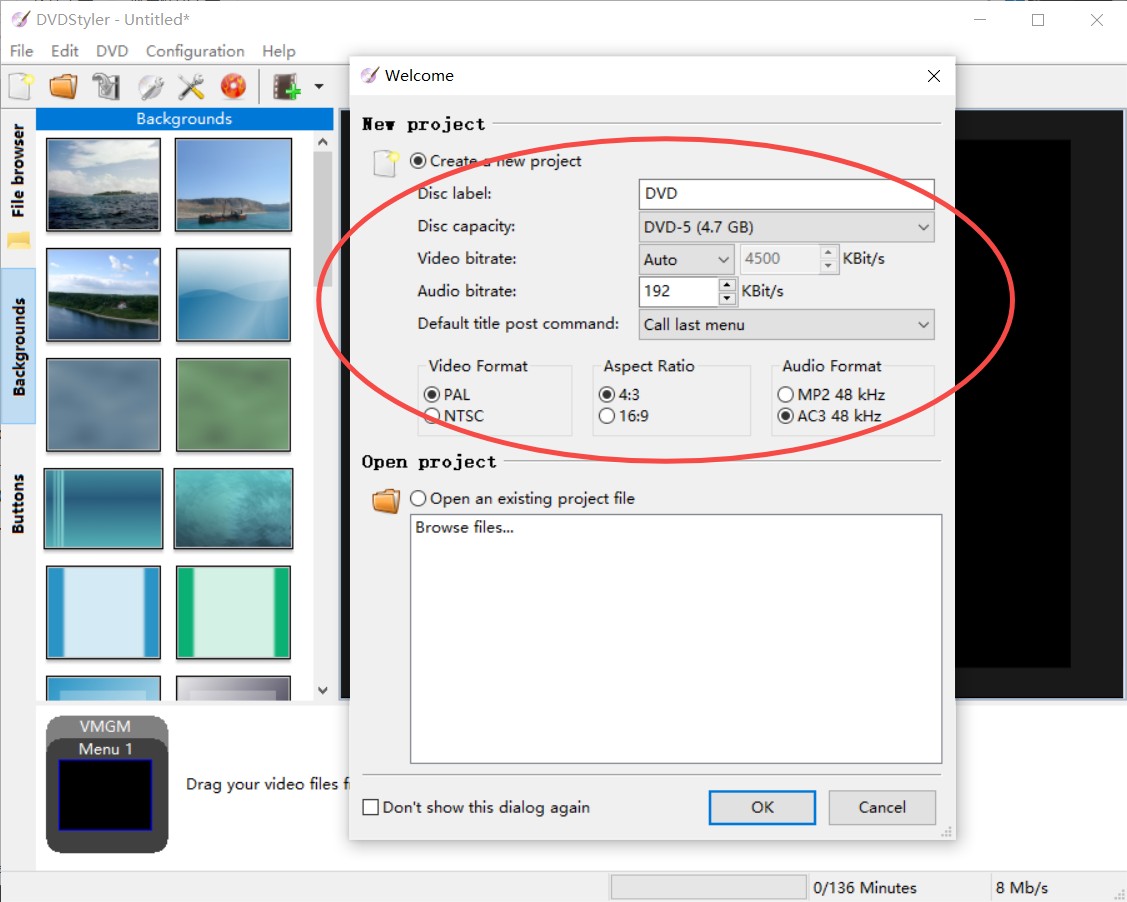
Step 2: On the "New project" window, set the disc capacity, video format (PAL/NTSC), aspect ratio (4:3/16:9), and audio format (MP2/AC3). If you don't want to set this part, ignore it; you can later adjust related settings after importing videos.
Step 3: Use the "+" button at the top menu to import the videos you wish to create a DVD.
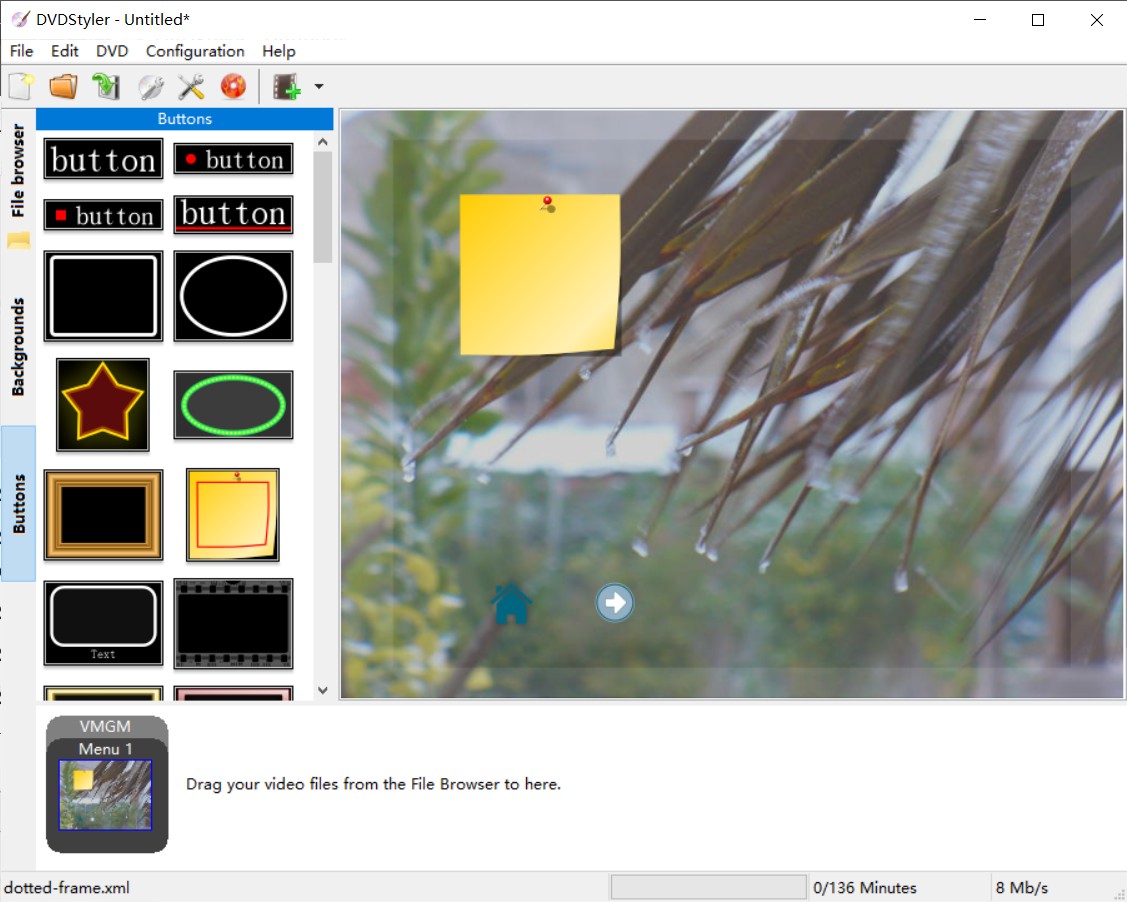
Step 4: Adjust the menu, change the menu's background, and choose a button option to your liking.
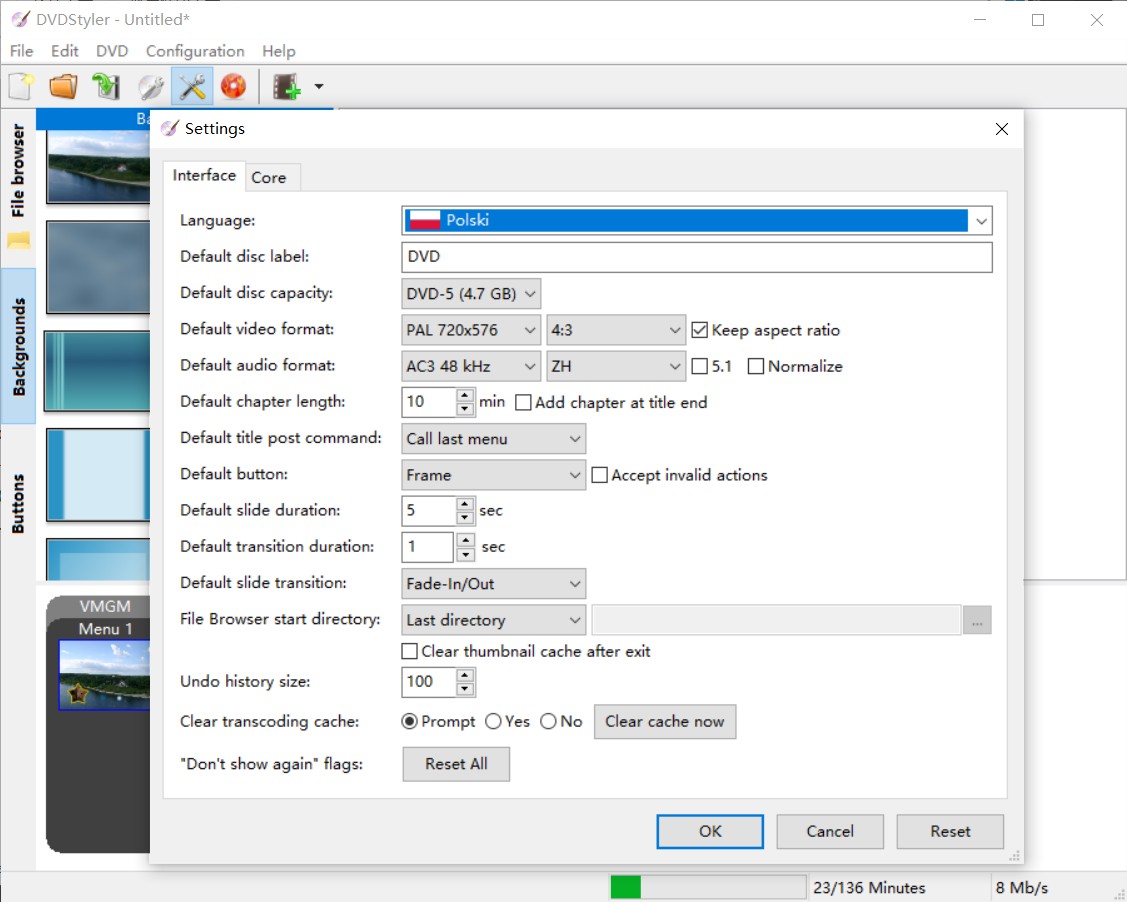
Step 5: Open the Settings panel to set the disc label, video format, audio format, chapter length, etc.
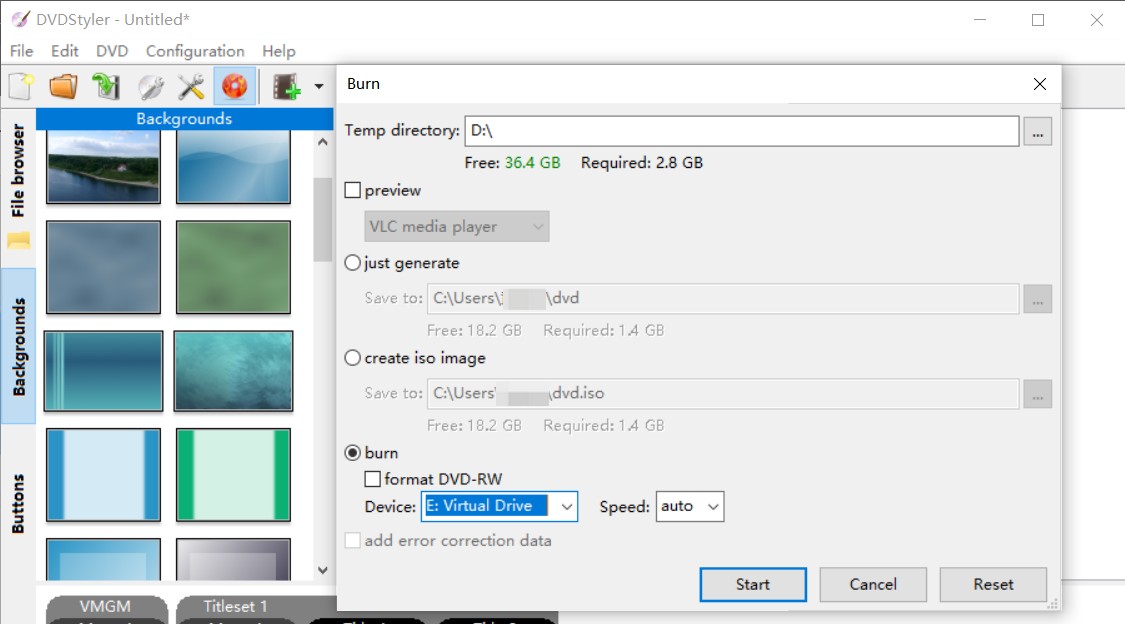
Step 6: On the top menu bar, click "Save" to save the DVD video to your hard drive or click the "Burn" button to burn it to a blank DVD.
3. CDBurnerXP (Windows)
CDBurnerXP is a free Windows-based DVD authoring software that allows you to make DVD video discs that are compatible with a DVD player. Besides that, you can also create data discs and audio discs, burn ISOs, and more.
How to burn a DVD with CDBurnerXP for playback on a DVD player
Step 1: Choose the needed setup version and then download CDBurnerXP and install it on your PC.
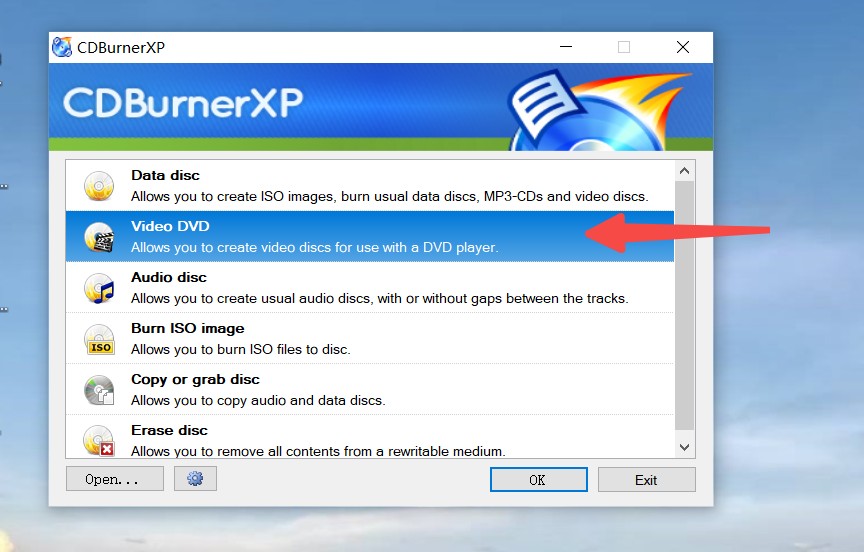
Step 2: Run CDBurnerXP and choose Video DVD.
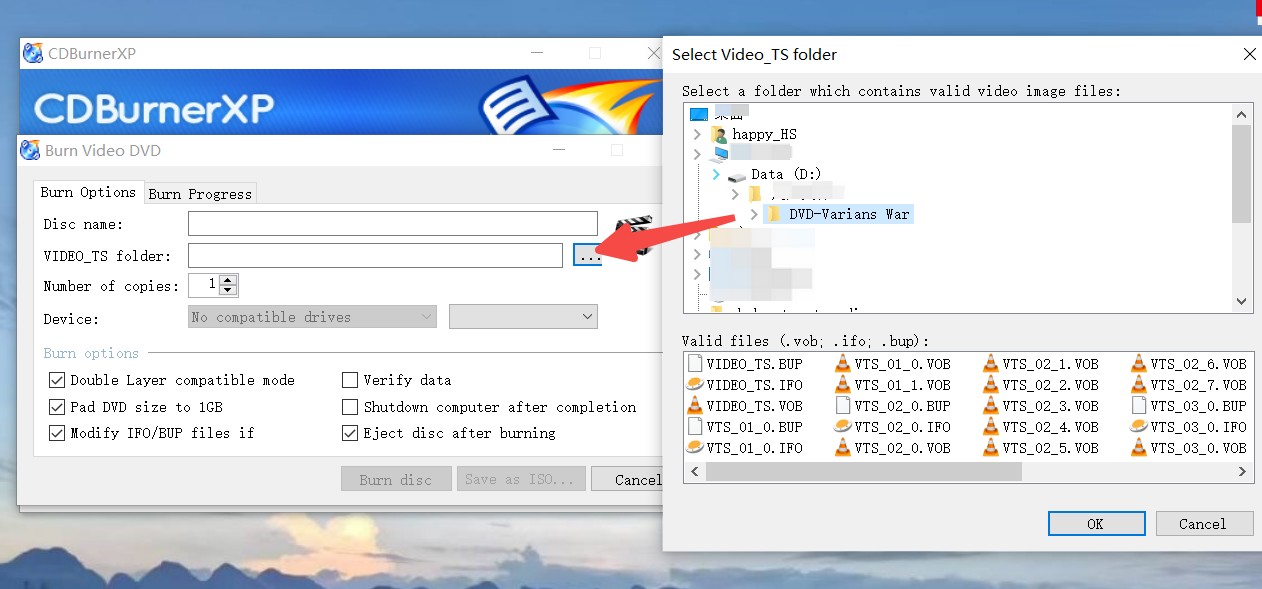
Step 3: Select the Video_TS folder (valid files include .vob, .ifo, .bup) as the source.
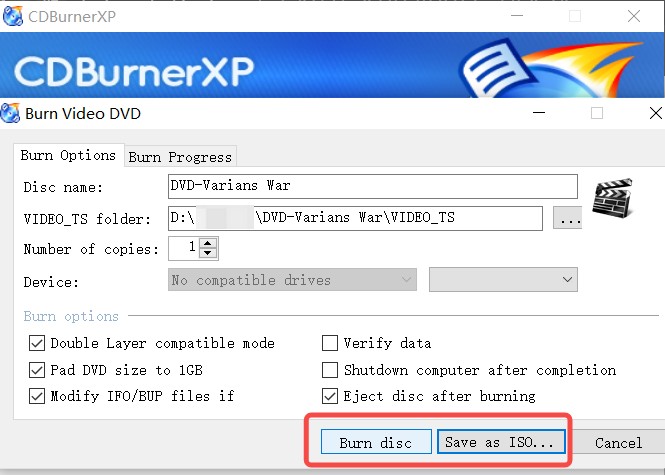
Step 4: Set the number of copies and then choose Burn disc or Save as ISO per your need.
FAQs
DVD is a versatile media storage format. To make a DVD from regular videos such as MOV, MP44, and AVI, you first have to change your movie file into the DVD format, which is MPEG 2. There are multiple options in the VLC DVD burner. Be sure to select the correct one.
PAL format (720x576 pixels) and NTSC Format (720x480 pixels) are two of the primary standards used for TV broadcasts. Choosing between PAL and NTSC affects how content is displayed on different systems. While you're making DVDs, it's important to know which format is compatible with your player to avoid playback problems.
A data DVD stores files in the same way a USB drive does. It can hold videos, documents, or any other type of data, but most DVD players cannot read these files directly. A video DVD, on the other hand, uses the standard DVD-Video structure with VIDEO_TS files, menus, and specific encoding, which allows it to play automatically on regular DVD players.
Conclusion
Burning DVD with VLC can be a bit complicated for beginners. For a more user-friendly experience, you can use alternative software such as DVDFab DVD Creator, and these are easier to navigate. With the best DVD burning software, you can effortlessly create DVD player-compatible discs with customizable menus. In addition, it offers a 30-day free trial so you can download the software and start making your own DVDs with ease right away.

![18 Best Free DVD Burner Software for Windows in 2025 [Expert Review]](https://r1.dvdfab.cn/upload/resource/en/best-dvd-burning-software-3mQn.jpg)
