Top 10 Solutions to Convert Low Resolution Image to High Resolution [Windows/Mac/Online]
Summary: Resolution is a critical determiner of an image’s quality. Normally (but not absolutely), the lower the resolution, less clear an image can be. So is there a way to enhance photo resolution to make it much clear? Read more to find out how.
When talking about image quality, the resolution must be the first thing that comes into one’s mind. We may often hear people say that increasing the resolution of an image or photo can significantly enhance the image quality. Is this really the case? Here in this article, we will talk about multiple ways to improve the quality of an image or to your photos, and increasing the resolution of the image is just one thing and also the very basic thing you can do.
Table of Contents
Section 1. Understanding image resolution
1.1 Defining resolution
Before jumping to resolution, we need first to know what a pixel is. In digital imaging, a pixel, also known as picture element, is a physical point in a raster image, or the smallest addressable element in an all points addressable display device. Resolution, typically described as PPI, refers to the size of an image measured in pixels. When multiplying the image resolution width and height, it gives the total number of pixels in an image. The higher the resolution, the more pixels there are per inch (PPI).
1.2 Resolution vs quality
Quality means the image’s representation of details that are stored in the pixels, like the color, shadows, contrast, saturation, brightness, sharpness etc. Obviously, resolution of an image is important for sure, but resolution is not all that matters to the quality of an image. There are many other factors that can affect the quality of an image. So, high resolution does not necessarily mean high quality. But, the change of resolution certainly can affect the image quality.
Section 2. How to Increase Resolution of Image without Photoshop
Like we’ve said above, though increasing an image’s resolution does not always better the image’s quality, it does, to some extent, affect the image quality. Actually, improving an image’s quality can start with enhancing its resolution. But how to increase the resolution of the image? There are many software applications and online solutions capable of doing that. Next, we’ll talk about that.
2.1 DVDFab Photo Enhancer AI (RECOMMENDED)
Photo Enhancer AI from DVDFab Software is an all-new AI-powered Photo Enhancer package that contains three separate working modules to help you make your photos look better, including the method to enhance photo resolution.
With the help of deep convolutional neural networks, Photo Enhancer AI can enlarge low-resolution photos without hurting the quality, reduce all types of noise without losing details, and remove motion and out-of-focus blurs to improve the photo sharpness. Apart from photo enhancer AI, DVDFab also own video enhancer AI that can be regarded as one of the best AI video upscaler software.
- Enhance photo resolution by up to 40x
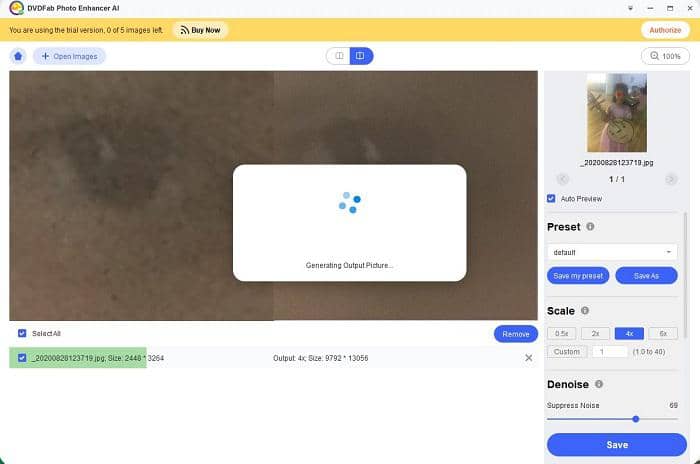
The very first independent working module of Photo Enhancer AI is the Enlarge module. This module is the one that answers the question of how to change photo resolution, how to fix low-resolution photos, or how to make a low-resolution photo high resolution. Using the state-of-the-art machine learning technology and trained by millions of sample photos of low and high resolutions, the Enlarge module masters its exclusive way to accurately identify every single pixel and its neighboring pixels of a photo or image, and then intelligently fill in tons more similar pixels to exponentially enhance the details, so that they will look super clear and crisp, even at 40 times their original size.
Steps to improve photo resolution with DVDFab Photo Enhancer AI:
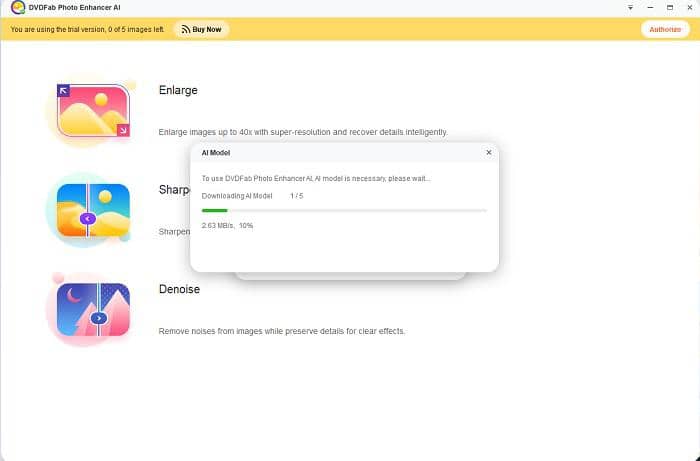
Step 1 — Launch Photo Enhancer AI and choose the Enlarge module. Be noted that on your first run, you will have download the relevant AI models, and you only have to do this once. So wait until they are downloaded.
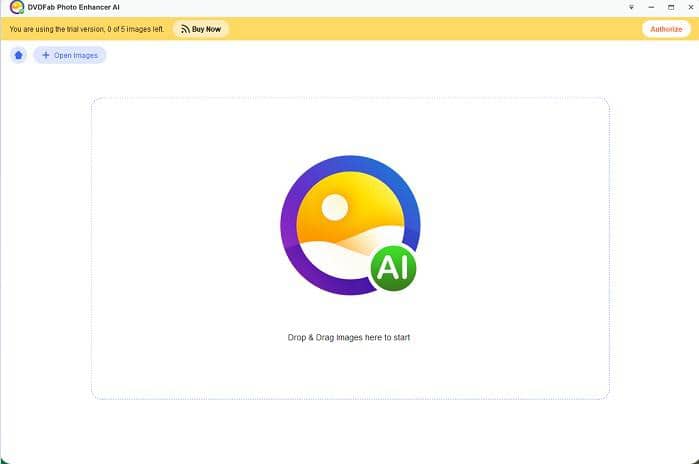
Step 2 — Load your photo(s) of low resolution to the interface, or you can simply drag & drop them into the interface.
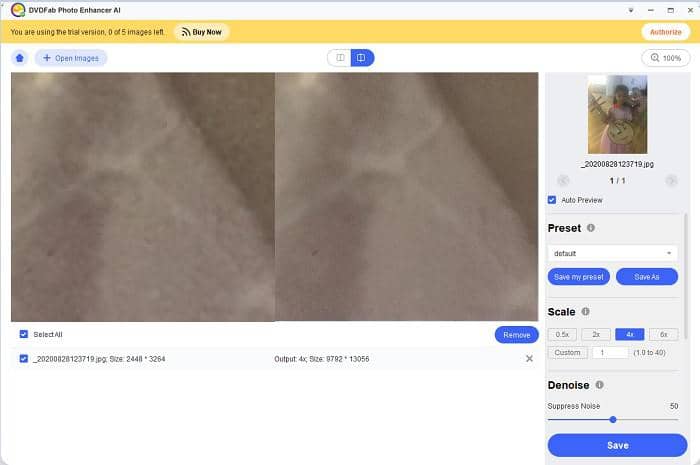
Step 3 — Select how much you want to enlarge your photos, choose a Preset and the enlargement scale.
Step 4 — Click the Save as button to choose an output format, name the output file and define the output path. If you want to preview the final result, enable the Auto Preview function.
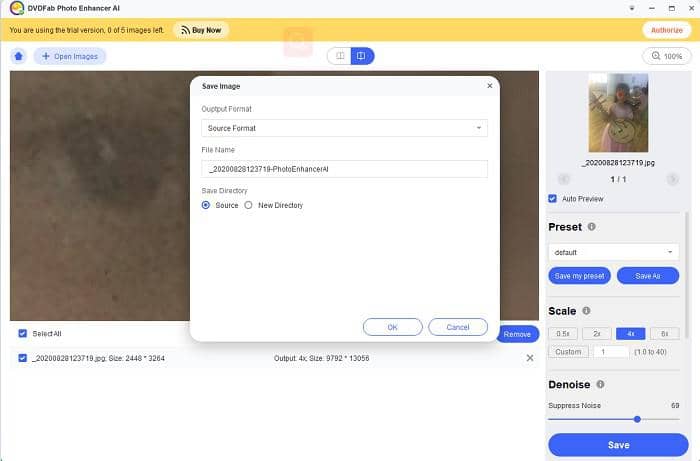
Step 5 — If you’re satisfied with the preview, click on the Save button to output the final result.
- Reduce photo noise to improve the quality
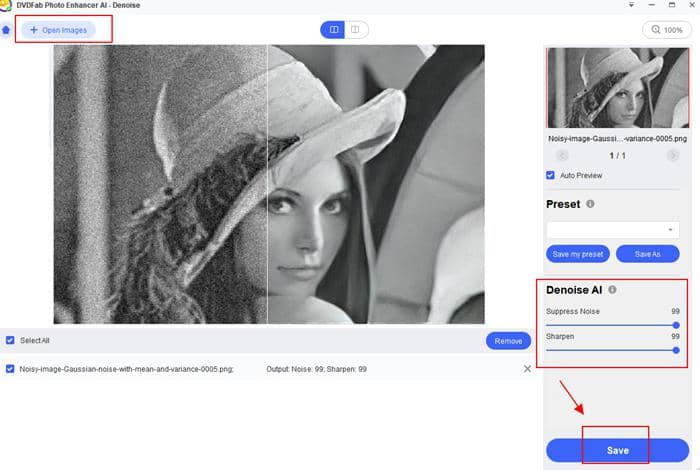
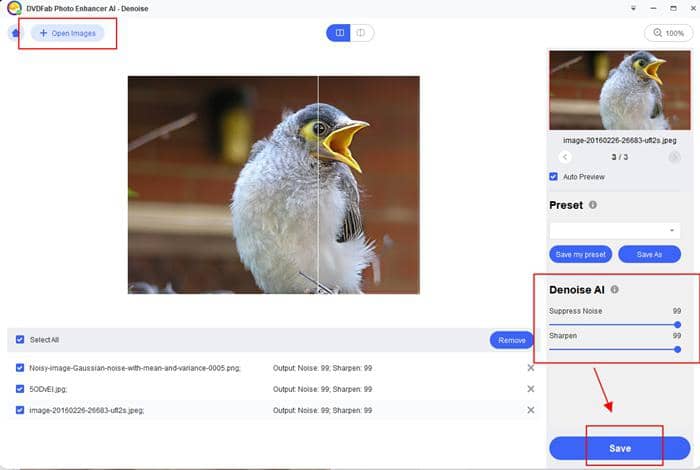
Increasing the resolution is only the first thing Photo Enhancer AI can do to fill photos and other images with tons more pixels, the job of its second working module, the Denoise module, is to reduce all types of noise, including digital noise and shot noise, to a perfectly balanced level, so that the photos can look much smoother, cleaner and realistic.
As we all know, photos shot under higher camera ISO settings or in the low light environment usually come out with background noise, chroma noise, or luminance noise that can badly hurt the image quality, the AI denoising feature of Photo enhancer AI is able to identify and intelligently reduce all those types of noise to a level beyond human eyes can recognize.
- Remove blurs to deblur blurry images
Even the best photographers sometimes take blurry or shaky photos. Thus, removing blurs from photos is another efficient way to improve photo quality, but this is not easy with those traditional, non-AI software tools. With Photo Enhancer AI, however, things get a lot easier! Powered by the Deep Convolutional Neural Networks, it does not take a genius to perform the procedures of deblurring a photo. Simply by one mouse click, the software will instantly remove all the motion blurs and out-of-focus blurs it identifies in a matter of seconds.
2.2 Adobe Photoshop
If you want to print your photos or upload them to social media websites for easy sharing, the resolution of your photos matters a lot. But what if some of your photos fail to meet the minimum resolution required for printing or uploading? When this occurs, Photoshop is a better option to improve photo resolution. As the most powerful image editing tool, the latest Photoshop CC offers various types of image editing tools along with the photo resizing option, with which, you can solve the problem of how to fix low-resolution photos.
Follow the steps below to see how to increase image resolution with Photoshop:
Step 1 — Add Photo to Photoshop
From the top menu bar, select Image, and then, choose Image Size from the dropdown submenu;
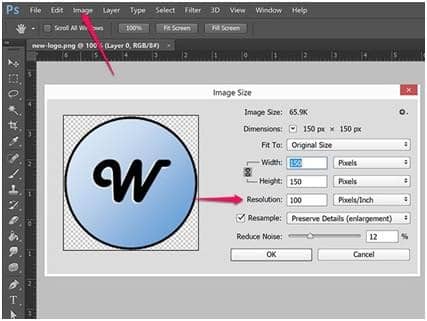
Step 2 — Resample the Photo
To keep the original dimensions of your photo, check the Resample option; otherwise, you can choose to keep the overall photo pixels, which will automatically change the value of height and width;
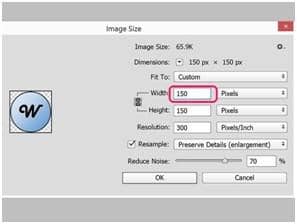
Step 3 — Increase Photo Resolution
To increase photo resolution or the pixels per inch, enter your wanted height and width, and then click the OK button to fix the low resolution photo.
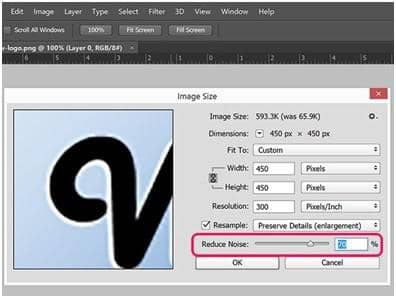
2.3 Adobe Lightroom
As a photo management and editing software combined, Adobe Lightroom can be considered as a simpler version of Photoshop, because it includes just some of Photoshop’s features that are custom tailored to the contemporary photographers. That said, it still covers the majority of the photo manipulation tools you’ll most likely need.
Check out below to see how to enhance your photo's resolution with Adobe Lightroom:

At the Image Sizing panel, use the megapixels option, and to write the file size you need and its resolution and Lightroom will resize it accordingly. Remember not the enable the Don’t Enlarge option if you are increasing the photo resolution from low to high level.
2.4 Fotophire Maximizer
The Fotophire Maximizer from Wondershare is an easy-to-use photo editing tool that can also enhance the resolution of photos to make them more attractive. The developers claim that this photo resolution enhancer is able to enlarge your photos by 1000% without affecting the quality. Besides, it also allows you to add various types of filters, background, grains and frames to decorate your photos.
Follow the steps below to see how Fotophire Maximizer enhances photo resolution:
Step 1 — Add photo to Fotophire Maximizer
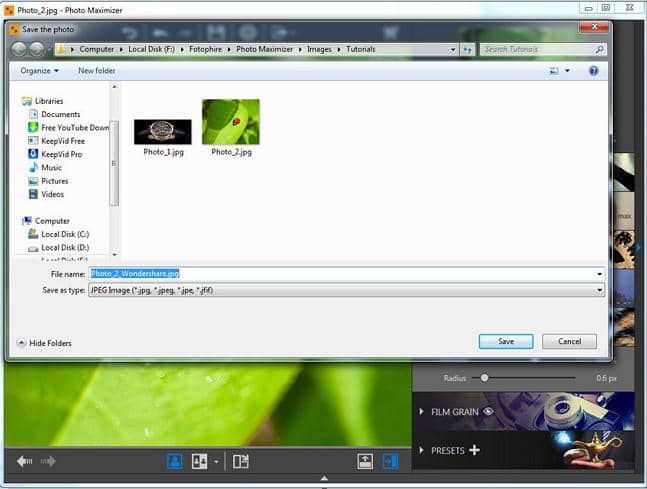
Launch Fotophire after installation, select the Photo Maximizer option, and then import the photo you want to enlarge using the Open button.
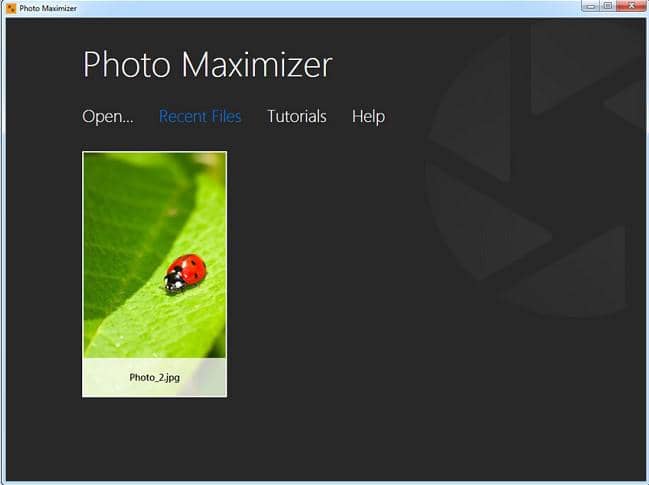
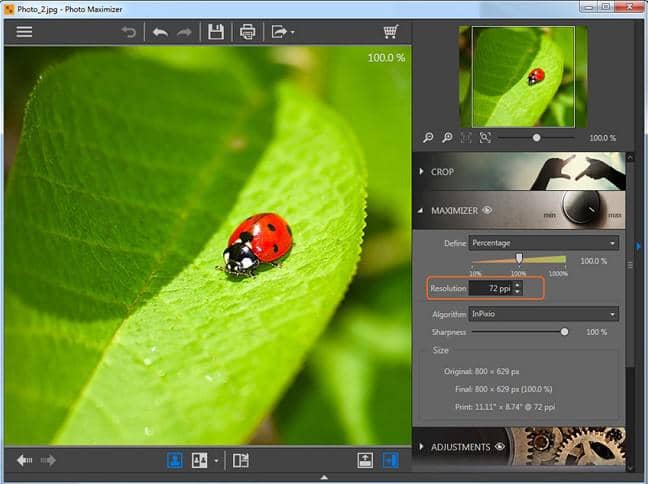
Step 2 — Enlarge photo and set parameters
Click on the inverted triangle icon to choose the parameter settings panel, and then adjust the length, width and height to customize the photo resolution.
Step 3 — Save the enhanced photo
Save the changes you’ve just made to save the final output.
2.5 Preview App on Mac
Mac users have a much simpler way to enhance photo resolution, by using the native Preview app, in case you don’t prefer anything that requires download an installation. The Preview app is the default application on Mac designed for you to view and edit photos. With it, you can do various types of photo editing jobs, such as cropping, color extraction, shape extraction, rotation, and of course, resizing the resolution as well.
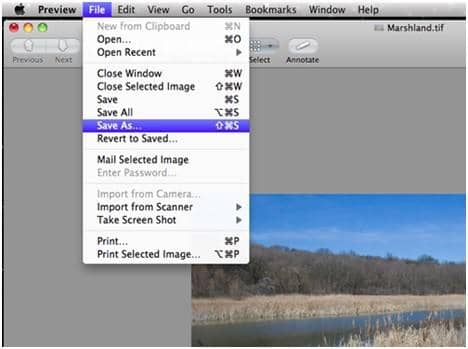
Refer to the following steps to how to make a low resolution photo high resolution with Preview app on Mac:
Step 1 — Go to the application folder on Mac and open Preview. When it is opened, click on File option and then select Open. Now locate the photo which you want to enlarge.

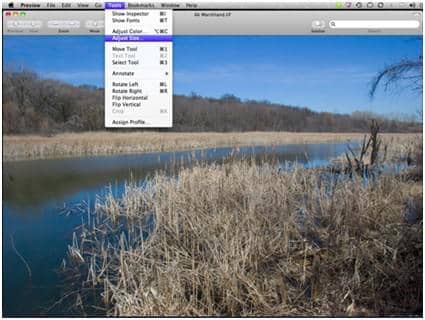
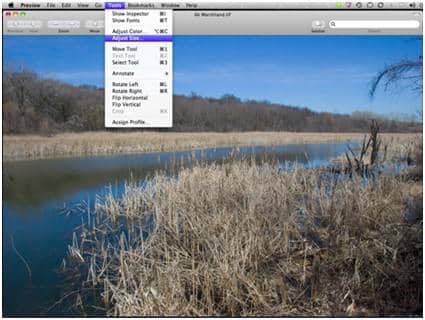
Step 2 — When your photo is opened, click on Tools option available on the menu bar. From the drop down menu options, select Adjust Size.
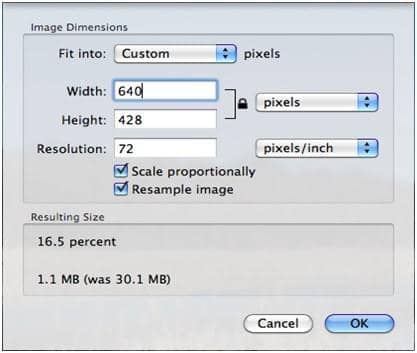
Step 3 — A popup window will appear on the screen on which the original size of the photo is available. Time to modify its resolution.
Step 4 — Change the pixel dimensions as you want it to be.
Step 5 — Click the File option in the menu bar again, and then click the Save as button to save your edited photos.
2.6 Let’s Enhance (Online)
Let’s Enhance is an online solution to convert low-resolution image to high resolution online by up to 16x using AI technology without visible quality loss, and it is 100% automatic and fast, and suitable to anyone, without or without any knowledge about photo editing and enhancement.
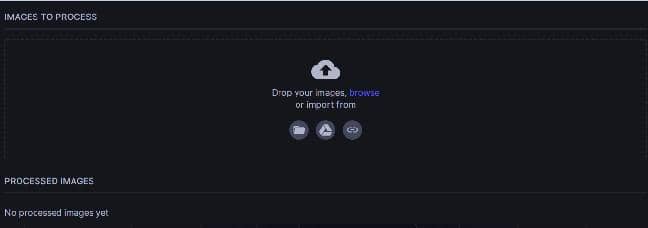
Step 1 — Sign in with your account and upload your photo.
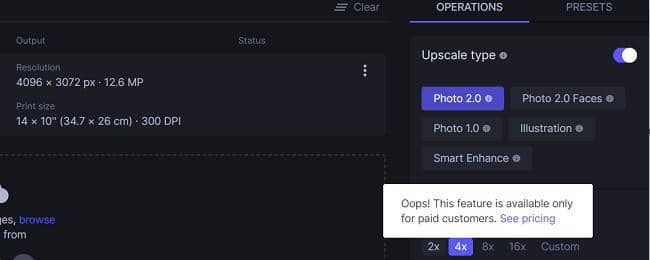
Step 2 — Choose your wanted upscale type and how many times you want to enlarge your photo. Be aware that free users can only enlarge by up to 4x, if you want larger than that, you’ll have to pay for it.
Step 3 — Click the Start processing button to convert low resolution image to high resolution online.
2.7 PhotoEnlarger (Online)
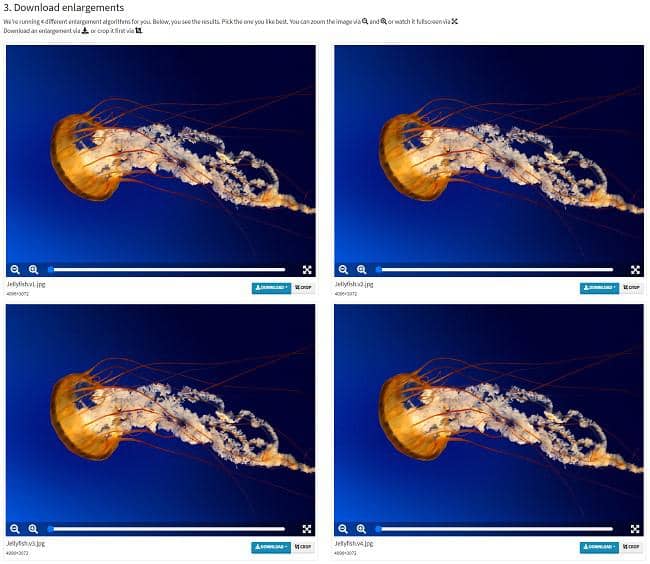
PhotoEnlarger is a totally free online photo resolution enhancement solution provider that is probably the easiest one among all the candidates we’ve mentioned in this article. It will give you four different results processed by four different upscaling algorithms for you to choose from. Just download the one that satisfies you the most, or all of them. Most importantly, it does not require a user login of any kind.
Step 1 — Choose the photo you want to enhance resolution from your computer;

Step 2 — Select the enlargement factor, using the slider bar, or by entering the scale value directly, and then click on the ENLARGE button;

Step 3 — Almost in a blink, four results will be delivered in front of your eyes, and what you need to do next is to pick the one you think is the best to download back to your computer.
2.8 Deep-Image
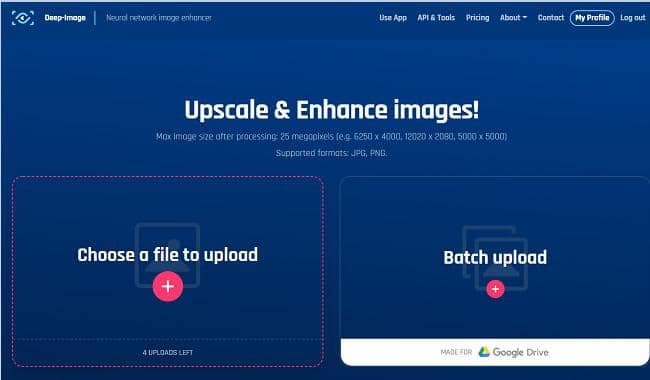
Deep-Image is another AI-powered photo resolution enhancement solution that can convert low resolution image to high resolution online. And it uses the advanced neural networks technology in its upscaling algorithms to help you enhance photo resolution. Be noted that this one also requires a login account and it only allows you to try four photos for free before you have to pay a price. The good thing is that it supports batch ai video upscaling.
Step 1 — Upload your photos to the website one by one, or use the batch upload function.
Step 2 — Choose how much times you want to enlarge your photos, and whether you want to remove artifacts in the process or not.
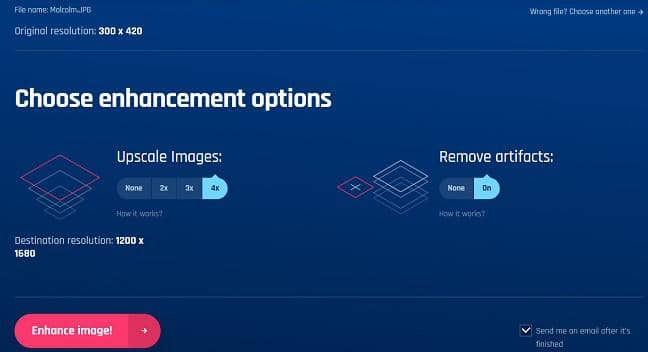
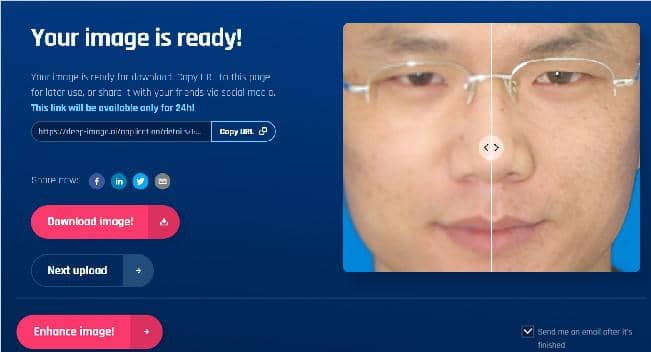
Step 3 — Click the Enhance image button to trigger the enlargement process. Depending on your photo size, it might take a while to finish enhancing them. In that case, you can ask to email you when it’s done. Then, you can download the final result to your computer.
2.9 ImageEnlarger
As a free online tool for photo resolution enhancement, ImageEnlarger allows you to convert low resolution image to high resolution online without losing quality or introducing distortion or artifact known to many. It provides multiple resampling methods that are suitable for different types of photos and allows you to choose your preferred upscaled version from a list of results.
Step 1 — Upload your low resolution photo. Supported input formats include JPG, PNG, GIF and BMP. Be aware of the photo size, it cannot exceed 5MB at most.

Step 2 — Choose an output formats only include JPG and PNG.

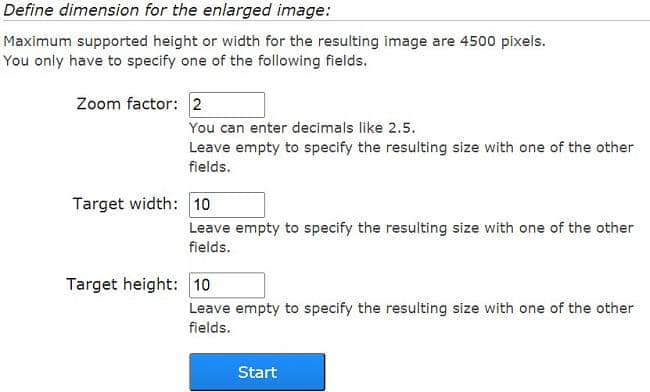
Step 3 — Define the values for your low resolution photo enlargement. Be aware of the maximum limitation of 4500 pixels. Then trigger the enhancement process by clicking the Start button, and wait for the processing the complete.
Step 4 — Download the final result to your computer hard drive.
2.10 ImageUpscaler
Image Upscaler is an online photo resolution enhancement service that upscales images and photos in 4 times. With the help of artificial intelligence, which makes images and photos larger without making them blurry at the same time, you are able to convert low resolution image to high resolution online without installing any 3rd-party software tool.
Step 1 — Upload your photo to be enhanced.
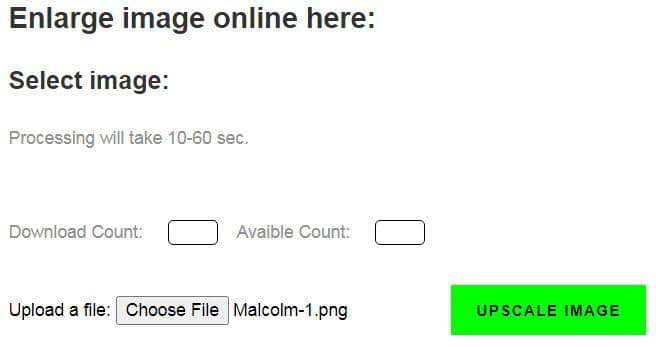
Step 2 — Click the large green UPSCALE IAMGE button and wait for the process to complete.
Step 3 — Download the processed photo back to your computer.

Section 3. Final Thought
During our life course, we may collect tons of photos. They are the most precious memories capturing the most memorable moments of our life. And among them, some are shot with very old cameras that only have limited resolution due to the limited technology back at the time.
Compared to today’s standard, when all forms of medium are going HD (high definition), even 4K and 8K, you may want to upscale image to make them look like they were just taken yesterday. There are many software applications, offline or online, to help you achieve that goal. Like the ones we’ve mentioned in this article, some of them only work on Windows PCs, some only on Macs, still other may work on both systems.
And if you’re not so tech-savvy, or simply don’t have the time for doing the job yourself, there’re also online solutions to help you convert low resolution image to high resolution online, too. So, depending on what your need is, it’s not hard to choose the one that’s best for you.


